Author: Andrew Baker
Fix Render-Blocking JavaScript in WordPress: 3-Step Guide
If you’ve run your site through Google PageSpeed Insights and seen the “Eliminate render-blocking resources” warning, you’ve probably wondered why something that sounds so simple is so hard to actually fix. The answer is that WordPress makes it surprisingly easy to load JavaScript the wrong way — and surprisingly difficult to fix it without either […]
Read more →
Quantum Computing Threat to Encryption: What You Must Know
Published on andrewbaker.ninja | Enterprise Architecture & Banking Technology There is a quiet revolution happening in physics laboratories around the world, and most of the people who should be worried about it are not paying attention yet. That is about to change. Quantum computing is advancing faster than anyone predicted five years ago, and when […]
Read more →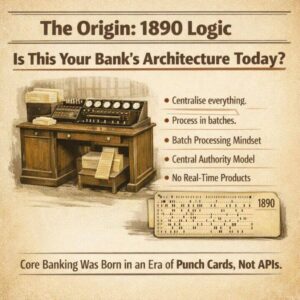
Why Core Banking Architecture Has Always Been Flawed
The COBOL apocalypse conversation this week has been useful, because it has forced the industry to confront something it has been avoiding for decades. But most of the coverage is stopping at the wrong point. Everyone is talking about COBOL. Nobody is talking about the architectural philosophy that COBOL gave birth to, the one that […]
Read more →
CloudScale SEO AI Optimiser: Free WordPress SEO Plugin
Written by Andrew Baker | February 2026 Download the plugin here: https://wordpress.org/plugins/cloudscale-seo-ai-optimizer/ S3 download (updated frequently): https://andrewninjawordpress.s3.af-south-1.amazonaws.com/cloudscale-seo-ai-optimizer.zip I spent years working across major financial institutions watching vendors charge eye-watering licence fees for tools that were, frankly, not that impressive. That instinct never left me. So when I wanted serious SEO for my personal tech blog, I […]
Read more →
How a Blog Post Wiped $30 Billion from IBM in One Day
Anthropic published a blog post on Monday. Not a product launch, not a partnership announcement, not a keynote at a major conference. Just a simple blog post explaining that Claude Code can read COBOL. IBM proceeded to drop 13%, its worst single day loss since October 2000, with twenty five years of stock resilience gone […]
Read more →
Cloudflare Free Tier Review: Why It Works for Enterprise
By Andrew Baker, CIO at Capitec Bank There is a truth that most technology vendors either do not understand or choose to ignore: the best sales pitch you will ever make is letting someone use your product for free. Not a watered-down demo, not a 14-day trial that expires before anyone has figured out the […]
Read more →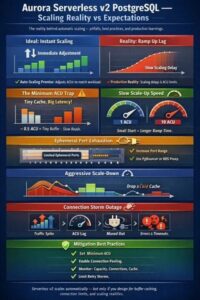
Aurora Serverless v2 PostgreSQL: Production Scaling Guide
Aurora Serverless v2 promises the dream of a database that automatically scales to meet demand, freeing engineering teams from capacity planning. The reality is considerably more nuanced. After running Serverless v2 PostgreSQL clusters under production workloads, I have encountered enough sharp edges to fill a blog post. This is that post. The topics covered here […]
Read more →
Corporate Heckling: Why Low-Context Oversight Fails Teams
There is a peculiar sport played in large organisations. It looks like leadership and sounds like governance, hiding behind frameworks, maturity models, and operating rhythms. But in reality it is something far less noble. It is corporate heckling. Corporate heckling is what happens when a function narrates from the sidelines with low context and high […]
Read more →Apache Kafka 4.x: What KRaft and ZooKeeper Removal Mean
There is a version of the Apache Kafka story that gets told as a series of press releases. ZooKeeper removed. KRaft promoted. Share groups landed. Iceberg everywhere. Each headline lands cleanly, and then platform teams go back to their actual clusters and wonder what any of it means for them. This post is the other […]
Read more →Java’s NullPointerException Problem: Causes and Fixes
Every Java developer has seen it. The stack trace that ends conversations. The production incident that ruins a Friday afternoon. The crash that leads to the post-mortem nobody wants to write. NullPointerException. Three words that have probably cost the industry more money, time, and credibility than any other single class of bug in software history. […]
Read more →