Open Source & Developer Tooling
13 views
Open source software that powers real production systems, and the macOS tooling that keeps high-output engineering teams productive.

How to Find and Set the Optimal MTU on Mac/macOS
If you have just changed ISPs or moved house and your internet suddenly starts misbehaving the likelihood is your Maximum Transmission Unit (MTU) is set too high for your ISP. The default internet facing MTU is 1500 bytes, BUT depending on your setup, this often needs to be set much lower. Step 1: First check […]
Read more →
Pauseless Garbage Collection in Java 25: ZGC Guide
1. Introduction Garbage collection has long been both a blessing and a curse in Java development. While automatic memory management frees developers from manual allocation and deallocation, traditional garbage collectors introduced unpredictable stop the world pauses that could severely impact application responsiveness. For latency sensitive applications such as high frequency trading systems, real time analytics, […]
Read more →
Keep Your Mac Awake While Claude Code Works
If you run Claude Code in its default local mode, your Mac will happily fall asleep mid-task, killing the session and whatever was being built. The fix is simple, but it is worth knowing about before it bites you. 1. The quickest solution: caffeinate macOS ships with a utility called caffeinate that prevents sleep for […]
Read more →
How to Set Up MCP Filesystem Access in Claude Desktop
If you use Claude Desktop to edit code, write patches, or build plugin files, you have probably hit the same wall I did: Claude runs in a sandboxed Linux container. It cannot read or write files on your Mac. Every session resets. There is no shared folder. You end up copy pasting sed commands or […]
Read more →
Disable iCloud Desktop Sync Without Losing Files: 3 Steps
The Problem: macOS Will Delete Your Local Files If you try to disable iCloud Drive syncing for your Desktop and Documents folders using the macOS System Settings interface, you’ll encounter this alarming warning: If you continue, items will be removed from the Desktop and the Documents folder on this Mac and will remain available in […]
Read more →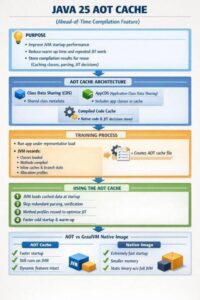
Java 25 AOT Cache: How Ahead-of-Time Compilation Works
1. Introduction Java 25 introduces a significant enhancement to application startup performance through the AOT (Ahead of Time) cache feature, part of JEP 483. This capability allows the JVM to cache the results of class loading, bytecode parsing, verification, and method compilation, dramatically reducing startup times for subsequent application runs. For enterprise applications, particularly those […]
Read more →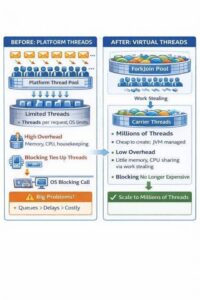
Java 25 Virtual Threads: Lightweight Concurrency Guide
1. Introduction Java’s concurrency model has undergone a revolutionary transformation with the introduction of Virtual Threads in Java 19 (as a preview feature) and their stabilization in Java 21. With Java 25, virtual threads have reached new levels of maturity by addressing critical pinning issues that previously limited their effectiveness. This article explores the evolution […]
Read more →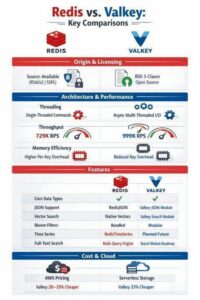
Redis vs Valkey: Enterprise Architecture Guide 2025
The in memory data store landscape fractured in March 2024 when Redis Inc abandoned its BSD 3-clause licence in favour of the dual RSALv2/SSPLv1 model. The community response was swift and surgical: Valkey emerged as a Linux Foundation backed fork, supported by AWS, Google Cloud, Oracle, Alibaba, Tencent, and Ericsson. Eighteen months later, both projects […]
Read more →
Wintel Is Dying to LinARM: How Mythos Class AI Just Tipped the Scales
Published on andrewbaker.ninja This is a researched opinion piece. The data points are sourced and linked in the references at the end, but the conclusions drawn from them are mine. I recognise that some of what follows will not be comfortable reading, particularly for teams that have built careers, processes, and significant capital programmes around […]
Read more →
Claude Code Terminal Setup: iTerm2, CLAUDE.md, and the Configuration Most Guides Skip
1. The terminal should not look like punishment Most developer terminals look like they were designed by someone who believes productivity is a moral debt. Black box. Tiny text. No context. No colour discipline. No Git awareness. No visual hierarchy. No joy. That is not just an aesthetic complaint. It is a productivity complaint. The […]
Read more →
macOS Screenshots to Clipboard: 4 Steps to Fix Your Workflow
If you’re like me, you probably take dozens of screenshots daily for documentation, bug reports, or quick sharing with colleagues. The default MacOSX behavior of saving screenshots as files to your desktop can create clutter and add an extra step to your workflow. There’s a better way. 1. The Quick Solution Instead of using Cmd […]
Read more →Change Default Mail Client on Mac via Terminal (CLI)
22 If you want to change the default mail client on your Mac then you can use a quick Python script to quickly change the default mail app. Copy/paste the following command into Terminal. Below I am setting Outlook to be the default mail client, but you can replace com.microsoft.Outlook with whatever application bundle identifier you use. […]
Read more →