CloudScale SEO AI Optimizer
CloudScale SEO AI Optimizer
CloudScale SEO AI Optimizer is a free WordPress plugin that combines complete technical SEO with an AI-powered content suite. It writes your meta descriptions, ALT text, and article summaries using your own Anthropic Claude or Google Gemini API key, builds an automatic internal linking network across your entire site, and handles all the technical SEO that WordPress leaves out: sitemaps, robots.txt, structured data schemas, social sharing tags, and performance optimisations that improve your Core Web Vitals scores.
There is no Pro version, no upsell, no monthly subscription, and no feature locked behind a licence key. Everything the plugin does is documented on this page.
- Go to the SEO Settings tab → Site Identity panel and fill in your Site name, Locale, and Default OG image.
- Still in Site Identity, fill in Target audience and Writing tone. These are injected into every AI request and have the biggest single impact on output quality.
- In the AI Settings panel, add your Anthropic Claude or Google Gemini API key and click Test Key to confirm it works. (Get a Claude key · Get a Gemini key)
- In the SEO Features panel (Sitemap & Robots tab), tick the features you want active and save.
- In the AI Tools tab, click Generate Missing in the Meta Description Writer to fill in all missing descriptions.
- Submit your sitemap URL to Google Search Console.
📊 SEO Settings
Before any AI tools or sitemaps can do their job, Google needs to understand the basic facts about your website: who runs it, what it’s called, and what kind of content it contains. The SEO Settings tab is where you establish that foundation. Fill in your site identity and author details once, and the plugin will embed that information into every page as structured data that search engines can read directly. This tab is also where you connect your AI provider (Anthropic Claude or Google Gemini) and configure the Auto Pipeline, which automatically processes every post you publish so you never have to manually trigger AI generation again.
Site Identity & Schema
Why CloudScale SEO Optimizer?
Yoast SEO locks most of its features — redirect management, internal linking suggestions, social previews, and AI generation — behind Yoast Premium at $99/year per site. RankMath Free gives you a solid base but charges $59+/year the moment you want AI-powered generation or advanced schema. All in One SEO’s AI writing tools cost $49+/year on their Plus plan. None of them include a site-wide SEO audit that identifies every gap across your entire site with one-click quick fixes to resolve them.
CloudScale SEO Optimizer uses Anthropic Claude 4 and Google Gemini 2.0 Flash — the same frontier models that SEO agencies charge thousands per month to access — to generate meta descriptions, ALT text, summary boxes, FAQ schema, HowTo schema, and related article links in bulk. The built-in Site Audit scores your entire SEO setup across 20+ checks (schema coverage, category SEO, structured data, sitemap, performance, and more) and surfaces one-click quick fixes: enable a missing schema type, generate FAQ schema for your top posts, add archive redirects, fix duplicate content — all without leaving the audit panel. Automatic XML sitemap, robots.txt editor, llms.txt generation, font optimiser, render-blocking JS/CSS removal, category health and drift detection, automatic redirects, and a full batch scheduler are all included. Free. No subscription, no premium tier, no upsell.
Configure Site Identity first. Target audience and Writing tone are injected into every AI request — they are the single biggest quality lever before you run any bulk generation.
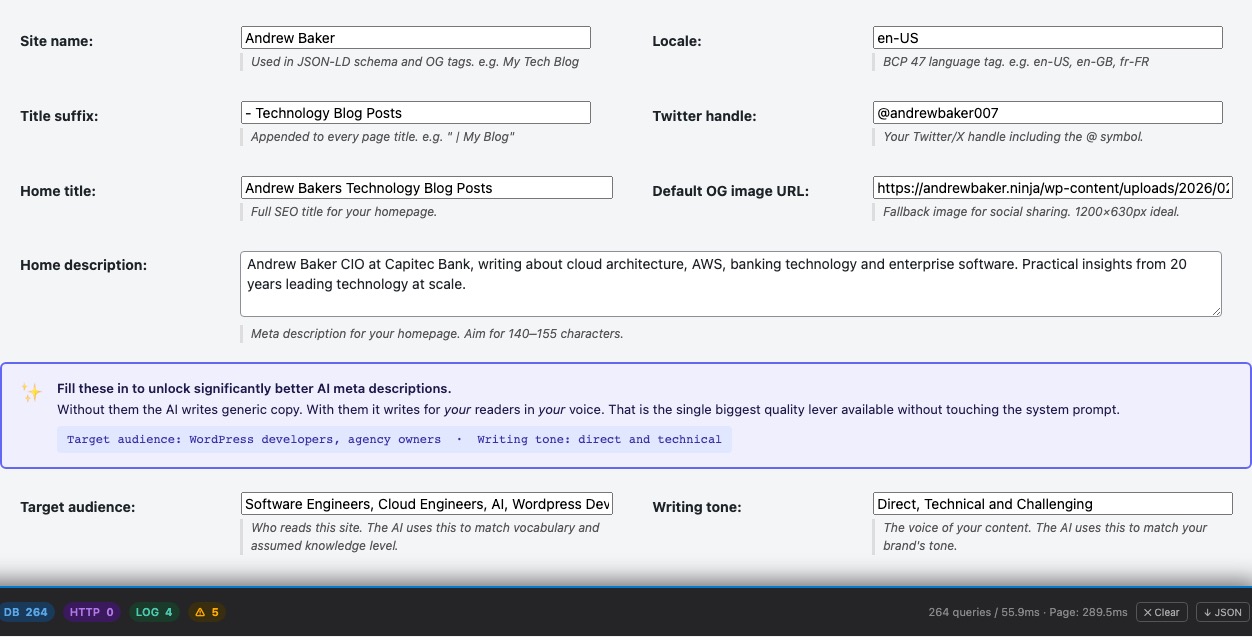
When someone searches for your name or your site on Google, how does Google decide what to show? It reads structured signals embedded in your pages: your site name, your homepage title, your preferred language, your social profiles. Without those signals, Google guesses, and it often gets things wrong. The Site Identity panel is where you set the record straight.
Everything you configure here is automatically embedded into every page on your site as meta tags, OpenGraph tags (which control how your pages look when shared on social media), and JSON-LD structured data (which Google reads to build rich search results). You only configure this once, and the plugin handles the rest.
- Site name: Your website’s name as it should appear in Google Search results and social media link previews. This is the brand name Google associates with your content, so make it consistent with how you refer to your site everywhere else.
- Locale: Your language and region code, e.g.
en-US,en-GB,fr-FR. This tells Google which language audience your content is written for, helping it serve your pages to the right searchers in the right country. - Title suffix: Text appended after every page title in browser tabs and search results, e.g.
| Andrew Baker. When someone has ten tabs open, your brand name in the tab title is the only way they recognise which tab is yours. - Twitter handle: Your Twitter/X username (including the @), e.g.
@yourusername. Added to thetwitter:sitemeta tag so Twitter attributes shared content to your account and shows it correctly in Cards. - Home title: The specific SEO title for your homepage. Your homepage is usually your most important page for brand searches, so write a title that includes your name or brand and your main topic area, e.g. “Andrew Baker: Cloud Architecture & Technology Leadership”.
- Home description: The meta description for your homepage. This is the sentence or two that appears under your homepage link in Google Search results. It should explain who you are and what value your site provides to a first-time visitor.
- Default OG image URL: The fallback image shown when any of your pages are shared on Facebook, LinkedIn, WhatsApp, or Slack and that page has no featured image of its own. Use a branded image at 1200 × 630 pixels. A consistent, professional-looking default image makes every shared link from your site look intentional rather than blank.
- Target audience: Who reads your site, e.g. “software engineers, CTOs, freelance developers” or “first-time homebuyers in South Africa”. This is one of the highest-impact settings in the entire plugin. Every AI request (meta descriptions, ALT text, summaries) is sent with this as part of the site context. The AI uses it to calibrate vocabulary, assumed knowledge level, and what makes a description compelling for your specific readers. A description written for CTOs reads very differently from one for junior developers or first-time buyers. Fill this in before running any bulk AI generation. The difference in output quality is immediately noticeable.
- Writing tone: The voice and style of your content, e.g. “direct and technical”, “warm and encouraging”, or “authoritative and concise”. Combined with target audience, this gives the AI the brand context it needs to write copy that sounds like you rather than generic SEO filler. Without it, the AI defaults to a neutral style that may not match your site’s personality at all.
✨ Fill in Target audience and Writing tone before generating anything. These two fields are injected into every single AI request as site context. They are the single biggest quality lever available without touching the system prompt, and they cost nothing to set. Leaving them blank means the AI writes for a generic, imaginary reader rather than yours.
Person Schema
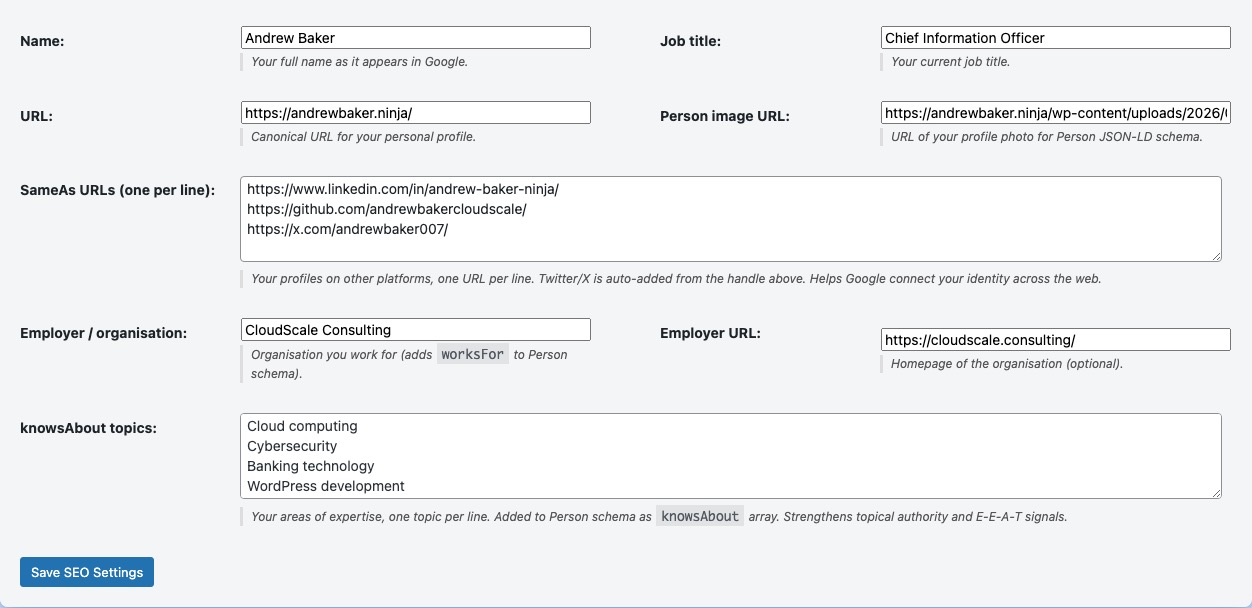
Have you ever noticed how some people have a “Knowledge Panel” on Google, the box on the right side of search results that shows their photo, title, and links to their social profiles? That’s powered by Person structured data. Even if you never reach Knowledge Panel status, telling Google who you are helps it connect your articles to your identity, which strengthens your E-E-A-T signals (Experience, Expertise, Authoritativeness, Trustworthiness), one of Google’s key quality criteria for ranking content, especially in technical and professional subject areas.
The Person Schema panel embeds this identity information into your pages as JSON-LD structured data. Nothing visible is added to your pages; it sits in the page source where Google can read it. The key is the sameAs field: by linking to your LinkedIn, GitHub, Twitter/X, and other profiles, you give Google the cross-references it needs to confirm that the “Andrew Baker” who wrote this post is the same “Andrew Baker” on LinkedIn, confirming that they’re a real, credible person.
- Full name: Your name exactly as you want it attributed across the web. Use the same form consistently everywhere.
- Job title: Your professional title, e.g. “Chief Information Officer” or “Cloud Architect”. Appears in Person JSON-LD and can show in Google rich results.
- Profile URL: The canonical URL for your identity, usually your homepage. Google uses this as the definitive identifier for you as a person.
- Person image URL: A URL to your headshot or profile photo. A square image of at least 400 × 400 pixels works best. Google can use this in Knowledge Panels and author rich results.
- sameAs URLs (one per line): Links to your profiles on LinkedIn, GitHub, Twitter/X, Wikipedia, Google Scholar, or any other authoritative platform. Each link is a cross-reference Google can verify. The more authoritative the profiles you list, the stronger the identity signal. LinkedIn and GitHub are especially valuable for technical authors.
AI Settings

All the AI features in this plugin (meta description generation, ALT text writing, article summaries, SEO scoring, and category analysis) run through a single connection to your chosen AI provider. This plugin does not run its own AI service and does not charge for AI usage. You bring your own API key from either Anthropic Claude or Google Gemini, and the plugin sends your content directly to that provider’s API. Your API key is stored in your WordPress database and never shared with anyone.
The cost of running AI through your own API key is typically very small. For a site with 100 posts, generating meta descriptions for all of them using Claude Haiku costs less than $0.10. Google Gemini has a free tier that is sufficient for most personal blogs. There is no subscription, no per-site licence, and no hidden fee imposed by this plugin. You pay the AI provider directly, and only for what you use.
- AI provider: Choose between Anthropic Claude and Google Gemini:
- Anthropic Claude: get a free API key at console.anthropic.com → sign up → API Keys → Create Key. Claude Sonnet 4.6 is the recommended default, fast and excellent at writing natural, accurate meta descriptions.
- Google Gemini: get a free API key at aistudio.google.com/app/apikey → sign in with your Google account → Create API Key. Gemini 2.0 Flash has a generous free tier and is a strong choice for bulk processing on a budget.
- API key: Paste your key here. It is stored in your WordPress database and sent only to the chosen provider’s API endpoint when you trigger generation. It is never transmitted to this plugin’s author or any third party.
- Model: The AI model to use for generation. The plugin provides a dropdown of current, stable models for each provider. If you want to use a specific model not in the list, choose “Custom model ID” and type the model identifier. For Anthropic:
claude-sonnet-4-6is the recommended default. Useclaude-haiku-4-5-20251001if you have a very large site and want faster, cheaper processing, orclaude-opus-4-6for the highest quality output. For Gemini:gemini-2.0-flashis the stable recommended choice. - Meta description character range (min / max): Google shows meta descriptions of up to approximately 155–160 characters before truncating them with “…”. The plugin defaults to 140–155 characters, which reliably fits within Google’s display limit. If your descriptions are being cut off in search results, lower the max. If they look too short, raise the min.
- ALT text excerpt length: When generating image ALT text, the AI receives a short excerpt of the surrounding post content to understand what the image is illustrating. The default of 600 characters gives the AI enough context without wasting API tokens. Increase this for posts with images that are only explained later in the article.
- System prompt: The instructions sent to the AI for every meta description request. The default prompt is carefully crafted to produce high-quality SEO copy. You don’t need to change it for most sites. Importantly, the plugin automatically appends your site context (site name, author, description, target audience, and writing tone from the Site Identity panel) after your prompt on every request. You never need to re-state those details here. If you customise the prompt, click Reset to default to restore the original if you want to start over.
The right way to customise AI output quality: The most effective customisation is to fill in Target audience and Writing tone in the Site Identity panel, not to rewrite the system prompt. Those two fields are injected into every AI request automatically, and they produce an immediate, visible improvement in how well the generated copy matches your brand and readers. The system prompt is an advanced option for structural requirements only: writing in a language other than English, enforcing specific formatting rules, or other niche cases.
Always click Test Key after adding your API key and before running any bulk operations. This makes a minimal API call to confirm the key is valid, the provider account is active, and the selected model is available.
✨ AI Tools
If you have a WordPress site with tens or hundreds of posts, there’s a good chance most of them are missing a meta description, the short paragraph that appears under your page title in Google Search results. Without it, Google writes its own snippet, which is often a random sentence pulled from your content. The AI Tools tab fixes this in bulk. Load your posts, click Generate Missing, and the AI writes compelling, correctly-sized meta descriptions for every post that doesn’t have one. The same tab handles image ALT text (important for both accessibility and Google Image Search), AI-generated article summary boxes that help readers decide whether to read, and the Related Articles system that builds an internal linking network across your entire site automatically.
Auto Pipeline
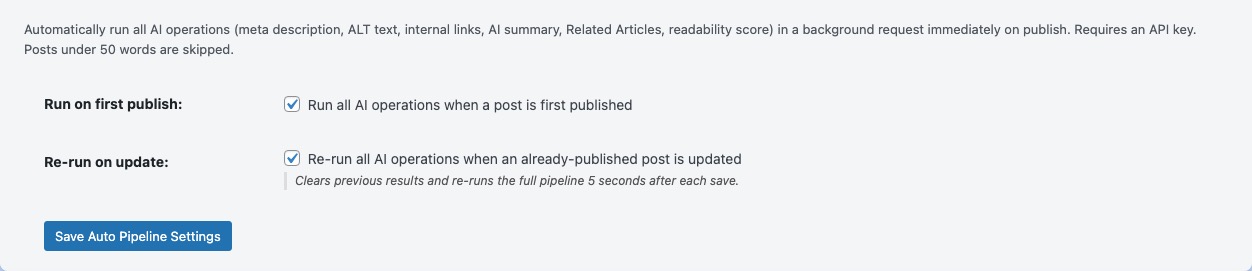
If you’re starting from scratch with a new post, the Auto Pipeline means you never have to think about SEO again. Write your post, hit Publish, and within seconds the plugin has generated your meta description, scored your content, and created your AI summary box, all without you touching anything. This is the “set it and forget it” approach to keeping your site SEO-optimised as you publish.
The pipeline runs as a background HTTP request immediately after WordPress saves the post, so the Publish button itself does not feel slow. Each step runs independently. If the meta description generation succeeds but the SEO scoring fails (e.g. due to a temporary API timeout), the description is still saved. The pipeline is designed to be safe: by default, it only fills in missing content and will not overwrite descriptions you’ve already written manually.
- Enable Auto Pipeline on first publish: When ticked, every post that goes from any non-published status to Published will automatically be processed. New posts only. It does not re-run on edits to already-published posts unless “Re-run on update” is also enabled.
- Re-run on update: When ticked, the pipeline re-runs every time you save an already-published post. Use this if you frequently make major content updates and want the AI content to stay current. Be aware that enabling this will regenerate AI content on every save, which uses API credits.
- Overwrite existing descriptions: When ticked, the pipeline regenerates the meta description even if one already exists. Leave unticked (the default) to protect manually written or previously generated descriptions.
Note on timing: The pipeline fires a background HTTP request, so it won’t block your post save. However, if you check the meta description immediately after publishing, it may not have been written yet. Wait a few seconds and refresh the post.
AI Meta Description Writer
The meta description is the short snippet that appears under your page title in Google Search results, usually two or three lines describing what the page is about. It is often the deciding factor in whether a searcher clicks your result or the one below it. When you don’t write one, Google generates its own, usually by pulling a random sentence from your page content. That sentence is rarely your best pitch to a potential reader.
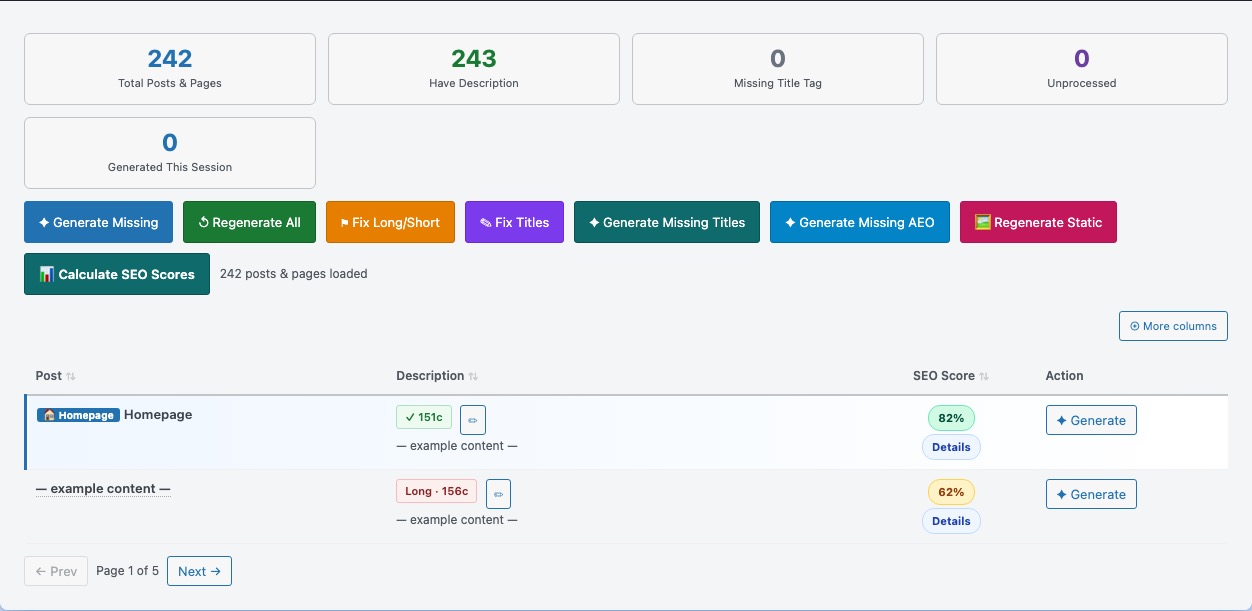
The AI Meta Description Writer solves this problem in bulk. It shows you every post and page on your site, the current status of each meta description, and lets you generate AI-written descriptions for all of them in a single operation. The AI reads your post title and content, then writes a compelling, correctly-sized description in your site’s voice. For a site with 100 posts, this typically takes 2–3 minutes and costs less than $0.10 in API fees.
Understanding the status badges:
- No AI description: No meta description has been written for this post. These are the highest priority to fix. Google is currently writing its own snippet for these pages.
- ✓ [number]c (green): A meta description exists and its length is within your configured character range. No action needed.
- Short · [number]c (amber): A description exists but is shorter than your minimum. It may appear thin in search results.
- Long · [number]c (amber): A description exists but exceeds your maximum. Google will truncate it with “…” in search results.
- ✦ Generated · [number]c (blue): A description was just generated in this session. It has been saved but you haven’t reloaded the page yet.
What the bulk action buttons do:
- Generate Missing: The recommended starting point for any new site. Generates descriptions for every post that doesn’t have one. Skips posts that already have a description, so it is safe to run at any time without overwriting your existing content.
- Regenerate All: Forces new descriptions for every post, replacing whatever is already there. Use this if you’ve changed your custom prompt or want a fresh pass across your entire site. This will overwrite manually written descriptions, so use with care.
- Fix Long/Short: Only rewrites descriptions that fall outside your character range. Useful if you’ve changed your min/max settings and want to bring everything into line without touching descriptions that are already correct.
- Fix Titles: Rewrites post title tags that fall outside the ideal 50–60 character range for search results. The rewritten title is saved as a custom SEO title. Your original WordPress post title is never changed.
- Regenerate Static: Refreshes cached OG image data so LinkedIn and other social platforms pick up featured image changes.
- ✦ Generate (per row): Generates or regenerates the description for a single post only. Use this to test the AI output on one post before running a bulk operation across your entire site.
- SEO Score badge: Each post shows an AI-generated SEO score from 0–100. Click the badge to see the AI’s specific feedback and suggestions. Green = 75+, amber = 50–74, red = below 50.
- Stop: Halts a running bulk operation after the current post finishes. Any posts already processed are saved.
AI ALT Text Generator
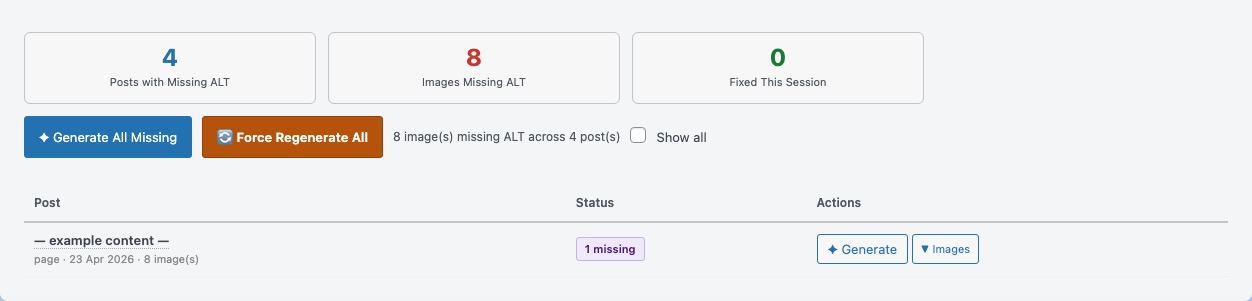
When someone uses a screen reader because they have a visual impairment, every image on your site that has no ALT text is invisible to them. They get silence where there should be a description. At the same time, Google’s web crawler cannot “see” images either. It reads ALT text to understand what an image depicts, whether that image is relevant to the page topic, and whether it should appear in Google Image Search results. A site full of images with empty ALT attributes is failing both its users and its search rankings.
The AI ALT Text Generator fixes this across your entire site in one bulk operation. It scans every post and page, identifies images with missing ALT attributes, and uses AI to write concise, contextually accurate descriptions for each one. The AI reads both the image filename and a short excerpt of the surrounding post content, so the ALT text it generates actually describes the image in context, not just a generic label.
ALT text is also generated automatically during meta description generation when you use Generate Missing or Generate in the Meta Description Writer. If you’ve already run that, your images may already have ALT text. This dedicated panel is for auditing and bulk-processing images specifically.
- Load: Scans your site and builds the list of posts with missing ALT text. Shows you the count of affected posts and total missing images before you commit to generating anything.
- Show all images checkbox: By default, only posts with at least one missing ALT image are shown. Tick this to see all posts including those already fully covered, useful for reviewing or spot-checking existing ALT text.
- ✦ Generate (per row): Processes all missing ALT images in a single post. Use this to test the AI output on one post before running the full site.
- Generate All Missing: Processes every post with missing ALT text in one bulk operation. This is the recommended approach for auditing an existing site for the first time.
- Force Regenerate All: Rewrites ALL ALT text across your entire site, including images that already have it. Use this if you want to improve the quality of previously generated ALT text or standardise the style. A confirmation prompt appears before it runs.
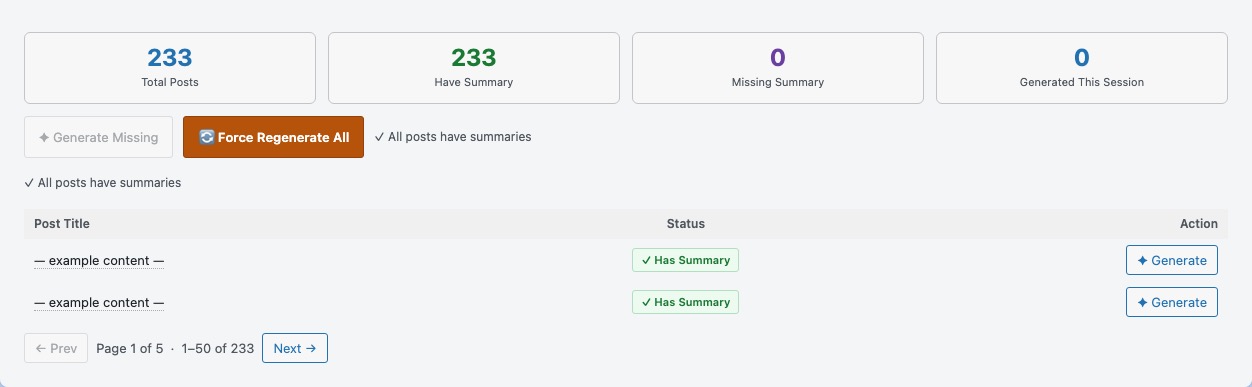
AI Summary Box
Most readers decide within the first few seconds whether an article is worth their time. If your post opens with a long preamble before getting to the point, readers bounce, and Google notices bounce rates. The AI Summary Box solves this by generating a three-sentence structured summary that appears at the very top of each post, before the article text. Readers see at a glance what the article is about, why it matters, and what they’ll take away from it.
The summary box also has an SEO benefit that isn’t visible to readers. The three fields are embedded into the Article JSON-LD structured data for each post, which Google can read and potentially surface as featured snippets or in AI Overviews. Providing a clean, structured summary increases the chance that Google quotes your content directly in answer boxes. This is a core goal of AEO (Answer Engine Optimisation).
The appearance of the summary box on your site is controlled by the “Show AI summary box on posts” checkbox in the SEO Features panel. You can generate and store summaries without showing the box. The JSON-LD benefit exists regardless of whether the box is visible on your pages.
The three fields generated for each post:
- What it is: One sentence defining the core topic of the article. Written for a reader who’s never heard of the subject before.
- Why it matters: One sentence explaining why this topic is relevant or important. Answers the reader’s “why should I care?” question.
- Key takeaway: The single most important insight or conclusion from the article. This is often the sentence Google pulls into a featured snippet.
Actions:
- ✦ Generate (per row): Generates or regenerates the summary for a single post. Use this to preview the output before running the full bulk operation.
- Generate Missing: Generates summaries for all posts that don’t have one yet. Safe to run at any time. It will not overwrite existing summaries.
- Generate All (force): Regenerates summaries for every post, replacing all existing ones. Use this if you’ve changed your AI prompt or want to refresh the content style across your site.
Related Articles — Settings
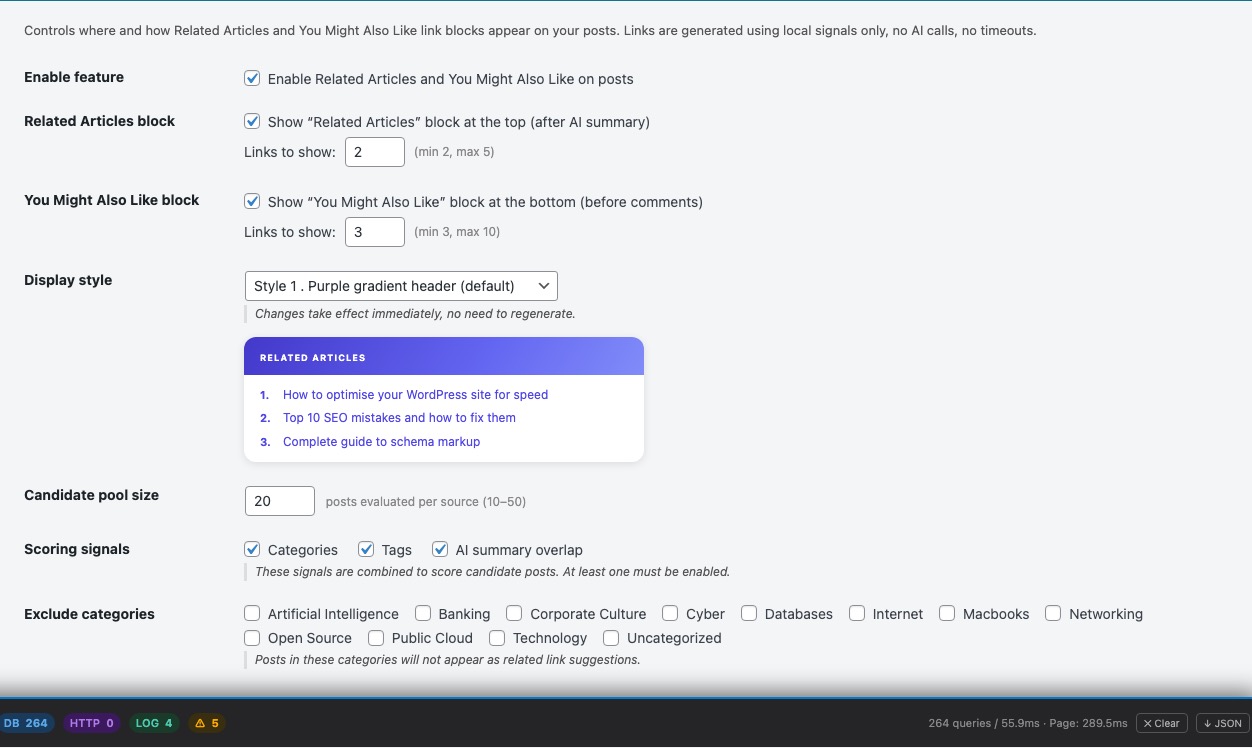
One of the best signals Google uses to understand a site’s topical authority is internal linking: how well your posts link to each other around a common topic. A site where every post on cloud computing links to related cloud computing posts tells Google (and readers) that you are a serious resource on that topic. Building this network manually across dozens or hundreds of posts is impractical. The Related Articles feature builds it automatically.
Related Articles analyses every post on your site and builds a relevance network by matching posts on shared categories, tags, and (if you’ve generated AI summaries) the semantic similarity of the content itself. It then injects a “Related Articles” block near the top of each post and a “You Might Also Like” block at the bottom. This keeps readers on your site longer, increases pages-per-session, and creates the kind of internal linking structure that Google rewards with stronger topical authority scores.
This is a purely local feature. It makes no API calls and costs nothing to run. All matching is done server-side using your existing WordPress data and your AI-generated summaries.
- Enable Related Articles and You Might Also Like on posts: Master switch. Turn this off to hide all related article blocks site-wide without losing your generated data or settings.
- Show “Related Articles” at the top: Adds a block near the top of each post (after the AI summary box if present). This position has high visibility. Readers see it before they’ve committed to reading the full article, which increases click-through to related content.
- Number of links (top): How many posts to show in the top block. 3 is a good starting point, enough to offer options without cluttering the reading experience before the article begins.
- Show “You Might Also Like” at the bottom: Adds a block at the end of each post, before the comments section. This is the traditional position for related content and captures readers who have just finished reading and are ready to explore more.
- Number of links (bottom): How many posts to show in the bottom block. 4–6 is typical.
- Pool size: How many candidate posts the algorithm considers when selecting the best matches. A larger pool gives more accurate results for sites with many posts. Default 20 is fine for sites under 500 posts.
- Match by Categories: Posts in the same category count as more relevant. Recommended. Categories are your primary topical grouping signal.
- Match by Tags: Posts sharing tags count as more relevant. Enable this if you use tags consistently and meaningfully across your content.
- Match by AI summary overlap: Uses the semantic content of AI-generated article summaries to find posts that are truly about the same topic, even if they’re in different categories. This produces the most accurate matches but requires AI summaries to have been generated first. Highly recommended if you’ve run the AI Summary Generator.
- Excluded categories: Posts in these categories will never appear as related article suggestions on any post. Use this to exclude categories like “Announcements”, “About”, or “Sponsored” that shouldn’t appear in contextual article recommendations.
Related Articles — Management
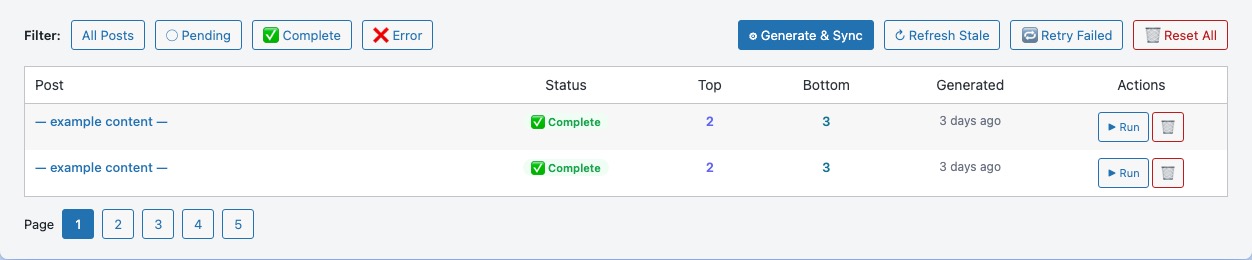
The Related Articles Management table is your control panel for the related articles network. When you first enable the feature, all posts start as “Pending”. They haven’t been processed yet and won’t show related article blocks on the frontend. Run the batch operation here to process your entire site and go from zero to a complete internal linking network in one click.
After changing your settings (for example, adding a new matching criterion, changing the number of links shown, or excluding a category), you’ll need to re-run existing posts for the change to take effect. Use the “Re-run Complete” batch button to refresh all already-processed posts.
- Status badges:
- Pending: This post hasn’t been processed yet. No related article blocks are being shown for it on the frontend.
- Complete: Related articles have been generated and are live. The Top and Bottom columns show how many links are being displayed.
- Error: Processing failed for this post. The error reason is shown in the row, usually a database issue or a post with no matchable content.
- Top / Bottom counts: The number of related article links currently displayed at the top and bottom of this post on the frontend. If these numbers are lower than your configured settings, the algorithm couldn’t find enough matching posts. This is normal for posts on niche topics.
- ▶ Run (per row): Generates or regenerates related articles for a single post. Use this to test the feature on one post before running the full site batch.
- 🗑 Reset (per row): Clears the related articles data for a post and sets it back to Pending. The post will no longer show related article blocks until it is processed again.
- Generate & Sync: Processes all Pending posts and updates link counts for Complete posts. This is the main batch button. Run it after enabling the feature for the first time, or after adding new posts that haven’t been processed yet.
- Refresh Stale: Re-runs all Complete posts. Use this after changing your settings to apply the new configuration to your existing related article data.
- Retry Failed: Re-runs all posts that are in the Error state.
- Reset All: Clears all related article data across your entire site. Use this only if you want to start completely fresh. All posts will return to Pending and no related article blocks will be shown until you re-run the batch.
🔍 SEO Site Audit
The SEO Site Audit gives you a single, scored overview of your entire SEO health — not just one page at a time, but your whole site in one pass. It runs 20+ automated checks across schema, metadata, content, security, performance, and technical SEO, then scores each category out of 100 and shows you exactly what to fix. For every issue it detects, it provides an inline one-click quick fix: enable a missing schema type, generate FAQ schema for your top posts, set up archive redirects, activate Speakable schema — without leaving the audit panel. Run it after initial setup to establish a baseline, then re-run it each time you add features to confirm your score improves.
SEO Site Audit
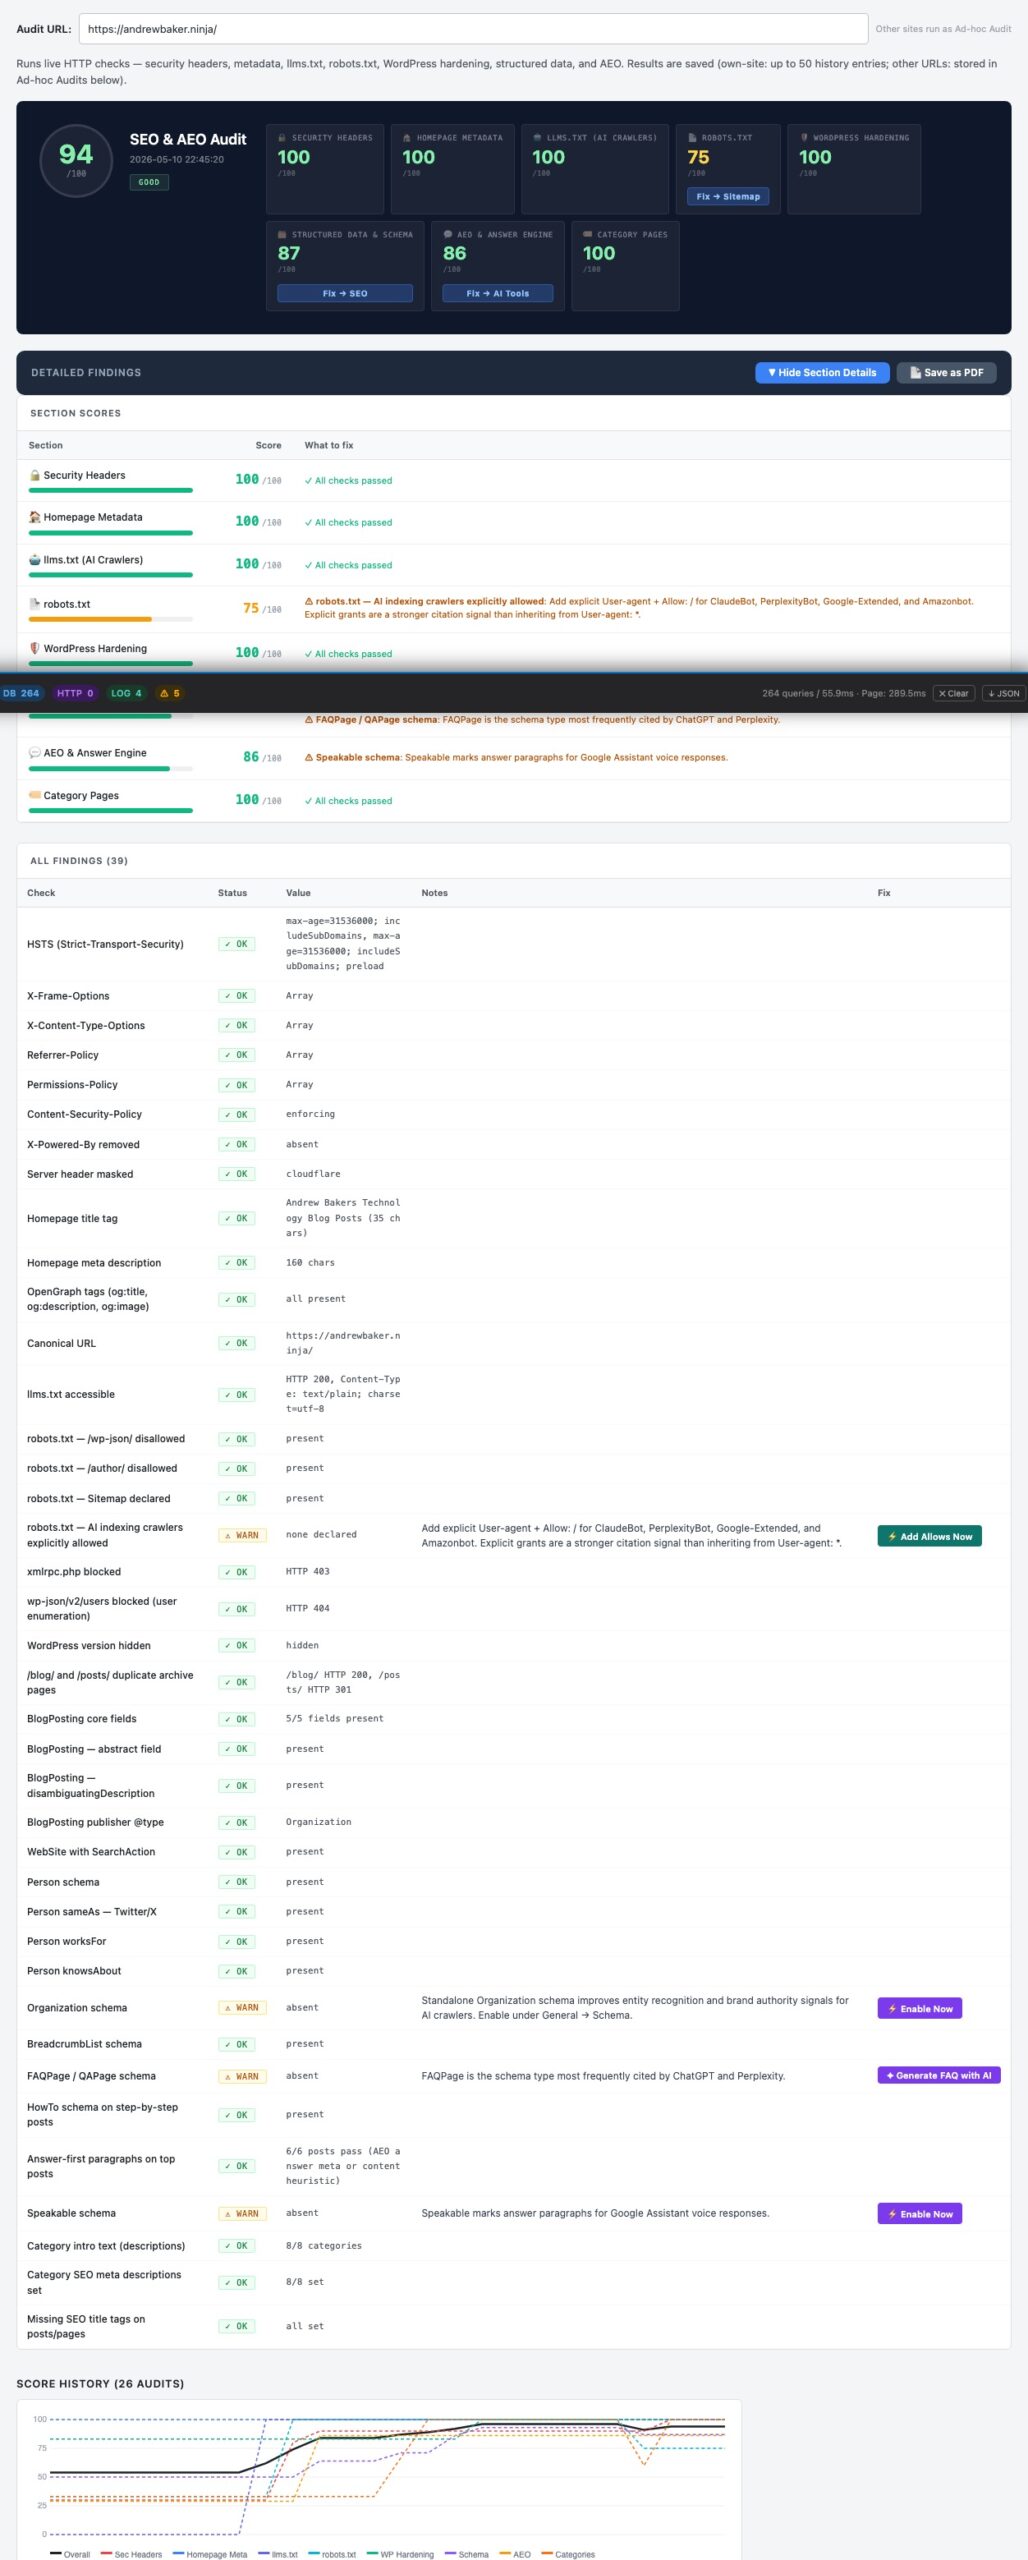
The SEO Site Audit runs a comprehensive, live scan of your entire site in one click. Unlike page-level checkers that only test a single URL, this audit evaluates 20+ checks across every aspect of your SEO setup: structured data, schema coverage, metadata, category SEO, sitemap, security headers, WordPress hardening, robots.txt, llms.txt, performance, and AEO readiness. Each category is scored out of 100 and a weighted overall score shows you your site’s SEO health at a glance.
The audit is designed around one-click quick fixes. Every issue it identifies shows an inline action button: you don’t need to navigate to another settings panel to fix it. Generate FAQ schema for your top 20 posts, enable Speakable schema, add archive redirects for /blog/ and /posts/ URLs, enable breadcrumb schema — all from directly inside the audit results.
- Audit URL: By default set to your site’s homepage. The audit fetches this URL live (including through your CDN and any caching layers), so the results reflect exactly what Google sees when it crawls your site. Change the URL to test a competitor or any other public URL — results for other domains are stored in Ad-hoc Audits and don’t overwrite your own site’s history.
- ▶ Run Audit: Starts the full scan. This runs live HTTP checks so it takes 20–40 seconds. Your previous result stays visible while the new scan runs.
- Score History chart: After you’ve run two or more audits, a trend chart appears showing how your overall score has moved over time. Use this to confirm that changes you make are improving your score, and to spot regressions.
Understanding the audit categories:
- Schema: Checks for Person, WebSite, Article, Breadcrumb, Speakable, FAQPage, and HowTo structured data blocks. Google uses these to generate rich results — expandable FAQ entries, breadcrumb trails in search results, voice search answers. Each missing schema type is flagged with a quick fix to enable it.
- Metadata: Checks your homepage title, meta description, OG tags, Twitter Cards, and canonical URL. These control how your pages appear in search results and social previews.
- Content: Checks whether your posts have AI-generated summaries, AEO answer paragraphs, and alt text on images. These are the signals that modern AI-powered search engines read to decide whether to feature your content in AI Overviews and answer boxes.
- Category Pages: Checks whether your WordPress category pages have custom SEO descriptions and intro text. Category pages are often a site’s highest-traffic entry points from Google, yet most WordPress sites leave them completely undescribed.
- Sitemap: Confirms your XML sitemap is enabled, accessible, and correctly structured. A missing or broken sitemap is one of the most common reasons new posts take weeks to get indexed.
- Security Headers: Checks for X-Content-Type-Options, X-Frame-Options, Referrer-Policy, and Content-Security-Policy headers. Google uses security as a ranking signal, and browsers show security warnings for sites that fail these checks.
- WordPress Hardening: Checks that your XML-RPC endpoint is protected, the WP-Login URL is hidden, and WordPress version information isn’t exposed in page source or HTTP headers. These are the three most commonly exploited WordPress attack vectors.
- Robots / llms.txt: Confirms both files exist, are syntactically valid, and don’t accidentally block legitimate crawlers.
- Performance: Checks page load time, server response time, and whether your pages pass Core Web Vitals thresholds. Slow pages rank lower than equivalent fast pages.
✅ Start here after initial setup. Run the audit once after configuring the plugin for the first time to see your baseline score. Each time you enable a feature or apply a quick fix, re-run the audit to confirm the score improved. The score history chart makes it easy to track your progress over time.
🗺 Sitemap, Robots & Redirects
A sitemap tells Google which pages exist on your site and when they were last updated. It is the fastest way to ensure new content gets discovered and indexed. Without one, Google has to find your pages by following links, which can take weeks for new posts. This tab controls your XML sitemap, your robots.txt file (which tells crawlers what they are and are not allowed to access), and your llms.txt file, a new standard that gives AI assistants like ChatGPT and Perplexity a structured, accurate summary of your site so they represent your content correctly in their answers.
SEO Features
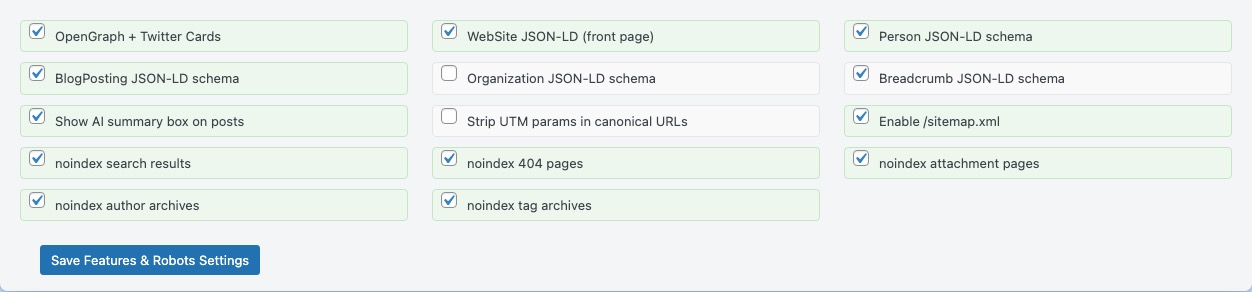
The SEO Features panel is the central switch board for every technical SEO capability the plugin provides. Each feature can be toggled independently. Turn on what you need, turn off what you don’t, and none of your settings are lost when you toggle something off.
If you’re setting up the plugin for the first time, the recommended approach is to enable all the Recommended items below, save, then come back and fine-tune after you’ve checked how your pages look in Google Search Console.
Social sharing (OpenGraph & Twitter Cards):
- OpenGraph + Twitter Cards: When someone shares one of your pages on LinkedIn, Facebook, Twitter/X, WhatsApp, or Slack, the platform reads OpenGraph tags to build the link preview: the card with a title, description, and image. Without these tags, the platform guesses, often producing blank or incorrect previews. Enable this and every shared link from your site will look intentional and professional. Strongly recommended.
Structured data (JSON-LD schema):
- WebSite JSON-LD (front page): Adds structured data to your homepage that tells Google your site’s name and URL. This is the foundation for Google potentially showing a Sitelinks Searchbox (a search field) directly under your homepage result in search. Recommended.
- Person JSON-LD schema: Embeds your name, title, photo, and social profiles (configured in the Person Schema panel) into every page’s structured data. This is how you build your author identity signal with Google and strengthen your E-E-A-T (Expertise, Authoritativeness, Trustworthiness) standing. This is critical for content in technical and professional niches. Recommended for personal blogs and authority sites.
- BlogPosting JSON-LD schema: Marks up every post as an Article with author, publish date, and headline in structured data. Google uses this to display article rich results (including author name, date, and publication), which can significantly improve click-through rates in search. Recommended.
- Breadcrumb JSON-LD schema: Adds breadcrumb structured data so Google can display the page’s hierarchy directly in search results (e.g. Home › AWS › Lambda Tutorial). Useful for sites with well-organised category structures.
Content features:
- Show AI summary box on posts: Controls whether the three-sentence AI summary (What it is / Why it matters / Key takeaway) appears at the top of each post for readers. The summaries are embedded in JSON-LD schema regardless of this setting. Enable once you’ve generated summaries for your posts. Recommended if summaries have been generated.
- Related Articles and You Might Also Like: Same as the master switch in the Related Articles Settings panel. Controls whether related article blocks appear on posts.
Technical SEO (canonical URLs & noindex):
- Strip UTM params in canonical URLs: If you use UTM tracking parameters in your links (e.g.
?utm_source=newsletter), this prevents them from being included in your canonical URL tag. Without this, Google may treat/post/?utm_source=twitterand/post/as two separate pages. Recommended if you use UTM tracking. - noindex search results: WordPress’s internal search results pages (
?s=query) are auto-generated, thin content with no SEO value. Noindexing them prevents Google from wasting crawl budget on them. Recommended. - noindex 404 pages: Error pages should never appear in search results. Recommended.
- noindex attachment pages: WordPress creates a page for every uploaded image or file (e.g.
/?attachment_id=123). These pages contain almost nothing and dilute your site’s overall quality score in Google’s eyes. Recommended. - noindex author archives: Author archive pages duplicate your post content under a different URL. If you’re a solo blogger, these add no value and create duplicate content. Enable with caution on multi-author sites where author pages serve a genuine purpose.
- noindex tag archives: Tag archive pages are thin if your tags are used loosely. Enable this if your tags are inconsistent or duplicative. Leave off if your tag pages are genuinely curated topic hubs with unique value.
XML Sitemap Settings
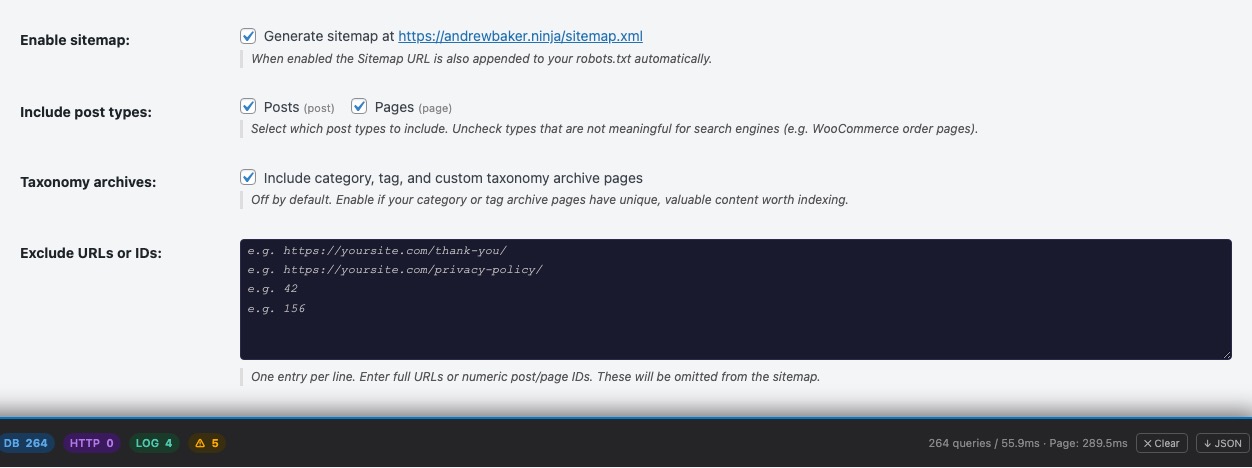
A sitemap is the most direct line of communication between your website and Google. When you publish a new post, Google might not discover it for days or weeks if it has to find the page by following links. With a sitemap, you’re effectively handing Google a complete, up-to-date list of every important URL on your site. Google re-crawls that list regularly to find new content fast.
The first thing you should do after enabling the sitemap is submit its URL to Google Search Console under Sitemaps. This is a one-time step that tells Google to start monitoring your sitemap. After that, the plugin keeps the sitemap updated automatically every time you publish or update a post.
- Enable /sitemap.xml: Activates the sitemap at
yoursite.com/sitemap.xml. Once enabled, visit that URL directly to confirm it’s working before submitting it to Google Search Console. - Post types to include: Select which content types appear in the sitemap. Include Posts and Pages. If you have custom post types (e.g. portfolio items, products), include those too if they contain public content you want Google to index. Exclude post types that are administrative or contain private data.
- Include taxonomy pages: Whether category and tag archive pages appear in the sitemap. Enable this only if those pages contain unique, valuable content beyond a simple list of posts. If your category pages are thin, excluding them keeps your sitemap focused on your highest-quality URLs.
- Sitemap exclude list: URL paths to remove from the sitemap, one per line (e.g.
/privacy-policy/,/contact/,/thank-you/). These pages will still be accessible to visitors. They just won’t appear in the sitemap, telling Google they’re not priority crawl targets.
The sitemap automatically handles large sites: if you have more than 5,000 URLs, it creates multiple child sitemaps (/sitemap-1.xml, /sitemap-2.xml, etc.) and the index at /sitemap.xml lists them all. A plain-text version is available at /sitemap.txt for tools that prefer that format.
Use the Sitemap Preview panel (visible when you scroll down on this tab) to browse exactly which URLs are in your sitemap before submitting it to Google.
Robots.txt Editor
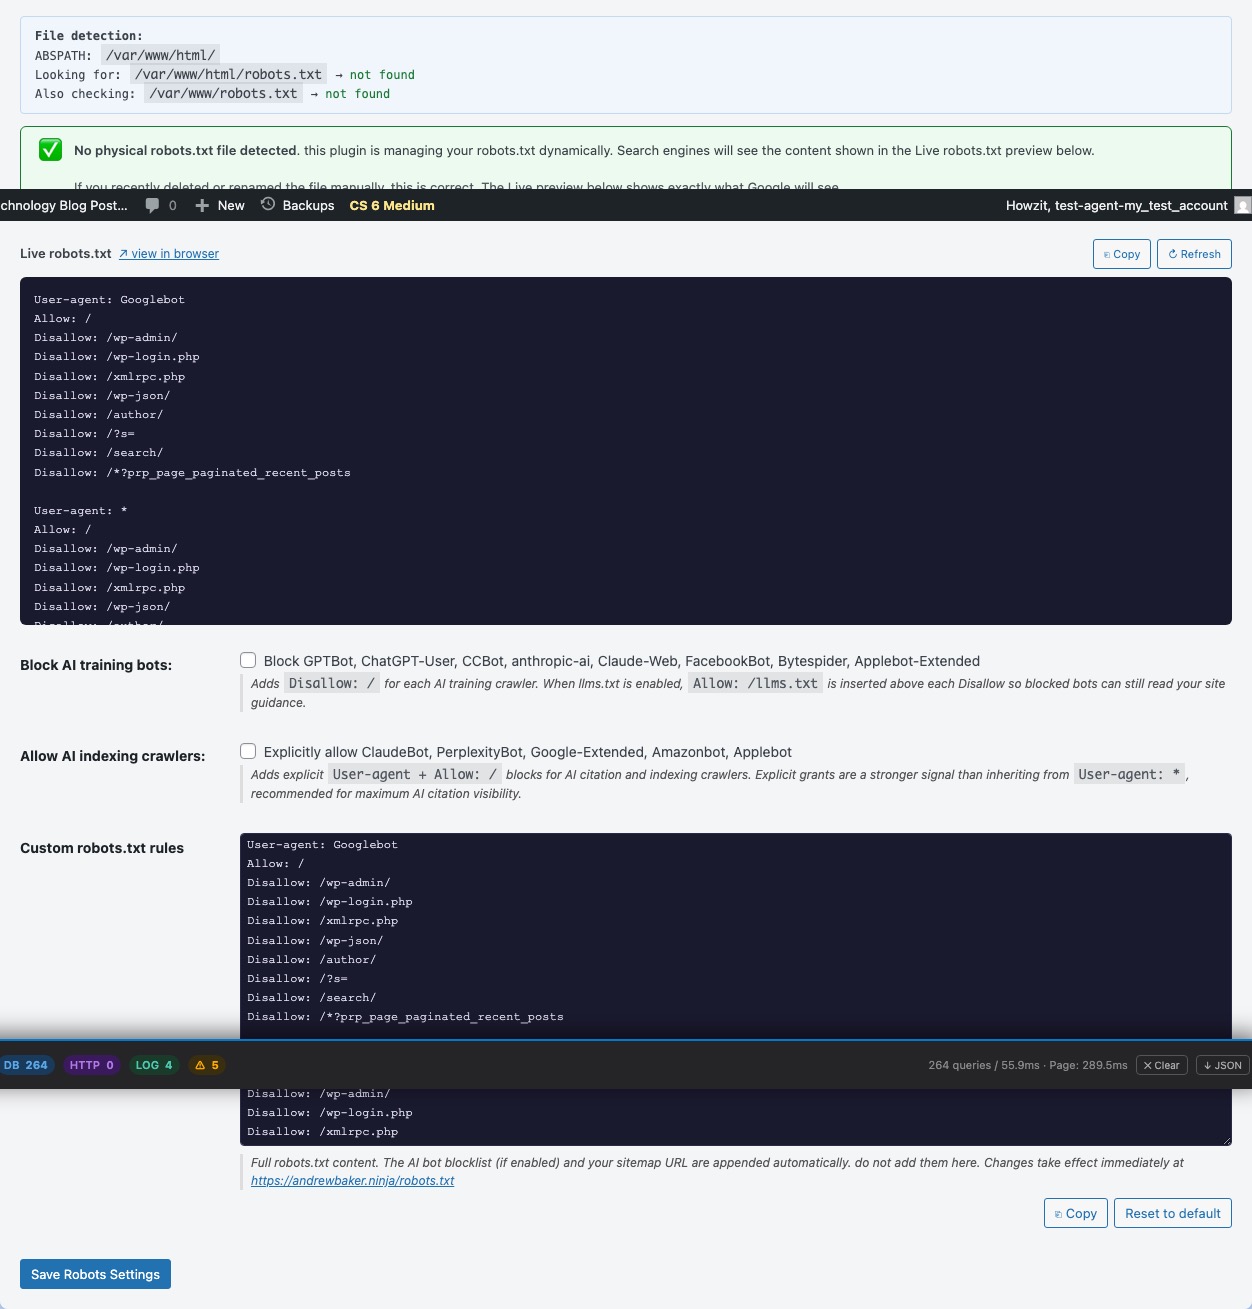
When a search engine crawler (or any bot) arrives at your website, the very first file it reads is robots.txt at the root of your domain. This file is a set of instructions that tells crawlers what they are and are not allowed to access. Without a well-configured robots.txt, crawlers may waste time in your admin area, checkout pages, or other non-public sections, consuming server resources and crawl budget that would be better spent on your actual content.
The Robots.txt Editor gives you full control over this file directly from your WordPress admin, without needing FTP or server access.
- Block AI training bots: When ticked, adds Disallow rules for the major AI content scraping bots: GPTBot (OpenAI), CCBot (Common Crawl), Claude-Web and anthropic-ai (Anthropic), Google-Extended, and others. These bots crawl your content specifically to train large language models. If you don’t want your writing used to train commercial AI systems, enable this. Note: this only affects well-behaved bots that honour robots.txt. It doesn’t guarantee all AI scrapers comply.
- Custom robots.txt content: The full text of your robots.txt file. The plugin provides a sensible default that allows all search engine crawlers while blocking your admin area. Common customisations include:
Disallow: /checkout/orDisallow: /cart/: Block crawling of WooCommerce transaction pagesDisallow: /wp-login.php: Explicitly block the login pageCrawl-delay: 10: Ask aggressive crawlers to slow down (only honoured by some bots)
Critical distinction: robots.txt controls crawl access, not indexing. A page you block in robots.txt may still appear in Google’s search results if other sites link to it. Google knows it exists but cannot read it. If you want a page removed from Google’s index, use the noindex meta tag (configured in the SEO Features panel) instead of robots.txt. If you want both (no crawling and no indexing), you need both.
llms.txt

When someone asks ChatGPT, Perplexity, or Claude a question that your site could answer, the AI either knows about your site (because it was included in training data) or it visits your site in real time via web browsing. In both cases, a machine is trying to understand your content from raw HTML, which is full of navigation menus, sidebars, cookie banners, and other noise that gets in the way of the actual content.
llms.txt is the solution. It’s a plain-text file at /llms.txt that gives AI systems a clean, structured summary of your website: your name, your site’s purpose, and a list of your key posts and pages with their URLs and meta descriptions. Think of it as robots.txt for AI, or a table of contents written specifically for machine readers. It’s an emerging standard proposed in 2024 and gaining adoption rapidly as AI-powered search becomes mainstream.
Publishing a well-structured llms.txt is one of the most important AEO (Answer Engine Optimisation) steps you can take. It gives you direct control over how AI systems represent your content in their answers, rather than leaving them to guess from your raw HTML.
- Enable /llms.txt: Activates the endpoint. Once enabled, visit
yoursite.com/llms.txtto see exactly what AI crawlers will read. The file is generated dynamically from your live post data and AI-generated meta descriptions. This is another reason to run Generate Missing in the Meta Description Writer first. Posts with no meta description are listed without a summary, which gives AI systems less to work with.
Use the Load Preview button to see a live preview of your llms.txt in your admin area before sharing it or submitting it to AI search indices. The llms.txt specification is an open standard. Read more about it and why it matters at llmstxt.org.
Automatic Redirects
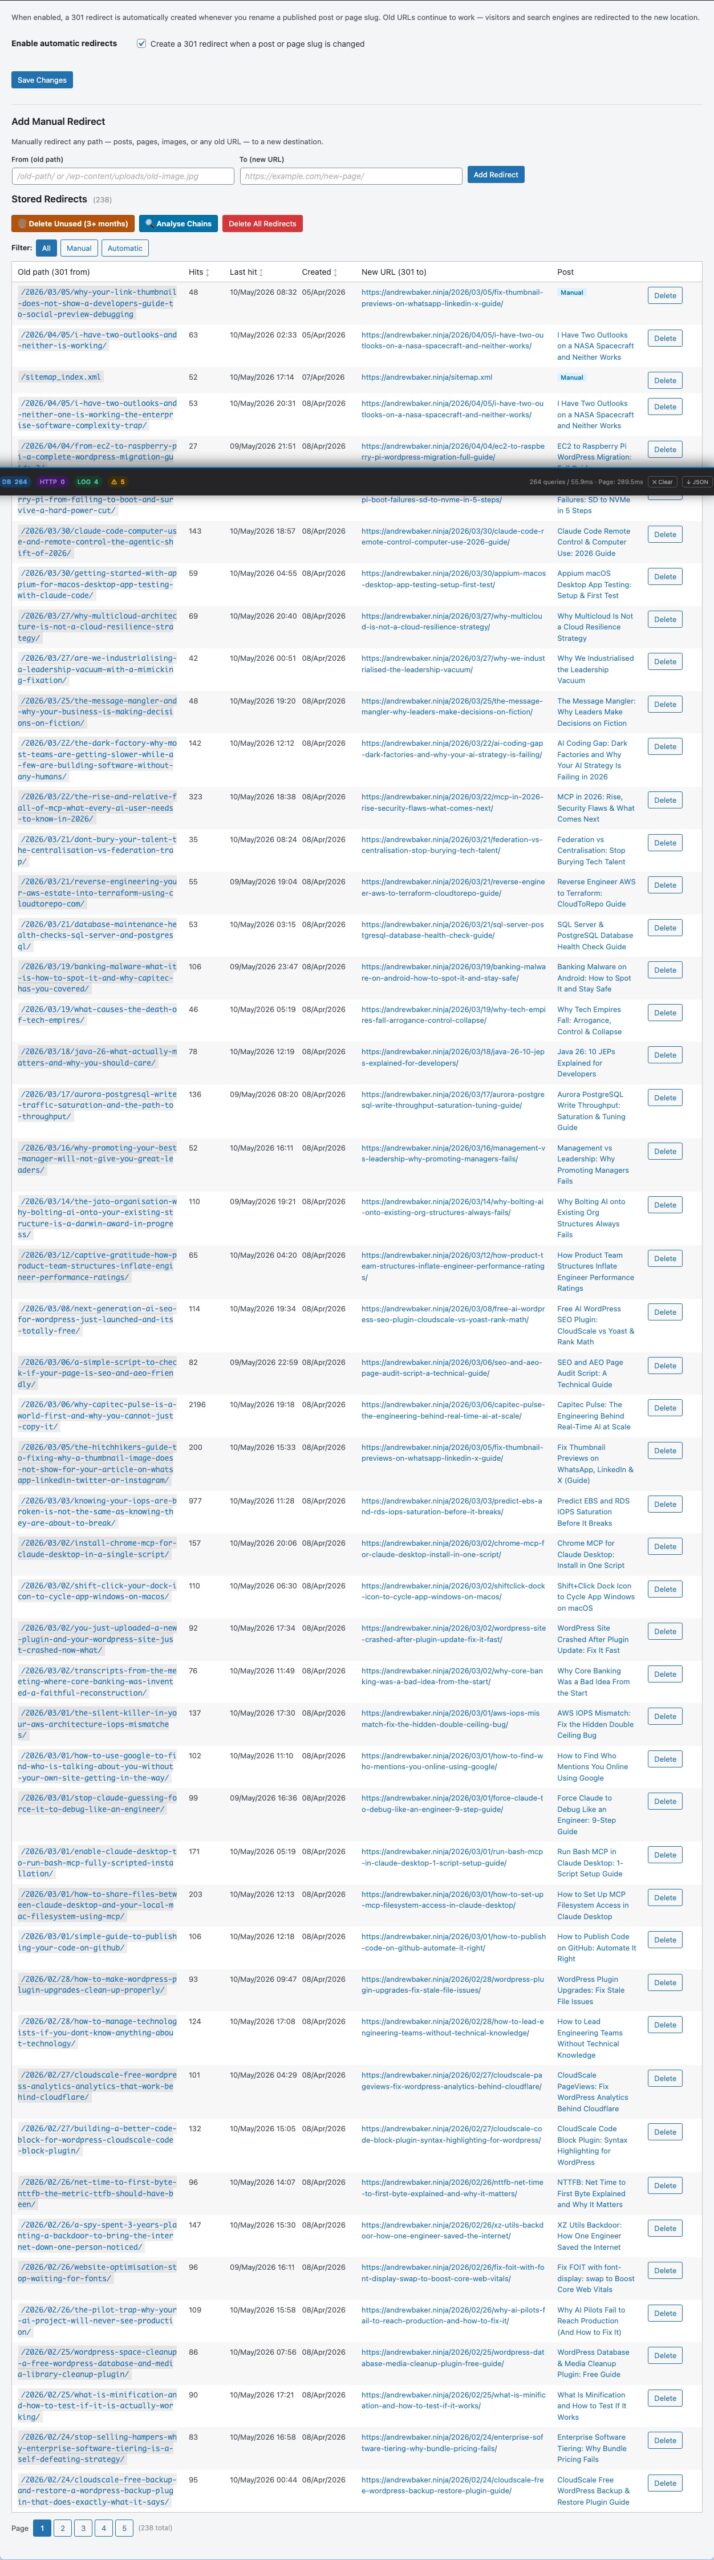
Every time you rename a post slug (something as simple as changing /my-post to /my-better-post), the old URL becomes a dead link. Any visitor who bookmarked it, any backlink pointing to it, any Google result still showing the old URL: they all land on a 404. The Automatic Redirects panel prevents this silently and automatically.
When you save a post with a changed slug, the plugin records the old path and creates a permanent 301 redirect from it to the new URL. No manual step is required. The next time any visitor or crawler follows the old URL, they are instantly forwarded to the correct page. For Google, a 301 transfers all ranking signals (backlinks, PageRank, indexed content) from the old URL to the new one, so you don’t lose any SEO value from the rename.
- Enable automatic redirects: Master switch. When enabled, slug renames are captured automatically on every post save. Disable only if you have a separate redirects plugin and want to avoid conflicts.
- Redirect table: Shows every stored redirect with its source path, destination URL, HTTP status code, hit count, and the date it was last followed. Use this to audit which old URLs are still receiving traffic and spot any redirect chains.
- Add Manual Redirect: Add a redirect for any path, not just renamed posts. Useful for legacy URLs from a previous CMS, old image paths, or any URL you want to permanently forward to a new location. The “from” field must be a path starting with
/. - Hit counter: Each time a visitor or crawler follows a redirect, the counter increments. A redirect with zero hits for several months is likely safe to delete. A redirect with active hits should be kept.
- Delete: Removes the redirect entry. The old URL will return a 404 again. Only delete redirects you are confident are no longer needed.
⚡ Performance
Page speed is a direct Google ranking factor. Slow pages rank lower, and Google measures speed using Core Web Vitals, the real-world performance metrics that appear in Google Search Console. This tab provides three performance optimisations that are safe to enable on virtually any WordPress site: local font hosting (which eliminates a slow Google Fonts network request and improves GDPR compliance), JavaScript deferral (which lets your page render before scripts run, reducing Time to Interactive), and HTML minification (which shrinks page size by removing unnecessary whitespace). The HTTPS URL Fixer is also here, essential if you ever migrated your site from HTTP to HTTPS and have old hardcoded links still pointing to the insecure version.
Font Optimiser

Most WordPress themes load their fonts from Google Fonts, a free CDN that serves web fonts from Google’s servers. This is convenient for theme developers, but it has two significant downsides for your site. First, it’s slow: every page load requires the browser to make an extra network request to fonts.googleapis.com, wait for a DNS lookup, establish a connection, and download the font stylesheet before text on your page can render. This directly hurts your Core Web Vitals scores, specifically LCP (Largest Contentful Paint), which Google uses as a direct ranking factor. Second, it’s a GDPR problem: when a visitor’s browser requests a font from Google’s CDN, their IP address is sent to Google. Under the EU’s General Data Protection Regulation, this is a transfer of personal data to a third party without your visitor’s explicit consent. German and Austrian courts have already ruled against sites doing this.
The Font Optimiser solves both problems by downloading the font files from Google’s CDN to your own server and rewriting the references in your theme to point to the local copies. The fonts look identical, but they now load from your domain with no external request, no GDPR exposure, and faster rendering.
How to use it:
- Click Scan & Download: the plugin detects Google Fonts stylesheet URLs registered by your theme, downloads all the font files (in woff2 and woff formats for broad compatibility), and stores them in your WordPress uploads directory.
- Click Apply Fixes: the plugin registers local versions of the font stylesheets and dequeues the Google CDN versions, so all font requests now resolve locally.
- Click Undo: if anything looks wrong after applying, this restores the original Google CDN references immediately.
After applying, check your site’s PageSpeed Insights score at pagespeed.web.dev. The “Eliminate render-blocking resources” warning for Google Fonts should be gone.
JS, CSS & HTML Optimisation
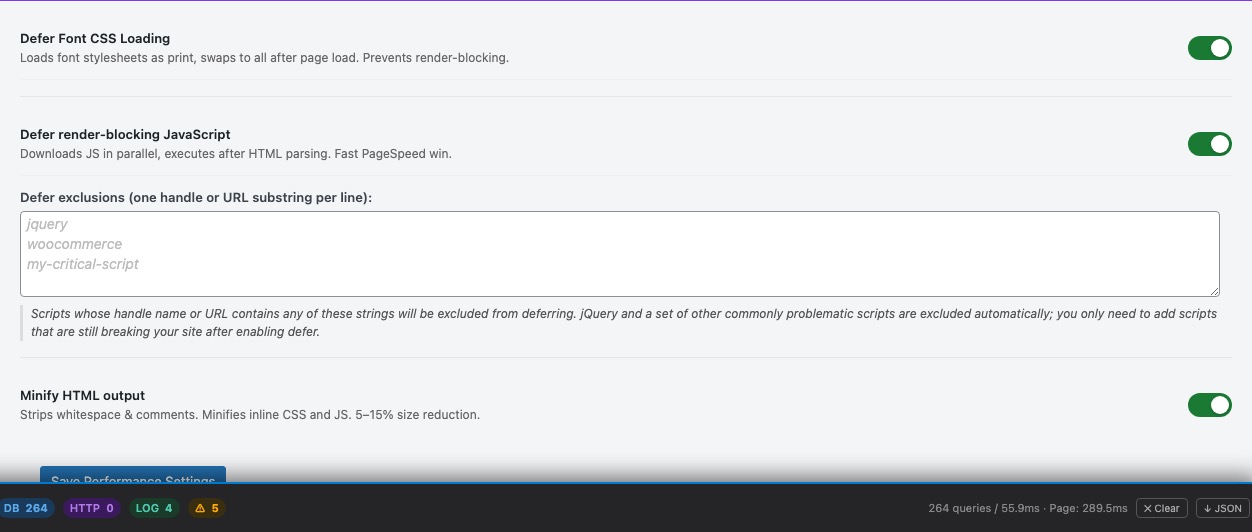
Page load speed is a confirmed Google ranking factor, and Google measures it using Core Web Vitals, the real-world performance metrics visible in Google Search Console. The three optimisations in this panel target specific speed metrics that appear in those reports. None of them change how your site looks. They only change how quickly it gets to a usable state in the browser.
- Defer non-critical fonts: Fonts that aren’t used to render the visible text on a page (for example, icon fonts loaded in the footer) can be loaded asynchronously. This allows the browser to render visible content first, rather than waiting for every font file to download before showing anything. Helps with the First Contentful Paint (FCP) metric.
- Defer JavaScript: By default, when a browser encounters a
<script>tag while parsing your page’s HTML, it stops everything, downloads the script, executes it, then resumes parsing. For JavaScript that doesn’t affect the initial visible page (analytics, social embeds, chat widgets, etc.), this is wasteful. Deferring scripts lets the page render first and runs scripts afterwards, which significantly improves Time to Interactive (TTI) and the Interaction to Next Paint (INP) metric.
Exclusion list: Some scripts must run before the page is visible, typically anti-flicker snippets for A/B testing tools or cookie consent managers that modify the page on load. Add patterns for those file names here to exclude them from deferring. If enabling defer breaks something on your site, add the offending script’s filename to the exclusion list. - Minify HTML: Removes whitespace, comments, and redundant formatting from the HTML your server sends to the browser. A typical WordPress page has 10–20% of its file size consumed by whitespace and comments that are invisible to visitors but take up bandwidth. Minifying this reduces transfer time and server bandwidth usage. This is the safest of the three optimisations. It has no effect on how the page looks or functions.
How to verify the improvements: Run your site through PageSpeed Insights before and after enabling these features. The “Reduce unused JavaScript” and “Avoid chaining critical requests” diagnostics should improve after enabling JS deferral. The overall page size should decrease after enabling HTML minification.
HTTPS URL Fixer
When a site moves from HTTP to HTTPS, the server-side redirect ensures visitors always land on the secure version. But the database is full of old hardcoded http:// links: image URLs embedded in post content, internal links written years ago, and theme option values. These old HTTP references cause “mixed content” browser warnings, where the browser detects that a secure page is loading resources over an insecure connection and blocks or flags them. Mixed content warnings can also suppress the padlock icon in the browser’s address bar, eroding visitor trust.
The HTTPS URL Fixer solves this with a targeted database search and replace. It finds every occurrence of http://yourdomain.com in your WordPress database and rewrites them to https://yourdomain.com. It handles serialised PHP data correctly (used by themes and some plugins to store settings), so the replace operation doesn’t break anything.
How to use it:
- Click Scan: the plugin searches your database for HTTP URLs and shows you a summary: which domains appear, in which tables, and how many rows are affected.
- Review the results and tick the domains you want to fix. Usually this is just your own domain, but the scanner may also find third-party embed URLs that can safely be upgraded.
- Click Fix Selected: the plugin updates all matching rows. The operation is logged so you can see exactly what changed.
Important: Always take a full database backup before running any bulk find-and-replace operation. While the HTTPS Fixer is designed to be safe and reversible for standard WordPress data, a backup is your safety net if something unexpected happens in a complex database with non-standard plugins or custom tables.
Note: this panel only appears once an AI API key has been saved in the AI Settings panel above.
🏷 Categories
Your category structure is more important for SEO than most WordPress site owners realise. Google uses categories as a signal for topical authority. If a category contains a jumbled mix of unrelated posts, it tells Google your site lacks focus on that topic. The Categories tab gives you four tools to fix this: the Category Fixer scans every post and tells you if it’s in the wrong category; the Category Health dashboard grades each category based on post count and recency so you can see at a glance which topics are strong and which are thin; Category Drift Detection uses AI to identify categories that have become catch-all buckets for loosely related content, with specific suggestions for where to move each post; and Migrate Categories lets you retire thin or redundant categories entirely by reassigning their posts to better ones and deleting the empty category — all in one workflow.
Category Fixer
Imagine a filing cabinet where half the folders have the wrong documents in them. That’s what a miscategorised WordPress site looks like to Google. When a blog post about AWS Lambda is filed under “Personal” instead of “Cloud Computing”, Google gets a confused signal about what topics each section of your site covers, which weakens your topical authority across the board. Google rewards sites that demonstrate consistent expertise in a topic, and consistent categorisation is a fundamental part of that signal.
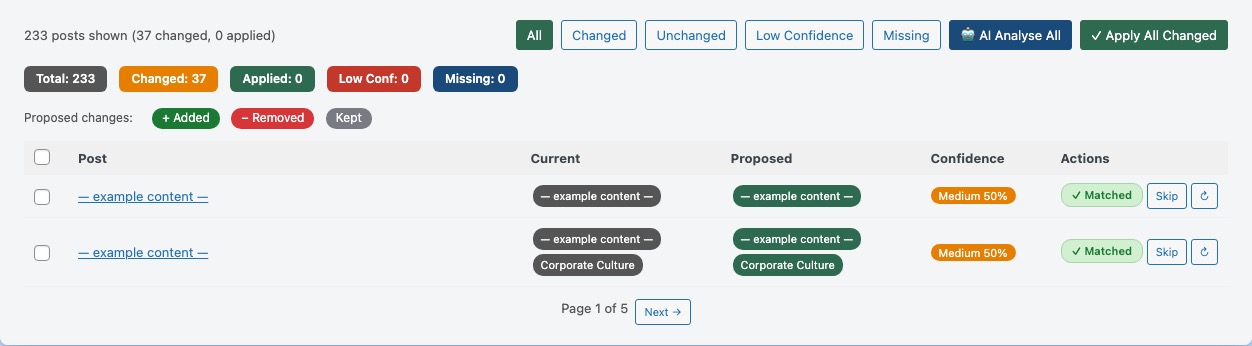
The Category Fixer audits every published post on your site and compares its content to its current category assignment. It uses keyword scoring to identify mismatches and can also use your configured AI provider for more nuanced analysis of ambiguous cases. The result is a prioritised list of suggested recategorisations. Review each one and decide whether to apply it.
How to use it:
- Click Scan Posts: the plugin reads every published post and scores how well its content matches its assigned categories. This runs locally and makes no API calls.
- Review the results. Posts with a high mismatch score are shown first. Each row shows the post’s current category and the suggested better category.
- Click Apply on individual rows to move the post to the suggested category, or Skip to dismiss the suggestion without making a change.
- Click Apply All Changed to accept every pending suggestion at once, useful if the scan has produced a large number of clear-cut corrections.
Filter tabs at the top let you narrow the view to: All posts, Changed (suggestions pending), Unchanged (post is already well-categorised), Low-confidence (suggestions the algorithm is less certain about), and Uncategorised (posts with no category at all, which should be addressed first).
The 🤖 AI Analyse button sends the selected posts to your AI provider for a deeper, semantic analysis. Use this for posts where keyword scoring produces a suggestion you’re not sure about, or for posts that cover multiple topics and need a human-plus-AI judgment call.
Category Health

Not all categories are created equal. A category with 25 posts about AWS architecture sends a strong topical signal to Google. A category with one post from 2021 that was never followed up sends essentially no signal at all, and it wastes crawl budget. Google allocates a limited amount of crawl budget to each site, and spending some of it on thin, empty category pages is a wasted opportunity to get your actual content crawled more frequently.
The Category Health Dashboard gives you an at-a-glance quality grade for every category on your site, so you can see immediately which categories are working for you and which ones are dragging down your topical authority. The grading is based on post count and recency. A category you stopped writing about three years ago signals to Google that your site has abandoned that topic.
Health grades and what to do about each:
- Strong (green, 10+ posts): This category is well established. Google has strong evidence that your site covers this topic in depth. Keep publishing in it.
- Moderate (orange, 4–9 posts): Healthy and indexed. Plan to grow this category with more posts over time to reach Strong status.
- New (blue, 1–3 posts within the last 180 days): A category you’re actively building. Don’t merge or delete it. Give it time to grow.
- Weak (yellow, 2–3 posts, none recent): This category exists but isn’t being maintained. Consider whether these posts belong in a broader, stronger category instead, or whether you plan to publish more on this topic soon.
- Empty (red, 0–1 posts): This category is contributing nothing and consuming crawl budget. Either delete it, merge it into a related category, or write new posts for it to bring it up to Moderate.
- Uncategorized (grey): The WordPress default category. Posts here were published without being categorised. These should all be moved to appropriate categories using the Category Fixer above.
Click any grade badge at the top of the table to filter the view. Click ▼ Show posts in any row to see which posts belong to that category, useful when deciding whether to merge or delete a weak category.
Category Drift Detection

Over time, a category that started with a clear focus can quietly drift into something much less coherent. A “Technology” category that began with cloud computing posts might now contain posts about personal productivity, book reviews, and hardware reviews, because they’re all vaguely “tech”. This kind of category drift is one of the most common reasons sites fail to rank well for their core topics. Google reads the aggregate of everything in a category to understand what that section of your site is about, and a catch-all category produces a confused, diluted signal.
Category Drift Detection uses AI to do what’s hard to see manually: read the titles of all the posts in each category and identify when they’ve stopped talking about the same topic. It flags categories that have become catch-alls and gives you specific recommendations for which posts to move where, so you can restore topical coherence to your category structure.
How to use it:
- Click Run Fresh AI Analysis: the AI reads a sample of post titles from each category and analyses the semantic coherence. It flags categories where the posts are clearly not all about the same topic. Results are cached so you don’t have to re-run the analysis on every visit.
- Click Load Cached Results: reloads the most recent analysis from the cache without making a new API call. Use this when you return to act on previous recommendations.
- Review the flagged categories. Each entry shows:
- Verdict: Either Catch-all (posts on completely unrelated topics are mixed together) or Drifting (posts are loosely related but the category has grown beyond its original focus).
- Confidence: How certain the AI is about the verdict: High, Medium, or Low. High-confidence catch-alls should be addressed first.
- AI Reasoning: A plain-language explanation of specifically why this category was flagged and what topics it has drifted into.
- Suggested moves: Specific posts the AI recommends moving to different, more appropriate categories, with a reason for each recommendation.
- Click → Move on individual post suggestions to apply them one at a time, or → Move all to apply all moves for a category at once.
- Click 🤖 Analyse remaining to ask the AI for additional suggestions covering posts in the flagged category that weren’t covered in the initial analysis.
Moves are applied immediately to the post’s WordPress category assignments. The analysis cache is updated after each move so the displayed state always reflects the current situation.
🔄 Migrate Categories

Over time, most WordPress sites accumulate categories that have grown thin: a category you tried once with three posts, a duplicate of something already covered elsewhere, or a topic that never had enough content to build real topical authority. These thin categories dilute your site’s authority signal. Google sees a category with two or three posts and concludes you’re not a serious resource on that topic.
The Migrate Categories panel lets you retire weak categories cleanly. Instead of manually reassigning each post and then hunting down the empty category to delete it, this panel does everything in one place: shows you all the candidates for retirement (sorted by fewest posts first), lets you choose what to do with each post, and then deletes the empty category when you’re done.
How to use it:
- Click 🔄 Load Categories. Categories are listed from fewest posts to most — the lowest-count ones are the best candidates to migrate away.
- Click a category row to open the post list for that category.
- For each post, set the action using the dropdown:
- Remove: Removes this category from the post, leaving its other categories intact. Only available for posts already assigned to two or more categories.
- Swap → [another category]: Replaces this category with a different one. This is the required action for posts assigned to only this category — removing would leave them uncategorised.
- Click Apply on individual rows, or ✓ Apply All to process every pending row at once.
- Once all posts have been migrated away, a red 🗑 Delete Category button appears in the header. Click it to permanently delete the now-empty category — no need to leave the plugin.
Click ← Back to Categories to return to the category list and start working on a different category. The category list refreshes automatically so already-emptied categories disappear from the list.
When to use this panel: Run the Category Health panel first to identify your weakest categories (grade D or F with very few posts). Those are the prime candidates to migrate. Cross-reference with Category Drift Detection to see whether a low-count category is better merged into an adjacent topic rather than deleted outright. Migrate Categories is the execution step — use it after you’ve decided which categories to retire.
🔄 Scheduled Batch
Most AI generation tasks in this plugin are triggered manually: you click a button and it runs. The Scheduled Batch tab automates this so new posts that haven’t been processed yet get picked up automatically on a schedule. Enable it, choose whether to generate missing meta descriptions, summaries, or SEO scores on each run, and set a frequency. The batch processor only fills in missing content. It will never overwrite descriptions or summaries you’ve already written. Check the Last Run Log after each run to confirm it’s working and see exactly what was processed.
Batch Schedule
The AI generation tools in the AI Tools tab are all manually triggered: you click a button and they run. That works for a one-time audit of your existing content, but what about the post you publish next week, or the week after? Without automation, every new post needs a manual visit to the admin to generate its meta description, ALT text, and summary. The Scheduled Batch solves this by running a background job on a schedule, automatically filling in AI content for any posts that don’t have it yet.
The batch processor is designed to be safe and non-destructive: it only creates content where none exists. It will never overwrite a meta description you’ve written manually, a summary that was generated last week, or an SEO score from the previous run. If you want to force-regenerate content, use the individual bulk tools in the AI Tools tab. The batch processor’s job is to catch anything that slips through: new posts, posts that failed during a previous run, or posts that existed before you installed the plugin.
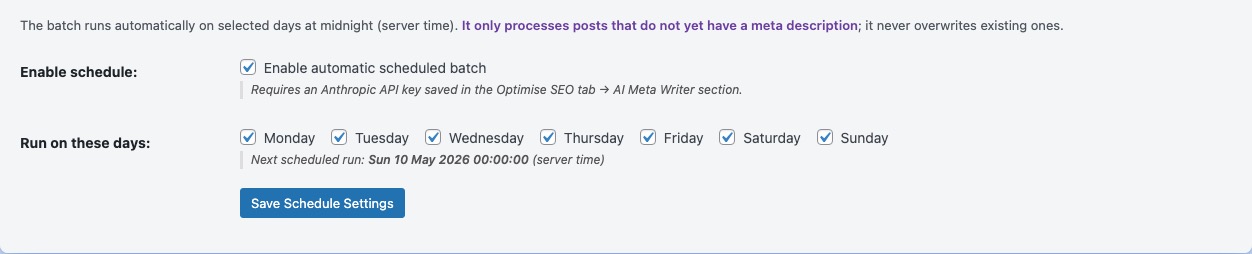
- Enable scheduled batch processing: Master switch. When ticked, a WordPress Cron job runs the processor at your chosen frequency. Untick this to pause all scheduled processing without losing your settings.
- Schedule frequency: How often to run: Hourly, Twice Daily, or Daily. For most bloggers publishing a few times a week, Daily is more than sufficient and consumes minimal API credits. Choose Hourly only if you publish multiple posts per day and want AI content available immediately.
- Generate missing meta descriptions: Each run will write AI meta descriptions for any published posts that don’t have one. This is the most important item to enable.
- Generate missing AI summaries: Each run will generate the three-sentence summary box for any posts that don’t have one yet.
- Score posts: Each run will calculate an SEO score for posts that haven’t been scored yet. This is a lightweight operation but consumes one API call per unscored post.
A note on WordPress Cron: WordPress’s built-in cron system runs when a visitor loads a page on your site. It doesn’t run on a true server-side schedule. If your site has very low overnight traffic, a scheduled “Daily” job might not run until the first visitor the next morning. For sites that need precise scheduling, set up a real server cron job (via cPanel, Linux crontab, or your hosting control panel) to call wp-cron.php on your preferred schedule. This is a one-time server configuration that makes WordPress Cron behave like a real scheduler.
Last Run Log
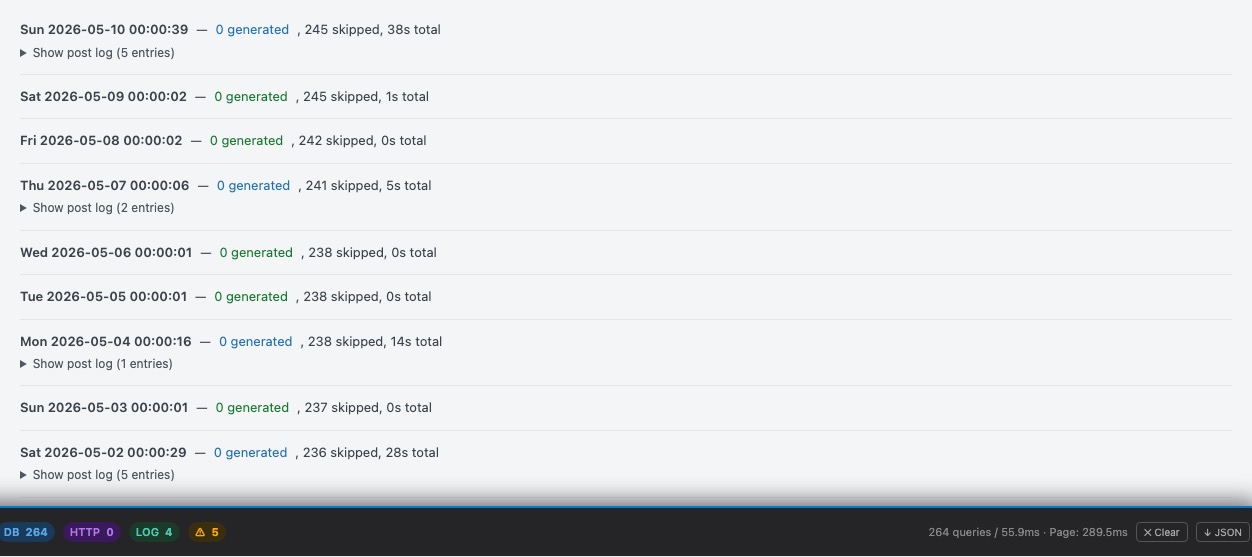
After enabling the Scheduled Batch, how do you know it’s actually running? The Last Run Log is your confirmation. After each batch run, the plugin records exactly what it did: how many posts it checked, how many descriptions it wrote, how many summaries it created, how many SEO scores it calculated, and whether any posts failed. Check this log periodically to confirm the automation is working and to catch any recurring errors.
- Run date/time: When the most recent batch ran. If this is more than 24 hours ago and you have “Daily” frequency enabled, the batch may not be running. Check that WordPress Cron is functioning (see the note about WordPress Cron in the Batch Schedule section above).
- Duration: How long the batch took to complete. Longer run times usually mean there were many posts to process. If the batch is timing out, reduce the number of tasks enabled or switch to a more efficient AI model (e.g. Claude Haiku instead of Sonnet).
- Posts processed: The total number of published posts the batch checked. This includes posts that already had content (and were therefore skipped) as well as posts that needed processing.
- Meta descriptions generated: How many new meta descriptions were written in this run.
- Summaries generated: How many new AI summary boxes were created in this run.
- Scores updated: How many SEO scores were calculated in this run.
- Errors: Posts that failed to process, with the specific error reason. The most common errors are:
- API rate limit: Your AI provider temporarily rejected the request because too many calls were made too quickly. The batch will retry the post on the next run.
- No content: The post has no readable text content (it might be a placeholder, a gallery-only post, or have content stored in page builder blocks that the plugin can’t parse). These posts will continue to be skipped.
- API key invalid: Your API key has expired, been deleted, or run out of credits. Check your provider console and update the key in AI Settings.
Click Run Now to trigger a manual batch run immediately, useful for testing that the batch is configured correctly or to process a batch outside its scheduled time after making changes.
Glossary of terms
- AEO
- Answer Engine Optimisation. The practice of structuring content so it is understood and surfaced by AI-powered answer engines such as Google’s AI Overviews, Perplexity, and ChatGPT Browse, as well as traditional search engines.
- API
- Application Programming Interface. A standard way for software to communicate with another service. In this plugin, you supply an API key so WordPress can send requests to Anthropic Claude or Google Gemini to generate content.
- ALT text
- Alternative text. A written description of an image, stored in the HTML
altattribute. Read by screen readers for accessibility and used by search engines to understand image content. - Canonical URL
- The preferred URL for a page when multiple URLs could serve the same content. Set via
<link rel="canonical" href="...">to tell search engines which version to index. - CDN
- Content Delivery Network. A globally distributed network of servers that delivers files (e.g. fonts, images, scripts) to visitors from the closest physical location, reducing load time.
- CSS
- Cascading Style Sheets. The language that controls the visual appearance of web pages.
- E-E-A-T
- Experience, Expertise, Authoritativeness, Trustworthiness. Google’s quality evaluation framework for web content. Person schema and author information contribute to E-E-A-T signals.
- GDPR
- General Data Protection Regulation. EU privacy law requiring disclosure and often consent for processing personal data, including IP addresses sent to third-party services such as Google Fonts CDN.
- JSON-LD
- JavaScript Object Notation for Linked Data. A format for embedding structured data in a web page. Google reads JSON-LD to understand page type, author, organisation, and content, enabling rich search results.
- JS
- JavaScript. The programming language that runs in web browsers. Deferring JS improves page load speed.
- LCP
- Largest Contentful Paint. A Core Web Vitals metric measuring how long it takes the largest visible element (usually an image or heading) to appear. Google uses LCP as a ranking factor.
- llms.txt
- A plain-text file at
/llms.txtthat provides a structured summary of your website for AI language models. Analogous torobots.txtbut for AI systems. - noindex
- A directive in the
<meta name="robots">tag that tells search engines not to include a page in their index. The page can still be crawled but will not appear in search results. - OG / OpenGraph
- OpenGraph. A protocol developed by Facebook that standardises how web pages are represented when shared on social media. OG tags control the title, description, and image shown in social previews.
- SEO
- Search Engine Optimisation. The practice of improving a website’s visibility in organic (unpaid) search engine results.
- Schema / Structured Data
- Machine-readable data embedded in a web page (using formats like JSON-LD) that tells search engines what a page is about: its type, author, publication date, and so on. Can enable rich results in Google Search.
- TTI
- Time to Interactive. A performance metric measuring how long until a page is fully interactive. Deferring JavaScript improves TTI.
- UTM
- Urchin Tracking Module. Parameters appended to URLs for marketing analytics (e.g.
?utm_source=newsletter). Should be stripped from canonical URLs to prevent duplicate content. - XML
- eXtensible Markup Language. The format used for sitemaps. An XML sitemap is a structured list of URLs that search engines can parse to discover your content.