CloudScale Backup & Restore
CloudScale Backup & Restore
The only WordPress backup plugin that is 100% free — including restore. UpdraftPlus, BackupBuddy, and Duplicator all charge $70–$200 per year the moment you need to actually recover your site. CloudScale Backup & Restore gives you scheduled backups, one-click restore, S3 cloud sync, Google Drive sync, Dropbox sync, Microsoft OneDrive sync, and AWS EC2 AMI snapshots at zero cost, forever. No upsell, no premium tier, no surprises.
Activity Log
The Activity Log panel appears at the top of the plugin admin page, above the Local Backups and Cloud Backups tabs. It gives you a real-time, timestamped record of everything the plugin does — useful for verifying that scheduled jobs ran, diagnosing sync failures, or copying a log dump for support.
What gets logged:
- Backup created — filename and size (e.g.
bkup_f42.zip (18.3 MB)). - Scheduled backup starting — components included (database, media, plugins, etc.).
- Cloud sync result per provider — S3, Google Drive, Dropbox, and OneDrive each log success or failure immediately after a backup.
- Manual cloud sync — when you click Sync Latest for any provider.
- Cloud connection tests — pass or fail result for S3, Google Drive, Dropbox, and OneDrive.
- Settings saved — local schedule, retention, S3, Google Drive, Dropbox, OneDrive, AMI, and cloud schedule settings all log when saved.
- AMI creation started — AMI ID, name, and instance ID logged on success; error details logged on failure.
- AMI state transitions (pending → available) detected during background polling.
- Retention deletions — each local backup deleted by the retention policy is logged with the retention limit.
- Selective restore initiated and completed — filename and table list logged at start and finish.
- Full restore and restore-from-upload — start and completion (or failure) with filename.
- Backup downloaded — logged when an admin downloads a backup zip.
- Backup deleted — filename logged when an admin deletes a backup.
- Automatic Crash Recovery events — pre-update backup, monitoring start, rollback triggered (with trigger reason and HTTP code), rollback complete.
- Plugin activated and deactivated.
- Errors and exceptions — all caught exceptions log the message and context before returning an error to the UI.
Entry colours:
- Green — success: backup completed, sync OK, deletion confirmed.
- Teal — in-progress: starting, running, retrying.
- Red — error: failed, skipped, aborted, access denied.
- Grey — informational: all other events.
Controls:
- Copy — copies all visible log lines (with timestamps) to the clipboard as plain text. Paste directly into a support ticket or bug report.
- Refresh — manually reloads the log. The panel also auto-refreshes every 5 seconds while the page is open.
- Clear — permanently erases all log entries from the database. Cannot be undone.
The log displays up to 100 entries and auto-scrolls to the newest entry on each refresh. Entries are stored in wp_options (key cs_activity_log). Background sync workers write temporary per-job entries (keys like cs_log_*) which are merged into the main log on the next load.
Backup Schedule
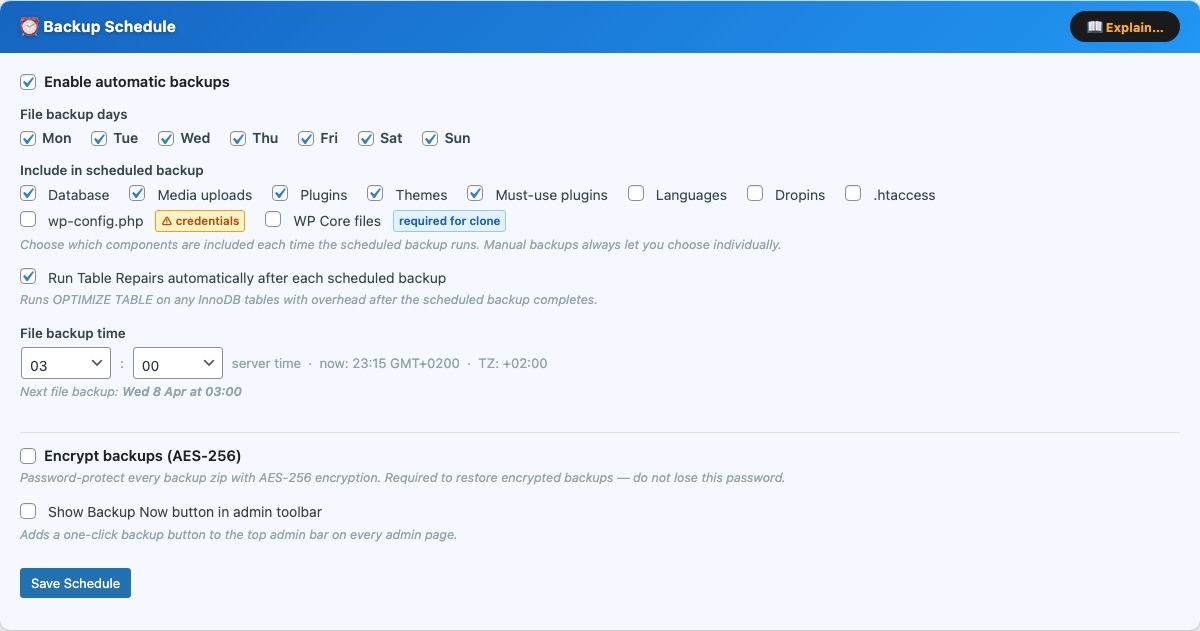
The Backup Schedule card (blue) configures automatic, unattended backups. Enable the checkbox at the top to activate the schedule — all controls are disabled when the schedule is off.
File backup days — select one or more days of the week on which the scheduled backup will run. The backup fires once per day at the configured time on each selected day.
Include in scheduled backup — choose which components are included each time the scheduled backup runs:
- Database — full SQL dump of all WordPress tables (always recommended).
- Media uploads —
wp-content/uploads/including all image sizes. - Plugins —
wp-content/plugins/(all installed plugins). - Themes —
wp-content/themes/(all theme directories). - Must-use plugins —
wp-content/mu-plugins/. - Languages —
wp-content/languages/. - Dropins — drop-in files such as
object-cache.phpinwp-content/. - .htaccess — the root
.htaccessrewrite rules file. - wp-config.php — contains database credentials and secret keys. Marked with a credentials warning badge. Include only if you intentionally want config backed up; do not restore this file to a different server without editing the credentials first.
Manual backups always let you choose components individually at run time, regardless of what is saved here.
File backup time — the hour and minute (server time) at which the scheduled backup fires. The current server time and timezone are shown inline. The next scheduled run is displayed below the time picker once a schedule is saved.
Run Table Repairs automatically — when enabled, the plugin runs OPTIMIZE TABLE on any InnoDB tables that have accumulated overhead immediately after each scheduled backup completes. This is equivalent to clicking Optimize tables in phpMyAdmin and can recover disk space from deleted posts, spam comments, and transient accumulation. It has no effect on tables that do not need it.
Show Backup Now button in admin toolbar — adds a one-click backup button to the top WordPress admin bar on every admin page. Clicking it runs an immediate backup using the default component selection and shows a live progress indicator in the toolbar.
Save Schedule — saves the schedule configuration and registers or updates the WordPress cron event. For production sites, supplement WP-Cron with a real system cron to ensure the schedule fires regardless of traffic: * * * * * curl -s https://yoursite.com/wp-cron.php?doing_wp_cron > /dev/null
Email, SMS, and push notification settings are configured in the Notifications card (purple, directly below this card). Enable the relevant channels there to be alerted after each backup or restore completes.
Backup Encryption
The Encrypt backups (AES-256) checkbox password-protects every backup zip with AES-256 encryption. When enabled, a Password field appears — enter a strong password and click Save Schedule. Every subsequent backup will be encrypted with that password. Encrypted backups show a padlock icon in the Local Backup History table.
Important things to know before enabling encryption:
- The password is required to restore the backup. If you lose it, the backup cannot be decrypted.
- The password is stored in the WordPress database. Anyone with database access can read it. Encryption primarily protects backup zips that leave the server — for example, files downloaded to your computer or synced to cloud storage.
- If you change or clear the password, existing encrypted backups cannot be restored using the new password. Keep a record of the password that was active when each backup was created, or run new unencrypted backups before clearing the password.
- Encryption requires PHP’s
libzipto be compiled with AES-256 support (ZipArchive::EM_AES_256). If your server’s libzip does not support it, a red error badge appears and the backups are created without encryption. Upgrade libzip (typically viasudo dnf upgrade php-zipon Amazon Linux orsudo apt upgrade php-zipon Ubuntu) to enable this feature.
Notifications
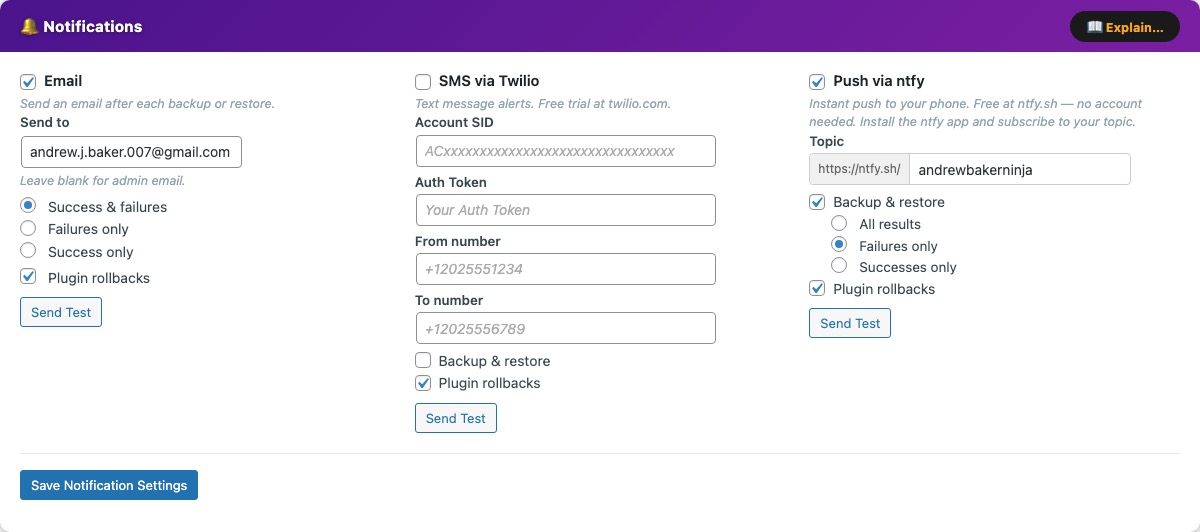
The Notifications card (purple) configures all alerts sent after backup, restore, and plugin rollback events. Three channels are available simultaneously — enable any combination. All settings are saved with a single Save Notification Settings button at the bottom of the card.
Enable Email to send an email after every backup or restore operation.
- Send to — the address that receives notifications. Leave blank to use the WordPress admin email (
Settings → General → Administration email address). - Success & failures — sends an email after every operation regardless of outcome. The most reliable option for unattended monitoring.
- Failures only — silent on success; sends an email only when something goes wrong. Good for set-it-and-forget-it installs where you only want to hear bad news.
- Success only — confirmation after every successful backup. Useful during initial setup to confirm the schedule is firing.
- Plugin rollbacks — sends an email whenever Automatic Crash Recovery rolls back a plugin update.
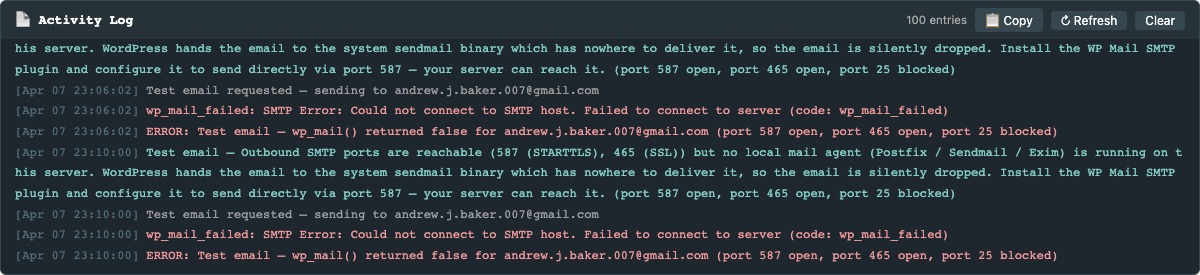
Send Test — sends a test message immediately to the configured address and reports success or failure inline. If email delivery is not working, a diagnostic banner appears explaining the likely cause:
- All outbound SMTP ports blocked — your hosting provider is blocking ports 587, 465, and 25. WordPress uses the server’s local
sendmailbinary to deliver email, so if those ports are blocked, nothing gets through. Install a plugin like WP Mail SMTP to route mail through an external provider such as Gmail, SendGrid, or Mailgun. - SMTP ports open but no local mail agent — the server can reach mail servers, but no local MTA (Postfix, Sendmail, Exim) is installed. WordPress has no way to hand off the email. Use WP Mail SMTP.
- Postfix running but no relay configured — Postfix is installed but will attempt direct delivery on port 25, which most ISPs and cloud providers block to prevent spam. Configure Postfix to relay through your email provider, or use WP Mail SMTP.
Any wp_mail() failure is also written to the Activity Log so you can see the exact error message without checking server logs.
SMS via Twilio
Enable SMS via Twilio to receive a text message alert. You will need a Twilio account — a free trial is available with no credit card required for testing.
- Account SID — found on your Twilio console dashboard (starts with
AC). - Auth Token — the secret token shown alongside the Account SID.
- From number — your Twilio phone number in E.164 format (e.g.
+12025551234). - To number — the destination mobile number in E.164 format (e.g.
+12025556789).
When to send SMS:
- Backup & restore — enable to receive SMS after backup and restore operations, with a sub-filter for All results, Failures only, or Successes only.
- Plugin rollbacks — enable to receive an SMS whenever Automatic Crash Recovery rolls back a plugin update.
Send Test — immediately sends a test SMS to verify credentials before saving.
Push via ntfy
Enable Push via ntfy for instant push notifications to your phone. ntfy.sh is completely free with no account needed — install the ntfy app on your phone, enter a unique topic name here (e.g. my-site-backups-a7x9), and subscribe to that topic in the app. Alerts arrive within seconds.
- Topic — a unique string appended to
https://ntfy.sh/. Choose something non-guessable to prevent unauthorised subscriptions. The full URL is shown inline as you type.
When to send push:
- Backup & restore — enable to receive push notifications after backup and restore operations, with a sub-filter for All results, Failures only, or Successes only.
- Plugin rollbacks — enable to receive a push notification whenever Automatic Crash Recovery rolls back a plugin update.
Send Test — immediately sends a test notification to your ntfy topic to verify connectivity before saving.
Retention & Storage
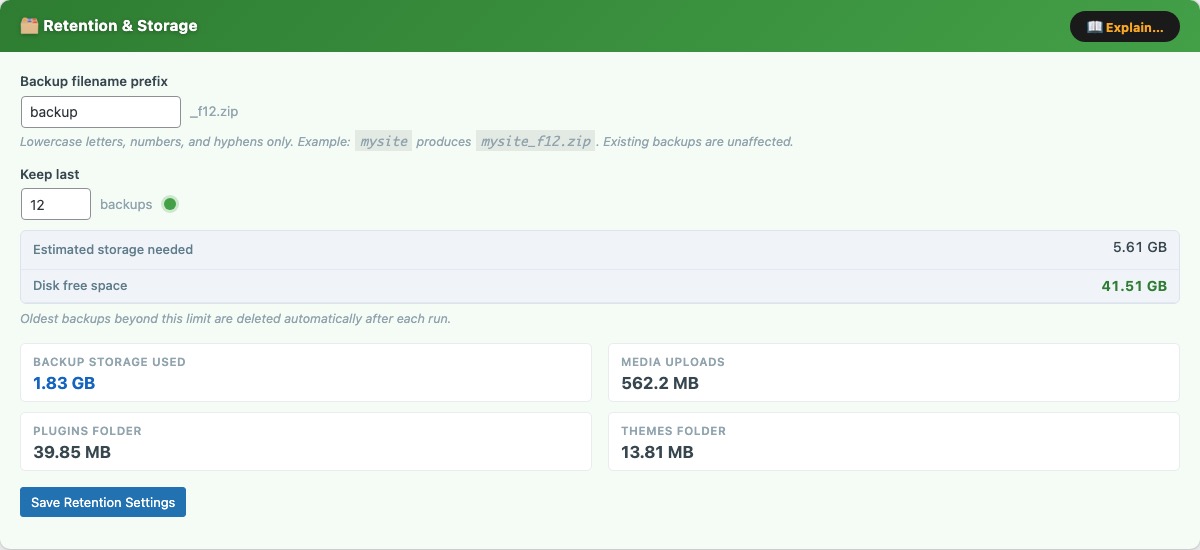
The Retention & Storage card (green) controls how many backups are kept on-server and lets you customise backup filenames.
Backup filename prefix — a short string prepended to every backup filename, e.g. mysite produces mysite_f12.zip. Lowercase letters, numbers, and hyphens only. Changing this prefix does not affect existing backup files.
Keep last N backups — when a new backup is created and the on-server count exceeds this limit, the oldest backup is deleted automatically. The storage estimate updates in real time as you type:
- Estimated storage needed — the retention count multiplied by the size of the most recent backup. Shown in red when it exceeds available disk space.
- Disk free space — current free space on the partition containing the backup directory. Shown with a green / amber / red traffic-light indicator.
The card also shows a live storage breakdown: backup storage used, media uploads folder size, plugins folder size, and themes folder size.
Recommended: keep 3–7 backups on-server and download at least one offsite weekly.
System Info
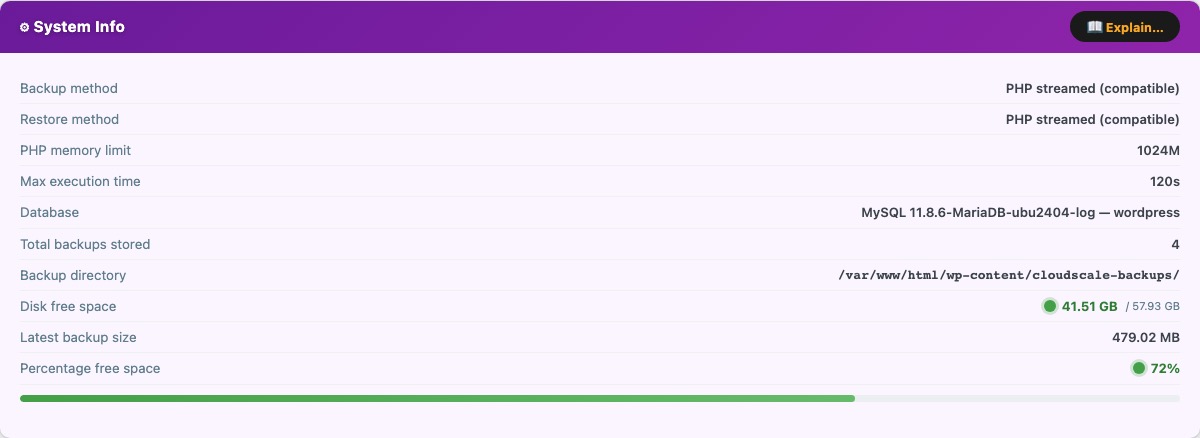
The System Info card (purple) displays read-only diagnostics about your server environment. Use this to confirm the plugin can create backups correctly before relying on automated schedules.
- Backup method — mysqldump (binary) when the binary is found on
$PATH, or PHP (PDO) as a pure-PHP fallback.mysqldumpis faster and more reliable for large databases. - Restore method — mysql (binary) or PHP PDO fallback.
- PHP memory limit — current
memory_limitfromphp.ini. Large sites may require 256M or more for the zip operation to complete. - Max execution time — current
max_execution_time. Shown as “Unlimited” when set to0. For sites with >1 GB of uploads, set this to at least 300 seconds to prevent timeouts. - Database — MySQL / MariaDB version string.
- Total backups stored — count of
.zipfiles currently in the backup directory. - Backup directory — full filesystem path to
wp-content/cloudscale-backups/. - Disk free space — free space with a traffic-light indicator: green (>20% free), amber (10–20%), red (<10%).
- Latest backup size — used as the baseline for the storage estimate in the Retention card.
- Percentage free space — graphical disk bar showing used vs free space.
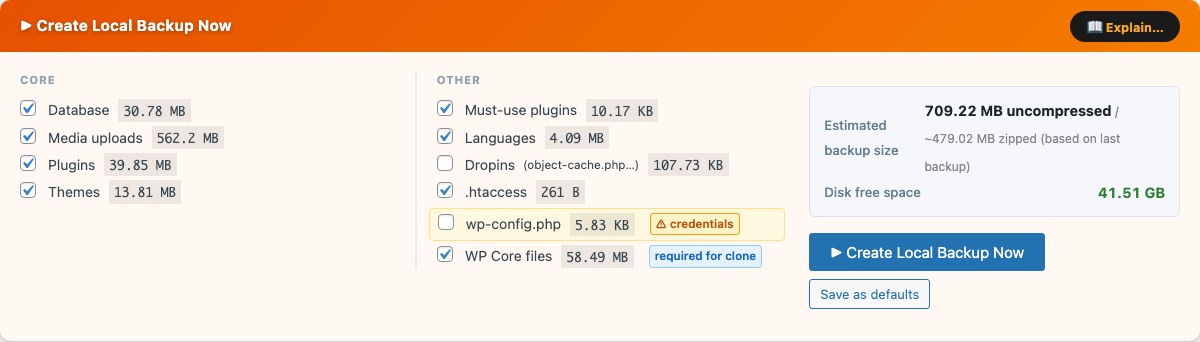
Create Local Backup Now
Why CloudScale Free Backup and Restore?
Most WordPress backup plugins lure you in with a free tier — and then lock the restore button behind a paywall. UpdraftPlus Premium costs $70/year. BackupBuddy starts at $80/year. Duplicator Pro is $69/year. All of them charge you at exactly the moment you are most desperate: when your site is broken and you need to get it back.
CloudScale is free. Not “free with paid restore.” Free. Scheduled or manual backups, one-click restore, maintenance mode, S3 cloud sync, Google Drive sync, Dropbox sync, and EC2 AMI snapshots — all included, no subscription required, source code on GitHub.
Your backups are stored on your server and can be automatically synced to Amazon S3, Google Drive, or Dropbox so a server failure never means data loss. And if the entire server dies, AMI snapshots let you spin up a replacement in minutes.
The Create Local Backup Now card (orange) lets you run an immediate backup with full control over which components are included. Select components in the two columns, then click Create Local Backup Now. Keep the browser tab open until the progress bar completes.
Core components:
- Database — complete SQL dump including all tables with the configured
$table_prefix. - Media uploads —
wp-content/uploads/, including all generated image sizes. - Plugins —
wp-content/plugins/(all installed plugins, not just active ones). - Themes —
wp-content/themes/.
Other components:
- Must-use plugins —
wp-content/mu-plugins/. - Languages —
wp-content/languages/. - Dropins —
object-cache.phpand other drop-ins inwp-content/. - .htaccess — the root Apache rewrite rules file.
- wp-config.php — contains environment-specific credentials. Do not restore this file to a different server without updating the credentials it contains.
Each component shows its current disk size. The Estimated backup size and Disk free space update in real time as you tick and untick components.
Save as defaults — saves the current checkbox selection as the default for future manual backups.
Cloud storage pre-check
When you click Create Local Backup Now, the plugin first checks whether any configured cloud providers (Google Drive and Dropbox) have enough free space to receive the backup. The button text changes to Checking cloud storage… during this check. AWS S3 does not impose a quota limit so it is not checked.
If all providers have sufficient space — the backup starts immediately, no action needed.
If a provider is running low — a yellow warning panel appears below the backup button showing, for each affected provider, the exact MB free vs the estimated MB needed. You then have three options:
- Free space on [Provider] — deletes the oldest non-golden backup(s) from that provider one by one until enough space is freed (with a 15% safety margin), then reports the new free space. Golden images are never deleted by this action. Once space is freed, click Create Local Backup Now again to proceed, or use Run Backup Anyway.
- Run Backup Anyway — starts the backup regardless. The local backup will be created successfully. If a cloud provider genuinely has no space, the sync step will fail and the failure will be recorded in the Local Backup History table and the Activity Log.
- Cancel — dismisses the warning panel without starting a backup.
If the cloud provider cannot be reached during the check (network error, rclone not configured, etc.), the backup starts immediately without waiting.
Disk space alerts
If your server disk is running low, a banner alert appears above the tab bar:
- Warning (amber) — disk is at 10–20% free. The banner shows free space and an estimate of how many more backups will fit. Consider reducing the retention count or removing old backups.
- Critical (red) — disk is below 10% free. Free up space or move old backups off-server immediately — the next backup may fail if insufficient space remains.
Local Backup History
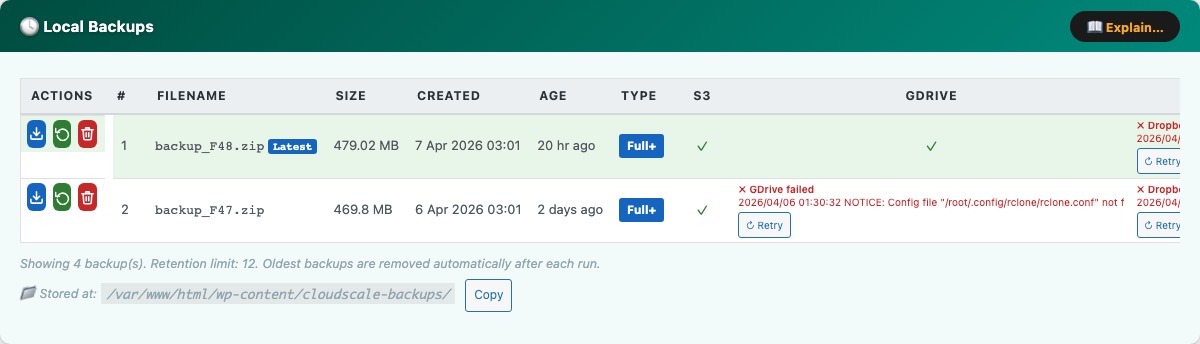
The Local Backups card (teal) shows every backup zip currently stored on your server.
- Date / time — exact timestamp when the backup completed, in your WordPress timezone.
- Size — zip file size. A typical site produces backups of 200 MB–2 GB.
- Type — Manual (triggered by you) or Scheduled (automatic).
- Cloud sync columns — a column appears for each configured provider (S3, Google Drive, Dropbox). A green tick means successfully synced; a red cross means sync failed (hover for the error); a dash means no sync was attempted.
- Download — streams the zip directly to your browser. Always keep at least one backup offsite.
- Restore — opens the restore confirmation modal for that backup.
- Delete — permanently removes the zip. Cannot be undone.
Row colours: The newest backup is highlighted green (latest). A Delete Soon badge marks the oldest kept backup when you are at your retention limit — it will be deleted when the next backup runs. Rows highlighted orange are already over-limit and will be deleted immediately on the next backup run.
The backup directory path is shown at the bottom with a Copy button. Backups are stored in wp-content/cloudscale-backups/.
Restore from Uploaded File

The Restore from Uploaded File card (red) lets you restore your site from a backup file stored on your computer — for example a backup downloaded from a cloud provider or a different server.
Click Choose File and select either:
- A
.zipcreated by this plugin — restores all components included in that backup. - A raw
.sqlfile — restores the database only, leaving files untouched.
Click Restore from Upload. The file is staged to the server, then the standard restore modal opens — giving you the same two options as a local backup restore:
- Full database — drops all current tables and recreates them from the uploaded backup.
- Specific tables only — choose which tables to restore from the uploaded file, leaving all others untouched.
This makes it possible to do a selective restore on a backup downloaded from S3, Google Drive, Dropbox, or OneDrive — download the file to your computer, upload it here, then restore just the tables you need.
Cross-server migration: after restoring a backup from a different domain, run: wp search-replace 'https://oldsite.com' 'https://newsite.com' --all-tables
Restore
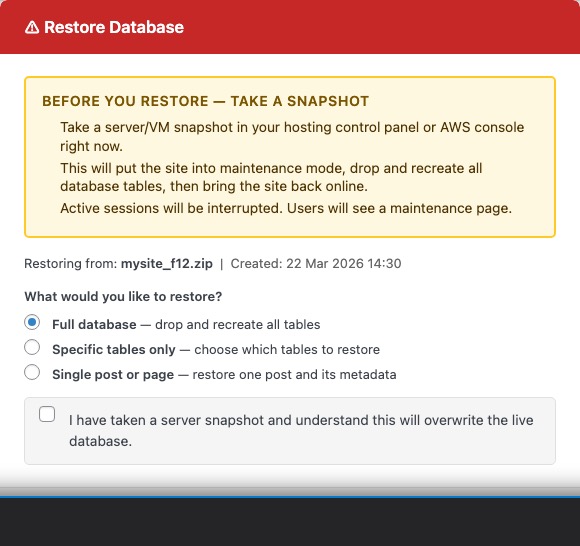
Clicking Restore next to any backup opens a unified restore modal. Choose how you want to restore before confirming:
Full database — restores the entire database. The plugin activates Maintenance Mode for the duration, serving HTTP 503 to frontend visitors while wp-admin stays accessible to administrators.
- Maintenance mode activated —
wp-content/.maintenancewritten to disk. - The backup zip is extracted to a temporary directory inside
wp-content/. - The database is replaced: all existing tables matching the backup’s table prefix are dropped and recreated from the
.sqldump. - The
uploads/,plugins/, and active theme directories are replaced (if included in the backup). - Any other included components (
.htaccess,wp-config.php, mu-plugins, etc.) are restored. - Maintenance mode deactivated —
.maintenancedeleted. OPcache flushed.
Specific tables only — restores only the tables you select. The plugin lists every table found in the backup; tick the ones you want. Only those tables are dropped and recreated — all others remain untouched. No maintenance mode is used.
Both modes require you to tick a confirmation checkbox before Restore Now activates. Take an EC2 AMI or hosting snapshot first — if anything goes wrong you can roll back instantly.
Important: a full restore is irreversible. Any changes made after the backup date are permanently lost.
If a full restore fails mid-way — maintenance mode remains active. Manually delete wp-content/.maintenance via SFTP or SSH to bring the site back online, then inspect wp-content/debug.log.
Which tables to choose for a partial restore
The Specific tables only mode is useful when you only need to recover one piece of the site without reverting everything else. The table names below assume the default wp_ prefix — if your install uses a different prefix (e.g. abc_), substitute it accordingly.
Posts, pages, and custom post types
wp_posts— every post, page, revision, menu item, and custom post type record.wp_postmeta— all post metadata (custom fields, featured image IDs, ACF data, etc.). Always restore this together withwp_posts.
Comments
wp_comments— all comment records including spam, pending, and approved.wp_commentmeta— comment metadata. Always restore together withwp_comments.
Users and login data
wp_users— usernames, email addresses, and hashed passwords.wp_usermeta— user roles, preferences, and metadata. Always restore together withwp_users.
Site settings and plugin configuration
wp_options— site URL, theme settings, plugin configuration, widget data, and transient cache. Restoring this table rolls back all plugin settings to the backup date, not just one plugin. If you only need to recover a single plugin’s settings, a full database restore is usually safer.
WooCommerce orders and customers
wp_posts+wp_postmeta— WooCommerce stores legacy orders as a custom post type. Restore both tables.wp_wc_orders+wp_wc_order_items+wp_wc_order_operational_data+wp_wc_order_addresses+wp_wc_order_stats— if HPOS (High-Performance Order Storage) is enabled, WooCommerce uses these dedicated order tables instead. Restore all of them together.
Email logs (Contact Form 7, Gravity Forms, Fluent Forms, newsletters)
These plugins store form submissions and email logs in their own tables. Look for tables with the plugin name in them — for example wp_cf7_* for Contact Form 7 add-ons, wp_gf_* for Gravity Forms, wp_fluentform_* for Fluent Forms, or wp_newsletter_* for newsletter plugins. Select all tables belonging to the plugin you want to recover. Because these tables are self-contained, restoring them does not affect posts, users, or any other part of the site.
The safest approach — before doing any partial restore on a live site, take a fresh backup first. That way if the partial restore causes unexpected problems, you can immediately do a full restore back to the moment before you started.
Cloud Backup Settings
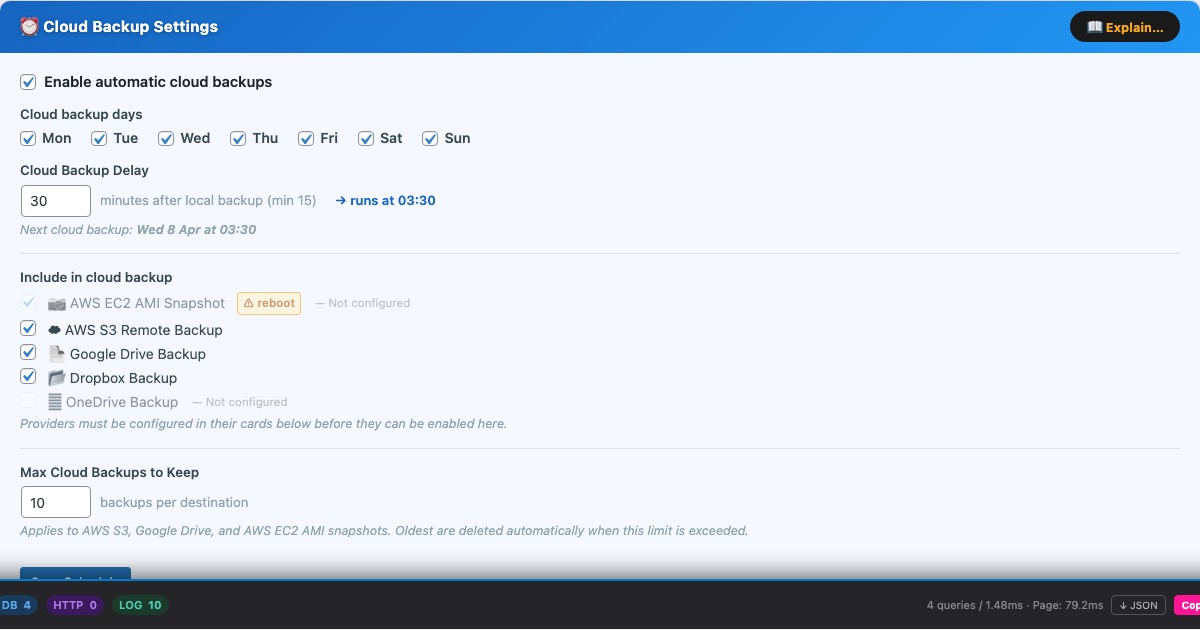
The Cloud Backup Settings card (blue) is the master control for all automated cloud syncing. It lives at the top of the Cloud Backups tab.
Cloud backup days — the days on which cloud sync runs. On each selected day the plugin runs providers in this fixed order: AMI snapshot → AWS S3 → Google Drive → Dropbox → OneDrive. Each provider is independent — a failure on one does not prevent the others from running.
Cloud Backup Delay — minutes after the local backup completes before cloud sync begins. Minimum 15 minutes. This ensures the local zip is fully written and closed before upload starts. The scheduled cloud sync time is shown when a schedule is configured.
Include in cloud backup — checkboxes to enable each provider individually:
- AWS S3 — uploads the backup zip to your S3 bucket using the AWS CLI.
- Google Drive — copies the backup zip to Google Drive using rclone.
- Dropbox — copies the backup zip to Dropbox using rclone.
- Microsoft OneDrive — copies the backup zip to OneDrive using rclone.
- AWS EC2 AMI Snapshot — creates an Amazon Machine Image of the entire EC2 server.
Providers that have not been configured in their cards below are greyed out and cannot be enabled here. All five providers can be active simultaneously — the backup zip is uploaded to each in turn.
Max Cloud Backups to Keep — the retention limit applied to each cloud destination independently. When this limit is exceeded after a sync, the oldest non-golden backup is deleted automatically. Applies to S3 objects, Google Drive files, Dropbox files, OneDrive files, and AMI snapshots. Golden images are exempt from this limit.
If the local backup schedule is disabled while cloud sync is enabled, a warning banner appears at the top of the page — cloud sync will upload the most recent existing backup, but no new local backups will be created first.
Google Drive
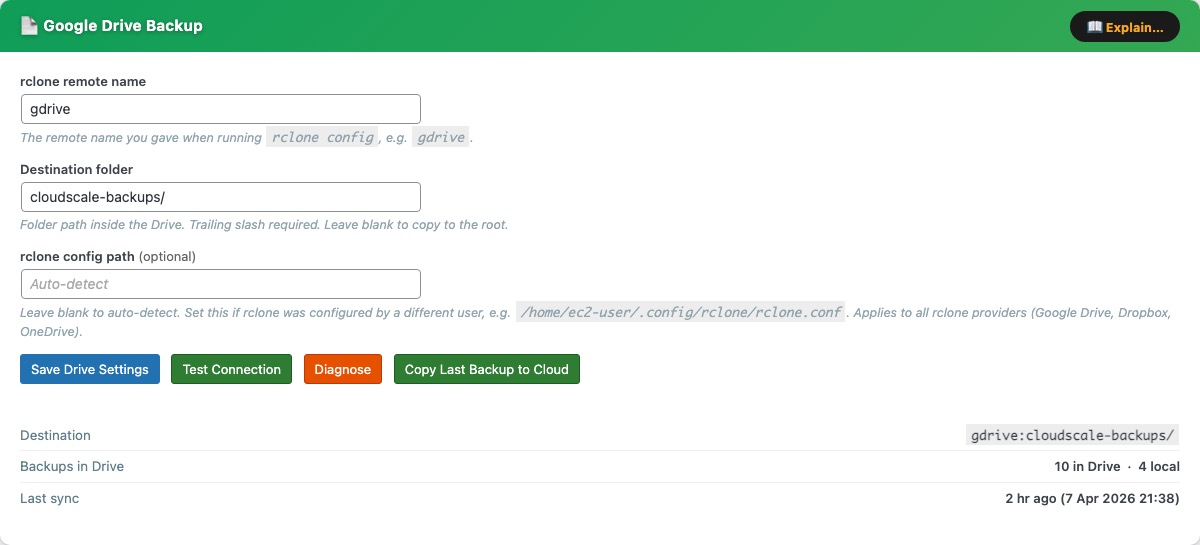
The Google Drive Backup card uses rclone to copy backup zips to Google Drive after every local backup. Setup takes about 5 minutes and only needs to be done once.
rclone remote name — the name you gave the remote during rclone config, e.g. gdrive. Case-sensitive.
Destination folder — path inside Google Drive where backups are copied. Trailing slash required (e.g. cloudscale-backups/). Leave blank for the Drive root.
Test Connection — runs rclone lsd and reports success or the error message.
Diagnose — shows rclone version, remote name, and authentication errors.
Copy Last Backup to Cloud — immediately copies the most recent local backup zip to Drive, outside of any schedule. Does not create a new backup — it copies whatever zip is already on the server. Before starting, the plugin checks how much free space Google Drive has:
- If Drive has enough space, the sync starts immediately.
- If Drive is running low, an inline warning appears showing MB free vs MB needed, with two options: Delete oldest (removes the oldest non-golden backup from Drive to make room, then starts the sync) or Sync anyway (proceeds regardless).
When configured, the card shows the full destination path, number of backups in Drive, and time of last sync.
Google Drive Setup Guide
Step 1 — Install rclone on the server
SSH into your server, then run:
curl -fsSL https://rclone.org/install.sh | sudo bash
The install log ends with: rclone v1.x.x has successfully installed. Now run "rclone config" for setup.
Step 2 — Fix apache home directory permissions
rclone saves its config in apache’s home folder. Run these commands or it will fail silently:
sudo mkdir -p /usr/share/httpd/.config/rclone
sudo chown -R apache:apache /usr/share/httpd/.config
sudo chmod 700 /usr/share/httpd/.config/rclone
sudo chown apache:apache /usr/share/httpd
sudo chmod 755 /usr/share/httpd
Step 3 — Run the setup wizard as the apache user
sudo -u apache rclone config
Answer each prompt as follows:
| Prompt | Type |
|---|---|
n/s/q | n (New remote) |
name> | gdrive |
Storage> | drive or the number for Google Drive |
client_id> | Enter (leave blank) |
client_secret> | Enter (leave blank) |
scope> | 1 (full access) |
service_account_file> | Enter (leave blank) |
| Edit advanced config? | n |
| Use web browser to authenticate? | n (no browser on server) |
Step 4 — Authorise on your laptop
The server prints: Execute the following on the machine with the web browser. Open a new terminal on your laptop (leave the SSH session open). Install rclone on your laptop if needed (brew install rclone), then run:
rclone authorize "drive"
Your browser opens — sign in to Google and click Allow. The laptop terminal prints a JSON token block. Copy the entire JSON (from { to }) and paste it into the SSH session at the config_token> prompt.
Step 5 — Finish the wizard
Answer n to “Configure as Shared Drive”, y to confirm the remote, then q to quit. You should see: Current remotes: gdrive / drive.
Step 6 — Save settings in the plugin
Enter gdrive in the rclone remote name field, your destination folder in Destination folder (e.g. cloudscale-backups/), click Save Drive Settings, then Test Connection.
Permission error? If the wizard prints permission denied when saving config, write the config file manually:
sudo bash -c 'cat > /usr/share/httpd/.config/rclone/rclone.conf << EOF
[gdrive]
type = drive
scope = drive
token = PASTE_YOUR_JSON_TOKEN_HERE
EOF'
sudo chown apache:apache /usr/share/httpd/.config/rclone/rclone.conf
sudo chmod 600 /usr/share/httpd/.config/rclone/rclone.conf
Replace PASTE_YOUR_JSON_TOKEN_HERE with the full JSON token from Step 4, then re-run Test Connection.
Running out of Google Drive space
Google Drive free tier provides 15 GB shared across Drive, Gmail, and Photos. If your backups are large, you may run out of quota. The plugin detects this in two places:
- Before a manual backup — the cloud space pre-check (see Create Local Backup Now) warns you and offers a Free space on Google Drive button.
- Before a Copy Last Backup to Cloud sync — an inline warning appears on the card with Delete oldest and Sync anyway options.
The Delete oldest / Free space action removes the oldest non-golden backup from Google Drive one file at a time until the required space (plus a 15% buffer) is available. Golden images are never deleted automatically. If all deletable backups have been removed and there is still not enough space, you will need to free up quota manually in Google Drive, upgrade your Google One storage, or reduce your retention count.
Note: the plugin computes free space as total quota − used quota rather than trusting Google’s reported free field, which can be inaccurate when the account is over quota.
Dropbox
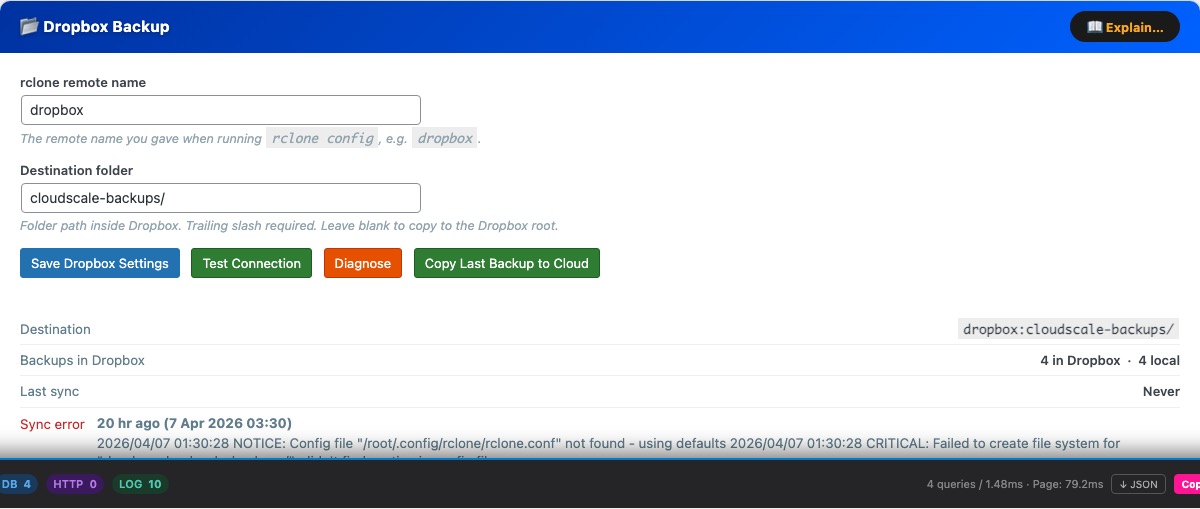
The Dropbox Backup card uses rclone to copy backup zips to Dropbox after every local backup. If you already set up rclone for Google Drive, skip straight to Step 3 — you just need to add a new remote.
rclone remote name — the name you gave the remote during rclone config, e.g. dropbox.
Destination folder — path inside Dropbox where backups are copied. Trailing slash required (e.g. cloudscale-backups/). Leave blank for the Dropbox root.
Test Connection — verifies rclone can reach Dropbox with the configured remote.
Diagnose — shows rclone version, remote name, and troubleshooting tips.
Copy Last Backup to Cloud — immediately copies the most recent local backup zip to Dropbox, outside of any schedule. Does not create a new backup — it copies whatever zip is already on the server. Before starting, the plugin checks how much free space Dropbox has:
- If Dropbox has enough space, the sync starts immediately.
- If Dropbox is running low, an inline warning appears showing MB free vs MB needed, with two options: Delete oldest (removes the oldest non-golden backup from Dropbox to make room, then starts the sync) or Sync anyway (proceeds regardless).
When configured, the card shows the destination path, number of backups in Dropbox, and time of last sync.
Dropbox Setup Guide
Step 1 — Install rclone on the server (if not already installed)
curl -fsSL https://rclone.org/install.sh | sudo bash
Step 2 — Fix apache home directory permissions
sudo mkdir -p /usr/share/httpd/.config/rclone
sudo chown -R apache:apache /usr/share/httpd/.config
sudo chmod 700 /usr/share/httpd/.config/rclone
sudo chown apache:apache /usr/share/httpd
sudo chmod 755 /usr/share/httpd
Step 3 — Run the setup wizard as the apache user
sudo -u apache rclone config
Answer each prompt as follows:
| Prompt | Type |
|---|---|
e/n/d/r/c/s/q> | n (New remote) |
name> | dropbox |
Storage> | dropbox or the number for Dropbox |
client_id> | Enter (leave blank) |
client_secret> | Enter (leave blank) |
| Edit advanced config? | n |
| Use web browser / Use auto config? | n (no browser on server) |
config_token> | Paste token from laptop (see below) |
| Keep this “dropbox” remote? y/e/d> | y |
e/n/d/r/c/s/q> | q (Quit) |
For the highlighted config_token> step, run this on your laptop (install rclone first with brew install rclone if needed):
rclone authorize "dropbox"
A browser window opens — log in and authorise Dropbox. The browser shows “Success! All done. Please go back to rclone.” Rclone prints a long token like {"access_token":"..."} — copy the entire JSON and paste it at the config_token> prompt on the server.
Step 4 — Save settings in the plugin
Enter dropbox in the rclone remote name field and your destination folder (e.g. cloudscale-backups/), click Save Dropbox Settings, then Test Connection.
Running out of Dropbox space
Dropbox Basic provides 2 GB free. Backup zips for a typical WordPress site are 200 MB–2 GB, so you may fill Dropbox quickly unless you keep your retention count low or upgrade your Dropbox plan.
The plugin detects a Dropbox quota problem in two places:
- Before a manual backup — the cloud space pre-check warns you and offers a Free space on Dropbox button.
- Before a Copy Last Backup to Cloud sync — an inline warning appears on the card with Delete oldest and Sync anyway options.
The Delete oldest / Free space action removes the oldest non-golden backup from Dropbox one file at a time until the required space (plus a 15% buffer) is available. Golden images are never deleted. If all deletable backups have been removed and there is still not enough space, you will need to free up Dropbox quota manually, upgrade your plan, or switch to a higher-quota provider such as Google Drive or S3.
Note: when a Dropbox account is over quota, Dropbox returns an extremely large number as the “free space” field. The plugin works around this by computing free space as total quota − used quota to detect the over-quota state reliably.
Microsoft OneDrive
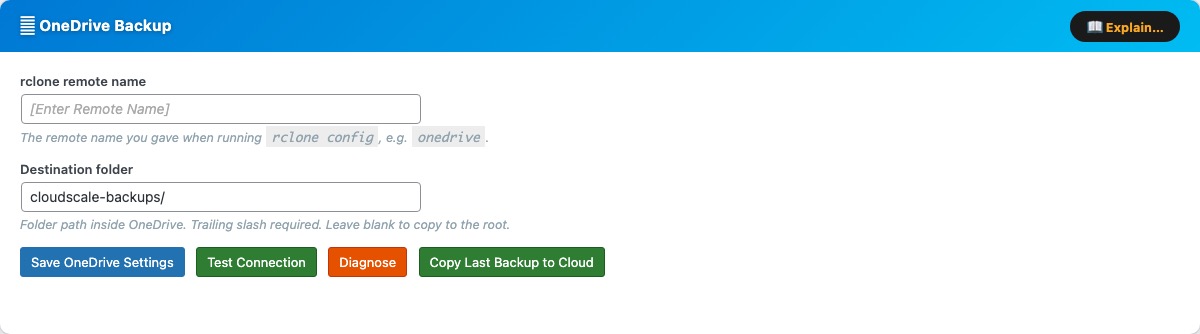
The Microsoft OneDrive Backup card uses rclone to copy backup zips to OneDrive after every local backup. If you already set up rclone for Google Drive or Dropbox, skip straight to Step 3 — you just need to add a new remote.
rclone remote name — the name you gave the remote during rclone config, e.g. onedrive.
Destination folder — path inside OneDrive where backups are copied. Trailing slash required (e.g. cloudscale-backups/). Leave blank for the OneDrive root.
Test Connection — verifies rclone can reach OneDrive with the configured remote.
Diagnose — shows rclone version, remote name, and troubleshooting tips.
Copy Last Backup to Cloud — immediately copies the most recent local backup zip to OneDrive, outside of any schedule. Before starting, the plugin checks how much free OneDrive space is available:
- If OneDrive has enough space, the sync starts immediately.
- If OneDrive is running low, an inline warning appears with Delete oldest and Sync anyway options.
When configured, the card shows the destination path, number of backups in OneDrive, and time of last sync.
OneDrive Setup Guide
Step 1 — Install rclone on the server (if not already installed)
curl -fsSL https://rclone.org/install.sh | sudo bash
Step 2 — Fix apache home directory permissions
sudo mkdir -p /usr/share/httpd/.config/rclone
sudo chown -R apache:apache /usr/share/httpd/.config
sudo chmod 700 /usr/share/httpd/.config/rclone
sudo chown apache:apache /usr/share/httpd
sudo chmod 755 /usr/share/httpd
Step 3 — Run the setup wizard as the apache user
sudo -u apache rclone config
Answer each prompt as follows:
| Prompt | Type |
|---|---|
e/n/d/r/c/s/q> | n (New remote) |
name> | onedrive |
Storage> | onedrive or the number for Microsoft OneDrive |
client_id> | Enter (leave blank) |
client_secret> | Enter (leave blank) |
region> | global (Microsoft Cloud Global) |
| Edit advanced config? | n |
| Use web browser / Use auto config? | n (no browser on server) |
config_token> | Paste token from laptop (see below) |
config_type> | onedrive (OneDrive Personal) or business |
| Select drive | 0 (your default drive) |
| Keep this “onedrive” remote? y/e/d> | y |
e/n/d/r/c/s/q> | q (Quit) |
For the highlighted config_token> step, run this on your laptop (install rclone first with brew install rclone if needed):
rclone authorize "onedrive"
A browser window opens — sign in to your Microsoft account and click Accept. The browser shows “Success! All done. Please go back to rclone.” Rclone prints a long token like {"access_token":"..."} — copy the entire JSON and paste it at the config_token> prompt on the server.
Step 4 — Save settings in the plugin
Enter onedrive in the rclone remote name field and your destination folder (e.g. cloudscale-backups/), click Save OneDrive Settings, then Test Connection.
Running out of OneDrive space
Microsoft 365 personal plans include 1–5 TB. Free Microsoft accounts include 5 GB. The plugin detects an OneDrive quota problem in two places:
- Before a manual backup — the cloud space pre-check warns you and offers a Free space on OneDrive button.
- Before a Copy Last Backup to Cloud sync — an inline warning appears on the card with Delete oldest and Sync anyway options.
The Delete oldest / Free space action removes the oldest non-golden backup from OneDrive one file at a time until the required space (plus a 15% buffer) is available. Golden images are never deleted automatically.
AWS S3

The AWS S3 Remote Backup card uses the AWS CLI to upload backup zips to an S3 bucket after every local backup. Requires the AWS CLI on the server and IAM credentials with s3:PutObject, s3:ListBucket, and s3:DeleteObject permissions on the target bucket.
S3 Bucket name — bucket name only, no s3:// prefix (e.g. my-wp-backups).
Key prefix (folder) — path prefix applied to all uploaded objects. Trailing slash required (e.g. backups/). Use / to store at the bucket root.
Test Connection — writes a small test file to the bucket and verifies it succeeds, confirming credentials and permissions are correct.
Diagnose — shows AWS CLI version, bucket, and last-sync details to help debug connection problems.
Copy Last Backup to Cloud — immediately copies the most recent local backup zip to S3, outside of any schedule. Does not create a new backup — it copies whatever zip is already on the server. S3 has no practical storage quota for most accounts, so no pre-flight space check is performed.
When configured, the card shows the full S3 destination path (s3://bucket/prefix/), number of objects in the bucket, and time of last upload. If an automatic sync fails, the plugin retries once after 5 minutes.
AWS CLI Setup Guide
Step 1 — Install the AWS CLI on the server
Amazon Linux 2023 / Amazon Linux 2:
sudo dnf install -y awscli
Ubuntu / Debian (ARM64):
curl "https://awscli.amazonaws.com/awscli-exe-linux-aarch64.zip" -o awscliv2.zip
unzip awscliv2.zip && sudo ./aws/install
Ubuntu / Debian (x86_64):
curl "https://awscli.amazonaws.com/awscli-exe-linux-x86_64.zip" -o awscliv2.zip
unzip awscliv2.zip && sudo ./aws/install
Verify: aws --version
Step 2 — Grant AWS credentials
Option A — IAM Instance Role (recommended — no keys on disk)
- AWS Console → IAM → Roles → Create role
- Trusted entity: AWS service → EC2 → Next
- Skip managed policies → Create role (e.g. name it
ec2-s3-backup) - Open the new role → Add permissions → Create inline policy → JSON tab → paste:
{
  "Version": "2012-10-17",
  "Statement": [{
    "Effect": "Allow",
    "Action": ["s3:PutObject","s3:ListBucket","s3:DeleteObject","s3:GetObject"],
    "Resource": [
      "arn:aws:s3:::YOUR-BUCKET-NAME",
      "arn:aws:s3:::YOUR-BUCKET-NAME/*"
    ]
  }]
} - Name the policy (e.g.
ec2-s3-backup-policy) → Create policy - EC2 Console → select your instance → Actions → Security → Modify IAM role → select the role → Update IAM role
- Verify (no keys needed):
aws sts get-caller-identity
Option B — IAM User with access keys
- AWS Console → IAM → Users → Create user (e.g.
cloudscale-s3) - Attach the same inline policy as Option A (scoped to your bucket)
- Open the user → Security credentials → Create access key → copy the Access Key ID and Secret Access Key
- SSH into the server and configure as the web server user:
sudo -u apache aws configure
# Enter when prompted:
AWS Access Key ID:     AKIA...
AWS Secret Access Key: your-secret-key
Default region name:   af-south-1
Default output format: json
Credentials are stored in /usr/share/httpd/.aws/credentials (apache) or /var/www/.aws/credentials (www-data). Verify with: sudo -u apache aws sts get-caller-identity
Step 3 — Save settings in the plugin
Enter your bucket name and prefix, click Save AWS S3 Settings, then Test Connection.
AWS EC2 AMI Snapshot
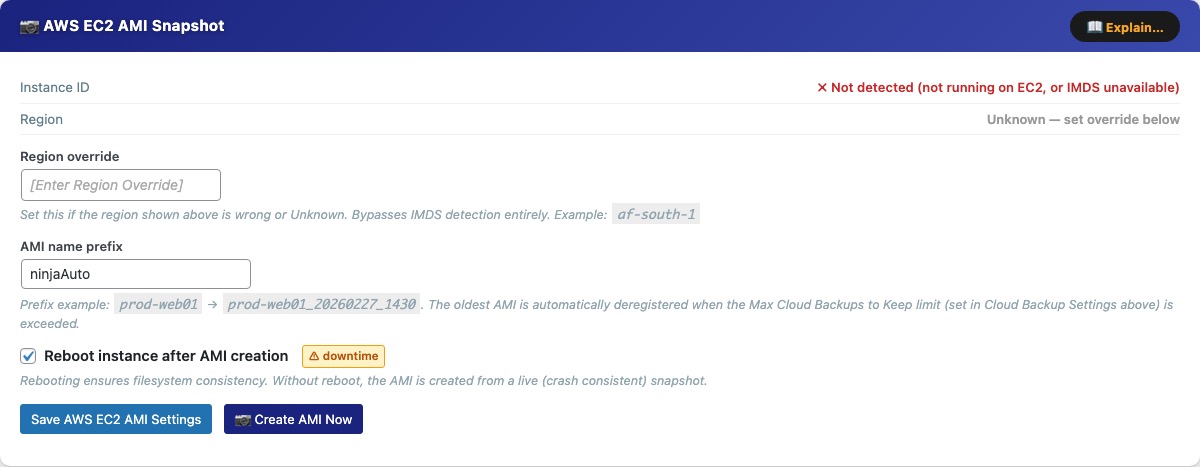
The AWS EC2 AMI Snapshot card creates an Amazon Machine Image of the EC2 instance your WordPress site runs on — a complete disk-level snapshot of the entire server including OS, web server config, PHP, and all files. Unlike a file backup, an AMI lets you recover an unbootable or completely broken server. Requires the AWS CLI with ec2:CreateImage, ec2:DescribeImages, ec2:DeregisterImage, and ec2:RebootInstances permissions.
Instance ID / Region — detected automatically via the EC2 Instance Metadata Service (IMDS). If not running on EC2, or if IMDS is unavailable, AMI creation is disabled.
Region override — set this if the auto-detected region is wrong or Unknown (e.g. af-south-1).
AMI name prefix — prepended to each AMI name (e.g. prod-web01 produces prod-web01_20260227_1430). The oldest non-golden AMI is deregistered automatically when Max Cloud Backups to Keep is exceeded.
Reboot instance after AMI creation — rebooting ensures filesystem consistency. Without reboot the AMI is crash-consistent (safe for most workloads). Marked with a downtime warning badge.
Create AMI Now — triggers an immediate AMI snapshot outside of any schedule. Status shows pending then available after 5–15 minutes. AMI state is polled automatically in the background — you do not need to keep the page open, but you can monitor progress in the Activity Log.
The AMI history table lists all tracked AMIs with name, tag, AMI ID, creation date, and state. Row actions:
- Refresh — queries AWS for the current state (useful for AMIs still in pending).
- Golden image (star) — permanently protects an AMI from automatic deletion. Does not count towards the retention limit. Up to 4 golden images per provider.
- Restore — available for available AMIs; replaces the root volume. All changes since the snapshot are permanently lost. The server reboots.
- Delete — deregisters the AMI from AWS and removes the record.
The Delete Soon badge appears on the oldest non-golden AMI when the retention limit is about to be exceeded — it will be deregistered automatically on the next cloud backup run.
AWS CLI Setup Guide
If you already configured the AWS CLI for S3, you can reuse it — just extend the IAM policy with the EC2 permissions below.
Step 1 — Install the AWS CLI on the server
Amazon Linux 2023 / Amazon Linux 2:
sudo dnf install -y awscli
Ubuntu / Debian (ARM64):
curl "https://awscli.amazonaws.com/awscli-exe-linux-aarch64.zip" -o awscliv2.zip
unzip awscliv2.zip && sudo ./aws/install
Ubuntu / Debian (x86_64):
curl "https://awscli.amazonaws.com/awscli-exe-linux-x86_64.zip" -o awscliv2.zip
unzip awscliv2.zip && sudo ./aws/install
Verify: aws --version
Step 2 — Grant AWS credentials
Option A — IAM Instance Role (recommended — no keys on disk)
- AWS Console → IAM → Roles → Create role
- Trusted entity: AWS service → EC2 → Next
- Skip managed policies → Create role (e.g. name it
ec2-ami-backup) - Open the new role → Add permissions → Create inline policy → JSON tab → paste:
{
  "Version": "2012-10-17",
  "Statement": [{
    "Effect": "Allow",
    "Action": [
      "ec2:CreateImage",
      "ec2:DescribeImages",
      "ec2:DeregisterImage",
      "ec2:CreateReplaceRootVolumeTask",
      "ec2:DescribeReplaceRootVolumeTasks",
      "ec2:RebootInstances"
    ],
    "Resource": "*"
  }]
} - Name the policy (e.g.
ec2-ami-backup-policy) → Create policy - EC2 Console → select your instance → Actions → Security → Modify IAM role → select the role → Update IAM role
- Verify:
aws sts get-caller-identity
Option B — IAM User with access keys
- AWS Console → IAM → Users → Create user (e.g.
cloudscale-ami) - Attach the same inline policy as Option A
- Open the user → Security credentials → Create access key → copy the Access Key ID and Secret Access Key (shown once only)
- SSH into the server and configure as the web server user:
sudo -u apache aws configure
# Enter when prompted:
AWS Access Key ID:     AKIA...
AWS Secret Access Key: your-secret-key
Default region name:   af-south-1
Default output format: json
Verify: sudo -u apache aws sts get-caller-identity
Step 3 — Configure this plugin
- Enter an AMI name prefix (e.g.
prod-web01) - If the detected region is wrong, enter it in Region override (e.g.
af-south-1) - Click Save AWS EC2 AMI Settings
- Click Create AMI Now to test — status shows pending then available after 5–15 minutes
Automatic Crash Recovery
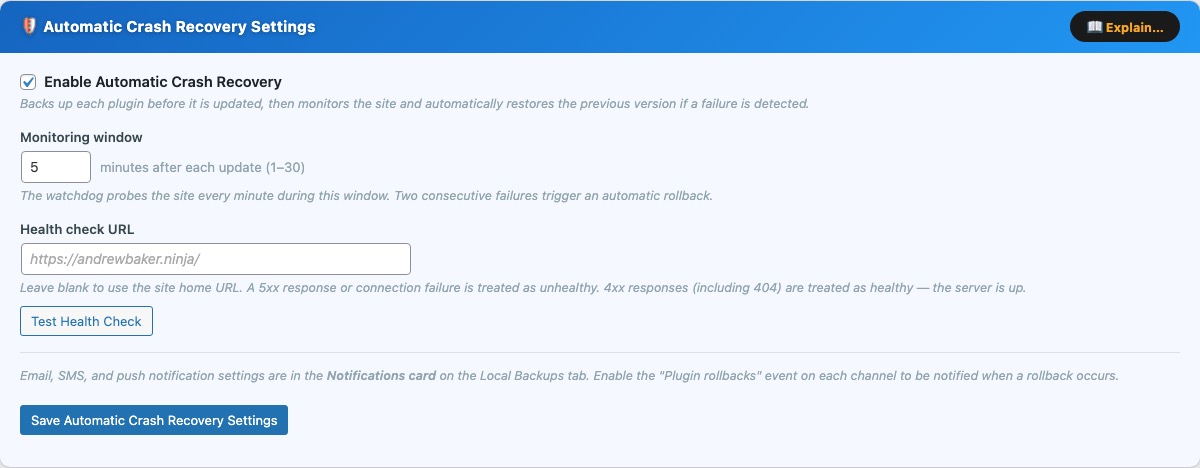
Automatic Crash Recovery automatically backs up each plugin directory before WordPress applies an update, then watches your site for failures. If something goes wrong, it rolls back to the previous version — with no manual intervention required.
How it works
- Pre-update backup — the moment WordPress begins updating a plugin, the current plugin directory is copied to a secure location on the server before any new files are placed.
- Monitoring window — after the update completes, a system-cron watchdog script probes the health check URL once per minute for the configured window (default 5 minutes).
- Automatic rollback — two consecutive probe failures (5xx error or connection timeout) trigger a rollback. The broken plugin directory is renamed and the backup is copied back. This happens entirely outside of WordPress, so it works even during a PHP fatal error.
- Notification — on the next WordPress page load after recovery, the rollback is recorded in the Rollback History card and an email is sent to the WordPress admin address. If Twilio SMS is configured, an SMS is sent as well.
- Branded recovery page — while the site is in a crash state, visitors see a branded “Automatic Crash Recovery is recovering this site” page with a live spinner instead of a white screen of death.
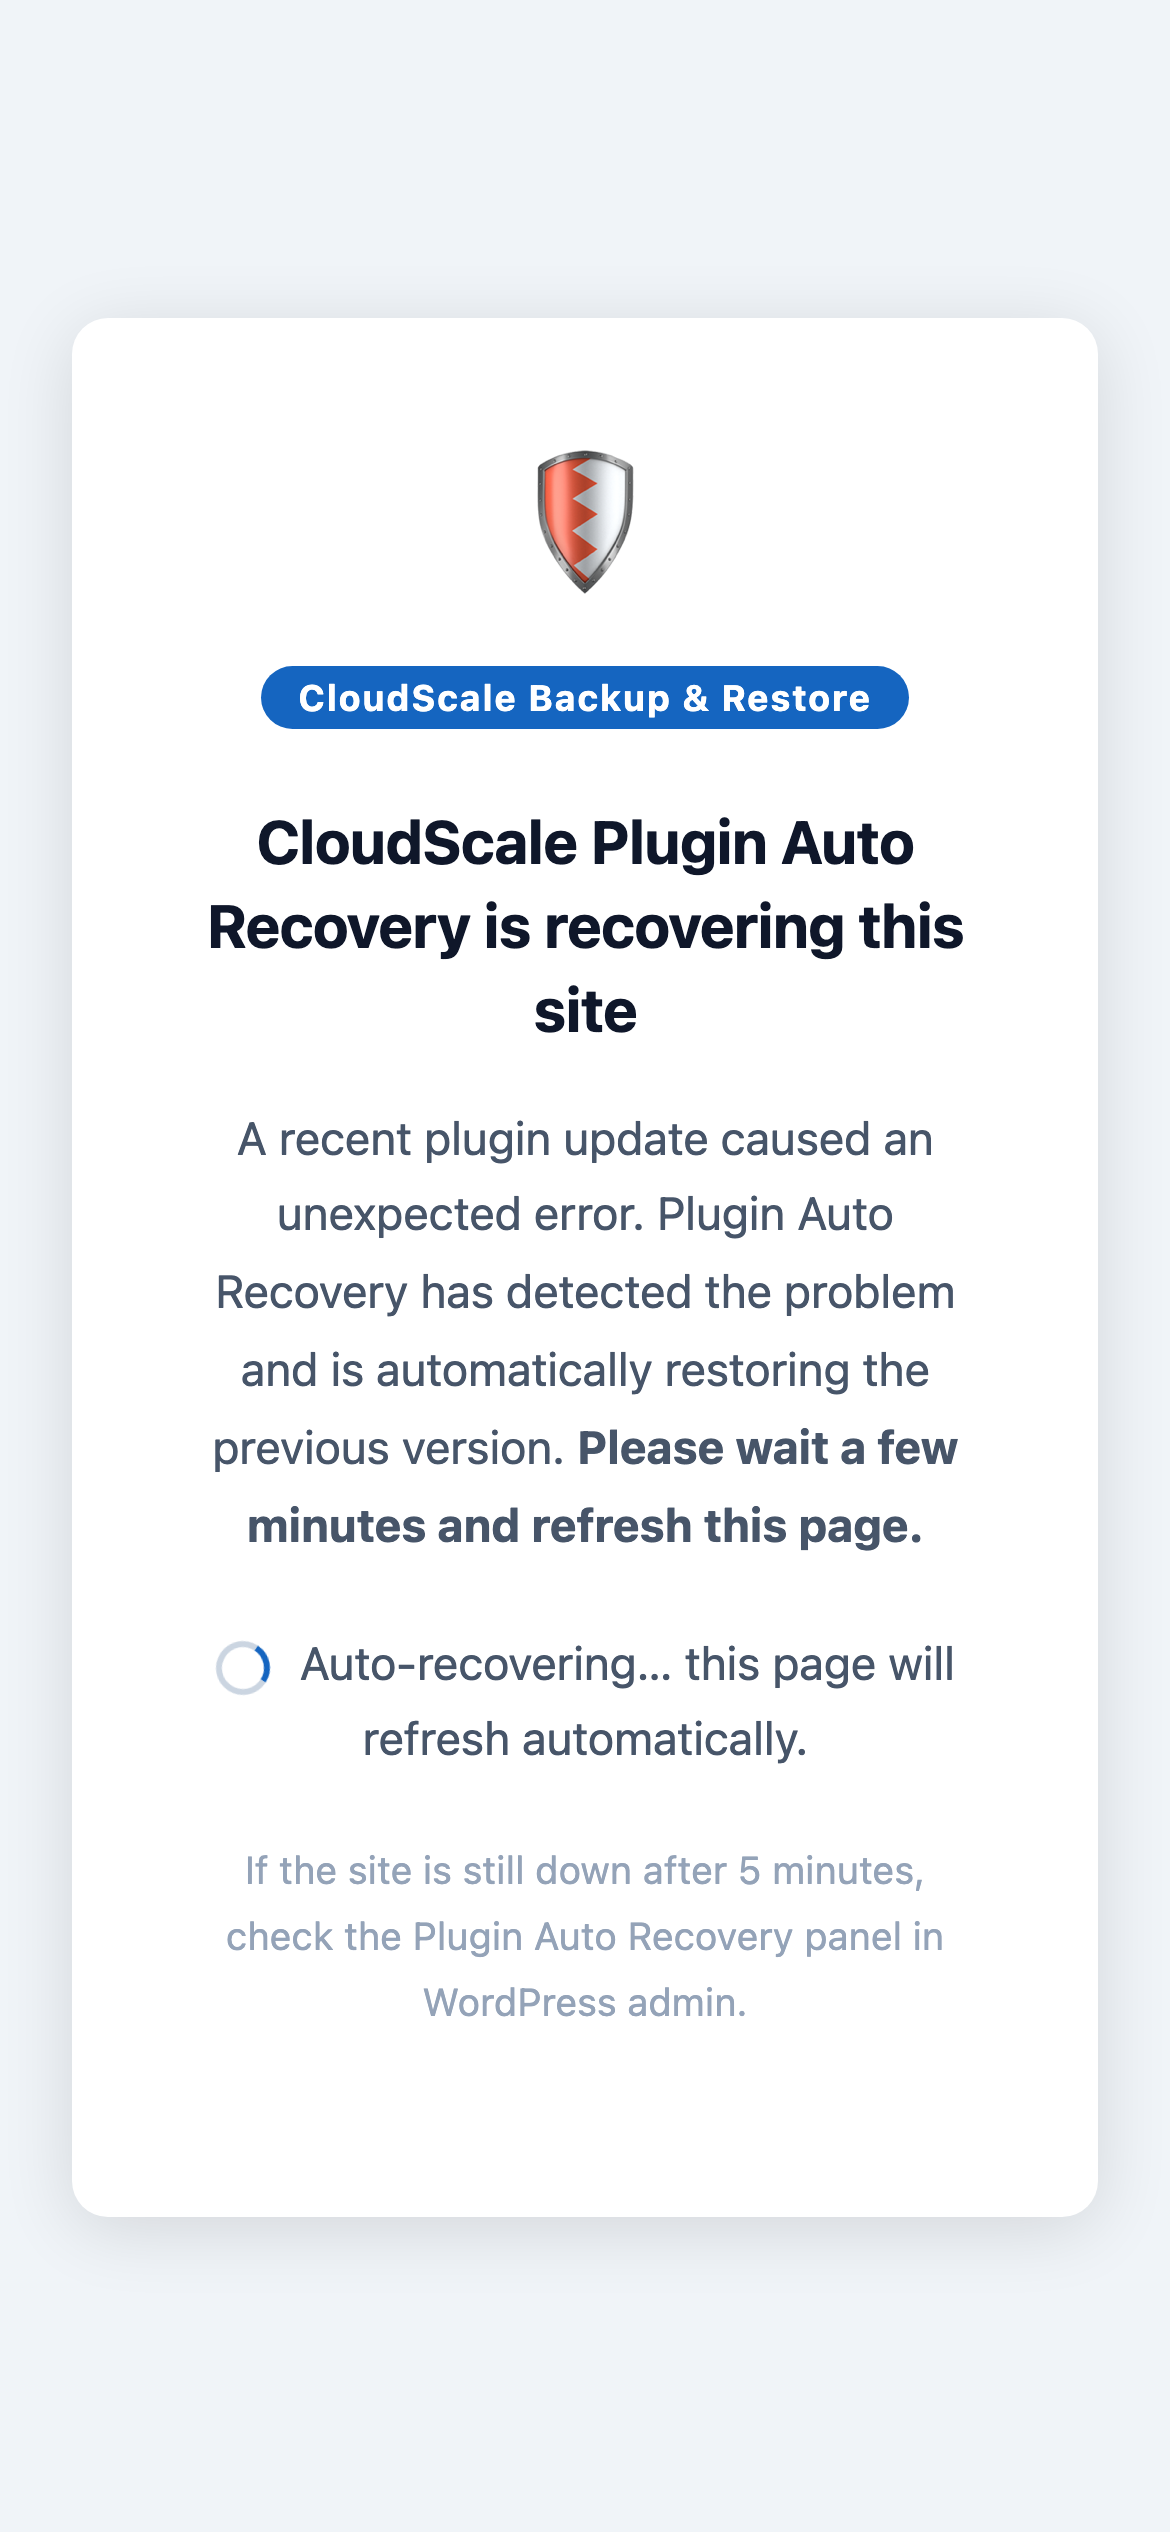
What visitors see while Automatic Crash Recovery is restoring the site — a branded page with a live spinner that auto-refreshes every 30 seconds.
Settings card
The blue Settings card contains all configuration for this feature. An Explain… button in the card header opens a full feature overview modal.
- Enable Automatic Crash Recovery — turn the feature on or off. When disabled, no backups are taken before updates and no monitoring occurs. Enabled by default.
- Monitoring window — how many minutes after an update the watchdog actively probes the site. Increase this for sites that take longer to stabilise after a plugin update (for example, sites that run cache warming or build steps). Maximum 30 minutes.
- Health check URL — the URL the watchdog fetches each minute to check site health. Leave blank to use the site home URL. A 5xx response or connection failure is treated as unhealthy; 4xx responses (including 404) are treated as healthy — the server is up even if the page is missing.
- Test Health Check — fetches the health URL immediately from the server and shows the HTTP status code. Use this to confirm the watchdog can reach your site before relying on it.
Watchdog Script card
The watchdog is a bash script that runs every minute via the server’s system cron (root’s crontab). It operates completely independently of WordPress and can detect and fix problems even when the entire site is returning errors. An Explain… button in the card header explains the setup in detail. The Watchdog status indicator turns green once the script has run in the last 90 seconds; amber means it has not run recently.
Step 1 — copy the script from the card using the Copy button.
Step 2 — paste it onto the server:
sudo tee /usr/local/bin/csbr-par-watchdog.sh <<'EOF'
(paste script here)
EOF
sudo chmod +x /usr/local/bin/csbr-par-watchdog.sh
Step 3 — add the cron line to root’s crontab:
sudo crontab -e
Paste this line and save:
* * * * * root /usr/local/bin/csbr-par-watchdog.sh >> /var/log/cloudscale-par.log 2>&1
Why system cron and not WP-Cron? If a plugin update causes a PHP fatal error, WordPress crashes completely — wp-cron.php never fires. A system cron job running every minute operates outside of WordPress entirely and can detect and recover from the problem before any visitor notices.
Active Monitors card
After each plugin update a monitor is created automatically. It appears in the Active Monitors table with a live countdown timer. The table auto-refreshes every 15 seconds while monitors are active, and you can reload it at any time with the Refresh button. An Explain… button describes what each column means.
- Plugin — the plugin being monitored.
- Version — the version before the update (left) and after (right). A rollback restores the “before” version.
- Time Remaining — countdown to when this monitor expires. A red fail badge shows consecutive probe failures detected so far — a second failure triggers a rollback.
- Roll Back Now — manually trigger an immediate rollback without waiting for the watchdog. Use this if you spot a problem before the watchdog does.
During a healthy update the monitor appears, counts down, then disappears automatically. No action is needed unless a problem is detected.
Rollback History card
Every automatic and manual rollback is recorded here. An Explain… button describes each column and what to do after a rollback.
- Plugin — the plugin that was rolled back.
- Versions — the failed version (left) and the version it was restored to (right).
- Rolled Back — date and time the rollback completed (UTC).
- Trigger — Watchdog / site failure (automatic) or Manual rollback (admin-initiated).
- Dismiss — removes the entry from this list. Does not undo the rollback or reactivate the updated version.
Each rollback also writes an entry to the Activity Log and sends a notification via whichever channels are enabled in the Notifications card.
Rollback notifications
Email, SMS (Twilio), and push (ntfy) alerts for plugin rollbacks are all configured in the Notifications card on the Local Backups tab. Each channel has a Plugin rollbacks checkbox — enable it on any channel you want to be alerted on when a rollback occurs. This means you can receive a rollback SMS without subscribing to backup success/failure SMS, or vice versa.
Cloud Backup History

The Cloud Backup History panel (teal, at the bottom of the Cloud Backups tab) gives you a unified view of all backups stored across your configured cloud providers. Use the View history for dropdown to switch between AWS S3, AWS EC2 AMI Snapshots, Google Drive, Dropbox, and Microsoft OneDrive.
Each provider’s history table queries the cloud service live when you click Refresh, so it reflects the true current state — including backups created outside of this plugin and files deleted directly in the cloud console.
Columns:
- File Name / AMI Name — the filename in S3, Google Drive, or Dropbox, or the AMI name for EC2 snapshots. The most recent entry is marked with a latest badge.
- Tag — an optional free-text label you can attach to any backup for identification (e.g. “pre-launch”, “client handover”). Click Edit to set or change the tag inline.
- Size — file size as reported by the cloud provider (S3, Drive, Dropbox) or N/A for AMI snapshots.
- Created — the date and time the backup was uploaded or the AMI was created.
Row actions:
- Golden image (star icon) — marks a backup as a golden image, protecting it permanently from automatic deletion by the Max Cloud Backups to Keep retention limit. Up to 4 golden images are tracked per provider. Golden rows are highlighted in yellow.
- Download — downloads the backup zip directly from S3, Google Drive, or Dropbox to your browser. Not available for AMI snapshots (use the AWS console to restore those).
- Delete — permanently deletes the file from the cloud provider. Cannot be undone.
The header bar shows a golden image counter (N / 4 golden) and the current non-golden count against your retention limit (N / max backups). The oldest non-golden backup is flagged with a Delete Soon badge when the retention limit is about to be exceeded — it will be removed automatically on the next cloud backup run.