CloudScale Free Analytics
CloudScale Free Analytics
Most WordPress analytics plugins miss 80–95% of your traffic when Cloudflare or a CDN is caching your pages. Google Analytics sends your visitor data to Google. Jetpack sends it to Automattic. CloudScale keeps every view count in your own database, counts every visit regardless of caching, and costs nothing. No subscriptions, no external services, no tracking pixels — your data stays on your server.
Statistics Dashboard
Why CloudScale Free Analytics?
If your site runs behind Cloudflare, WP Rocket, or any other caching layer, server-side analytics see only the 5–20% of requests that reach PHP. Your stats are lying to you — by a factor of 5 to 10.
CloudScale solves this with a JavaScript beacon that fires after the browser loads the page, regardless of where the HTML came from. The beacon POSTs to a REST endpoint that bypasses the CDN cache, so every real visit is counted. You finally see your actual traffic.
Unlike Google Analytics or Jetpack, your visitor data never leaves your server. No third-party scripts, no tracking pixels, no GDPR headaches from external data processors. IP addresses are hashed before storage — the raw IP is never written to the database.
It is completely free. No premium tier. No per-site fees. Install it, add one Cloudflare Cache Rule, and your stats are accurate from the first pageview.
The Statistics Dashboard shows page view data stored directly in your WordPress database across five custom tables (wp_cspv_views_v2, wp_cspv_referrers_v2, wp_cspv_geo_v2, wp_cspv_visitors_v2, wp_cspv_404_v2). No data is ever sent to Google, Facebook, or any external service.
How tracking works: A lightweight beacon.js script fires a POST request to the WordPress REST API endpoint /wp-json/cloudscale-wordpress-free-analytics/v1/record/{post_id} after the page has fully loaded. Because this is a fresh HTTP request — not served from cache — it reaches WordPress even when Cloudflare or another CDN is serving the cached HTML page. This is why beacon-based tracking counts every real visit, whereas server-side counters miss 80–95% of views on cached sites.
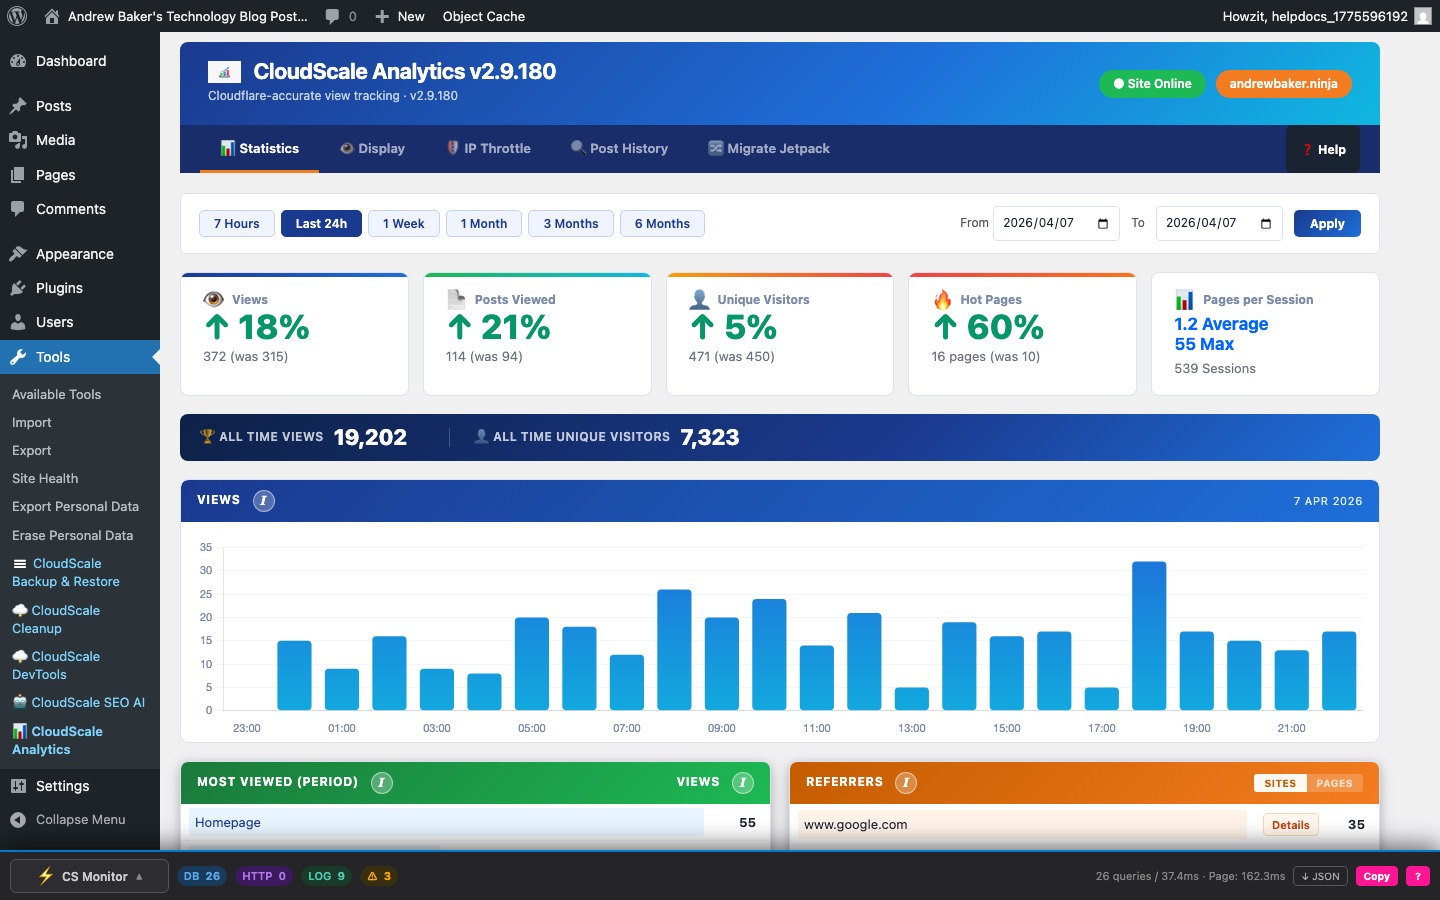
Views, Top Posts & Referrers
- Period selector — switch between Today, 7 days, 30 days, 90 days, and All time. Each period queries the
wp_cspv_views_v2table directly; no aggregation tables are needed. - Totals bar — Total Views, Unique Posts Viewed, and Lifetime totals pulled in a single indexed query on
viewed_at. - Views chart — daily bar chart. Gaps indicate days with zero traffic (not missing data).
- Most Viewed (Period) — top posts ranked by view count for the selected period, with direct edit links.
- Referrers — parsed from the
document.referrervalue sent by the beacon; stored inwp_cspv_referrers_v2. Toggle between Sites (referrer domain) and Pages (full referring URL). Direct traffic (no referrer) appears as “Direct”.
All Time Top Posts
A separate ranked table showing lifetime view counts across all time — independent of the period selector. Includes imported Jetpack view counts blended with live beacon data if you migrated from Jetpack Stats. Useful for identifying your most valuable evergreen content.
Cloudflare Cache Bypass
An interactive test panel that verifies your Cloudflare Cache Rule is correctly configured to bypass caching for the beacon REST endpoint. Without this rule, Cloudflare caches the REST responses and beacon POSTs fail silently — your view counts appear to record but nothing is actually written.
Required Cache Rule: In your Cloudflare dashboard → Caching → Cache Rules → create a rule: URI Path contains /wp-json/cloudscale-wordpress-free-analytics/ → Cache Status: Bypass.
Click Test Cache Bypass to send a probe request through the beacon endpoint and check whether the response has the expected headers. A green status badge confirms Cloudflare is bypassing the cache correctly; a red badge means the rule is missing or misconfigured.
404 Error Log
Tracks every 404 (page not found) response served by your site and logs the requested URL, referrer, and timestamp. Stored in wp_cspv_404_v2. Useful for finding broken links from external sites, detecting content that has moved without a redirect, and identifying crawler probing paths.
The log shows the most recent 404 events with the requested path and the source (referrer or direct). Use this to set up 301 redirects for your most-hit missing pages before they cost you rankings or visitor trust.
Privacy: visitor IP addresses are hashed with SHA-256 combined with your site’s wp_salt before storage — the raw IP is never written to the database. The hash is used only for deduplication and throttle checks.
Geography
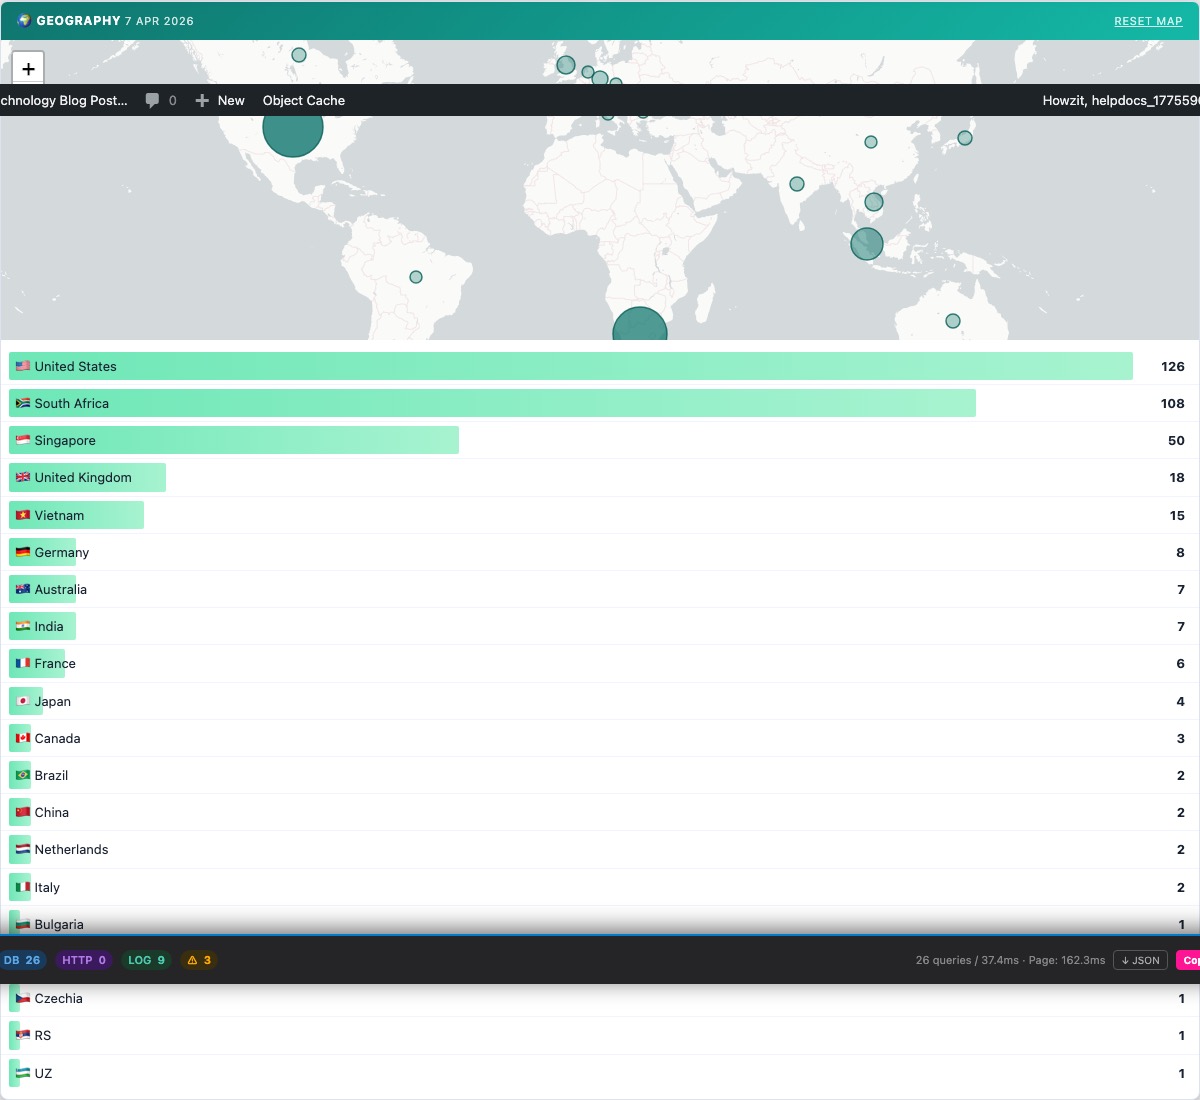
An interactive world map showing where your visitors come from, powered by data stored in wp_cspv_geo_v2. Country-level tracking is built into the beacon — no third-party geolocation service is used.
- World map — bubble markers sized by relative visit volume. Click any country bubble to drill down to a city-level breakdown for that country.
- Country list — ranked list of countries with visit counts for the selected period, shown below the map.
- Reset Map — clears any active country drill-down and returns to the full world view.
The geography date range matches your currently selected period (Today, 7 days, 30 days, etc.). Country data is captured via the Cloudflare CF-IPCountry header when available; otherwise the plugin uses the DB-IP Lite database or falls back to the site’s configured geo source. Configure this in the Display Settings tab under Geography Source.
Display Settings
The Display Settings tab controls how view counts appear on your site, configures the sidebar widgets, and provides data management tools.
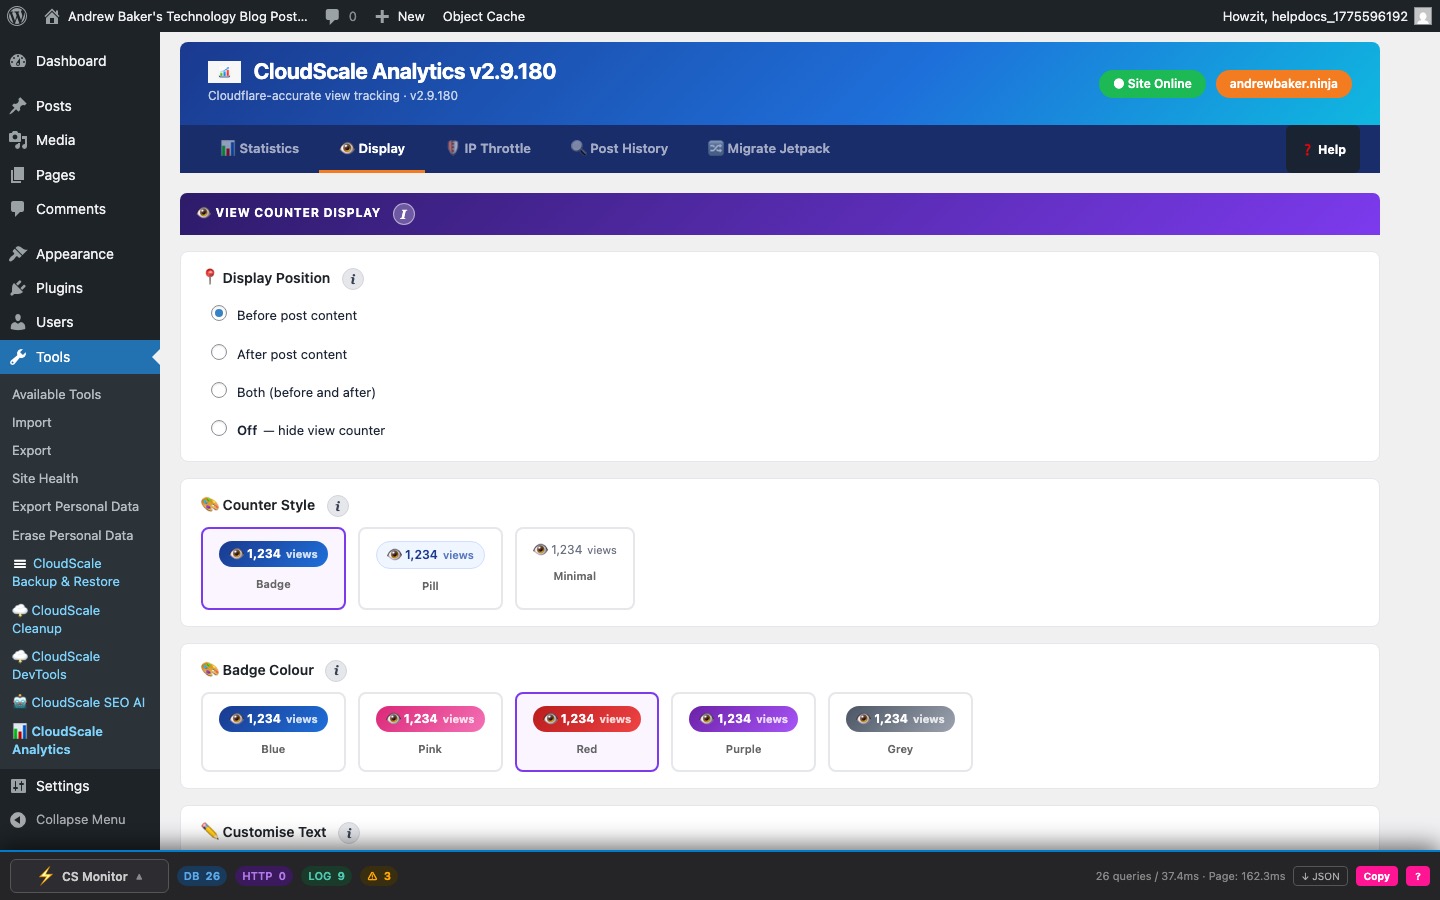
View Counter Display
- Display position — before post content, after post content, both, or off. The count is read from the
_cspv_view_countpost meta key, which is synced fromwp_cspv_views_v2on each beacon hit. - Counter style — choose between Badge (coloured pill with gradient), Pill (outlined), or Minimal (plain text). Five colour options: blue, pink, red, purple, grey.
- Exclude post types — comma-separated list of post types to skip tracking (e.g.
productfor WooCommerce). Excluded types do not fire the beacon and are not counted in the dashboard.
Widgets
- Top Posts widget — register via Appearance → Widgets or the block widget editor. Queries
wp_cspv_views_v2for a configurable view window (default: all time). Settings: total posts to pool (default 10), posts per page, thumbnail width, and sort order (most viewed or most recent). - Recent Posts widget — shows the most recently published posts with view counts. Configurable post count and optional publication date display.
Data Management
The Purge Visitor Hashes tool removes historical unique visitor tracking data from the wp_cspv_visitors_v2 table older than a selected threshold (30, 60, 90, 180 days, 1 year, or all data). The table records hashed IP addresses for deduplication and throttle checks — it grows indefinitely unless periodically purged.
Purging old visitor hashes frees database storage but removes the ability to deduplicate views from that period retroactively. View counts already recorded in wp_cspv_views_v2 are not affected — only the visitor hash records used for future deduplication are removed. The panel shows the current row count and date range before you purge.
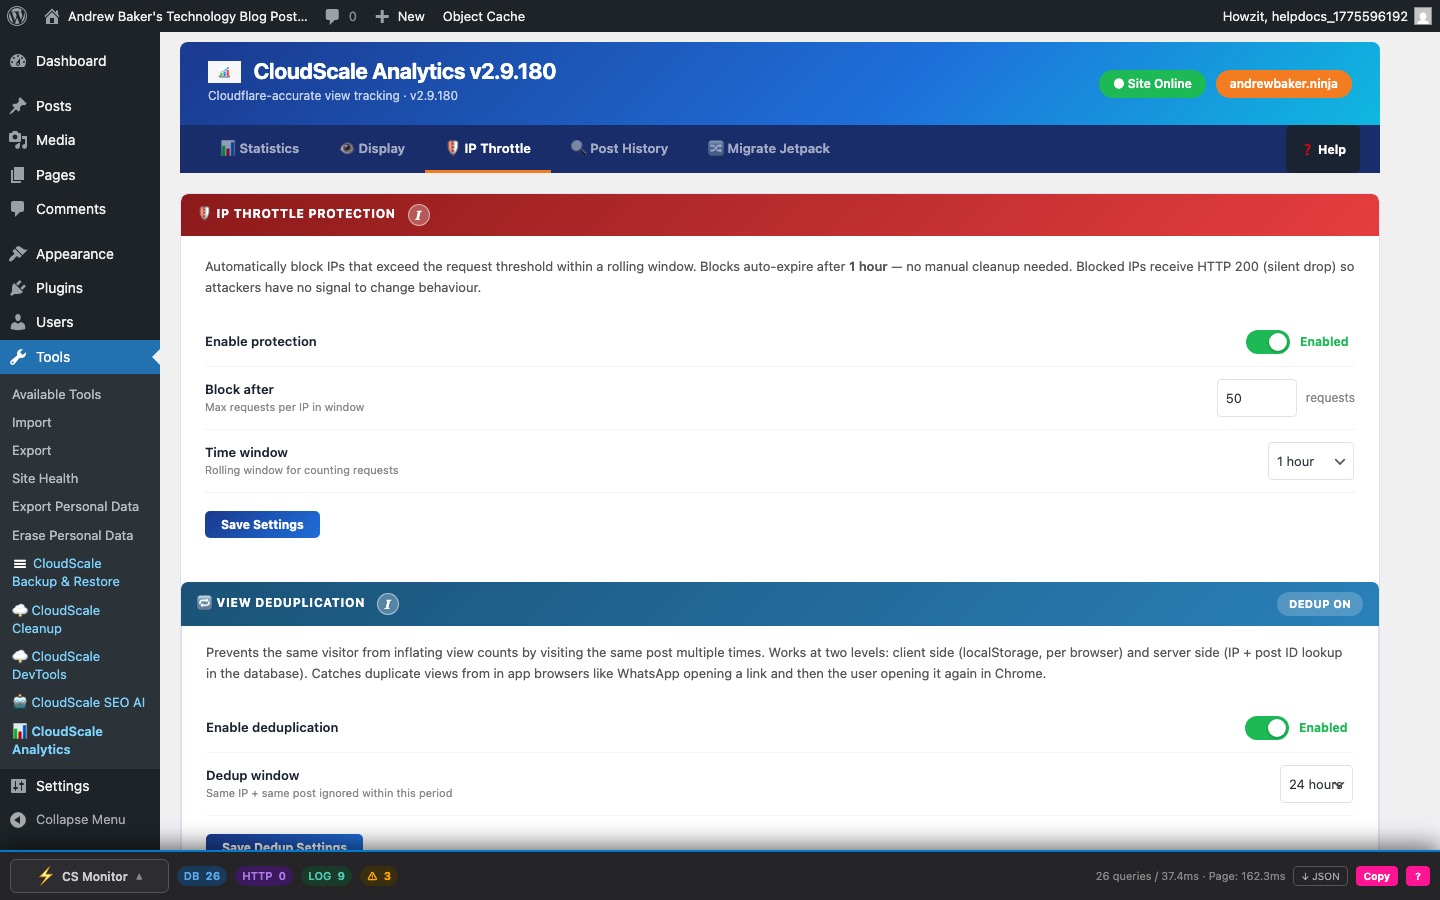
IP Throttle
The IP Throttle tab has four panels that work together to prevent inflated statistics from bots, repeat loads, and your own browsing.
IP Throttle Protection
Automatically blocks IP addresses that send an excessive number of beacon requests within a rolling time window — typically aggressive scrapers, bots, or misconfigured load tests. Blocked IPs receive an HTTP 200 response (silent drop) so attackers have no signal to change behaviour. Blocks auto-expire after 1 hour.
- Enable protection — toggle to activate automatic IP blocking.
- Block after — maximum number of requests per IP within the time window before the IP is blocked. Default: configurable.
- Time window — the rolling window for counting requests: 10 minutes, 30 minutes, 1 hour, 2 hours, or 24 hours.
- Exclude logged-in users — prevents any authenticated WordPress session from being counted. Detected via the
logged_in_{hash}cookie in the beacon. - Exclude administrators — more granular: only users with the
administratorrole are excluded. Editors, Authors, and Contributors are still counted.
View Deduplication
Prevents the same visitor from inflating view counts by visiting the same post multiple times within a configurable window. Works at two levels simultaneously:
- Client-side (localStorage) — the beacon records a key in
localStorageper post on first fire. Subsequent visits to the same post from the same browser do not fire the beacon again within the window. Catches duplicate views from in-app browsers (e.g. WhatsApp opening a link, then the user opening it again in Chrome). - Server-side (IP + post ID lookup) — the REST endpoint checks
wp_cspv_views_v2for a recent row matching the same hashed IP andpost_idwithin the dedup window. This catches duplicates from clients that clear localStorage or use private browsing.
Configure the dedup window (1 hour to 48 hours). Setting it shorter counts repeat visits within a day; longer prevents the same reader from contributing more than once per session period.
Blocked IPs
Shows all IPs currently blocked by the throttle system. IPs are stored as one-way SHA-256 hashes — they cannot be reversed to a real IP address. Each entry shows the block timestamp and time remaining until auto-expiry.
- Unblock — removes a specific IP hash from the blocklist immediately, before the auto-expiry timer.
- Clear All — removes all blocked IPs at once. Use after a false-positive event (e.g. a load test triggered the throttle).
Page Tracking
An emergency kill switch that instantly stops all view tracking across the entire site. When paused, the tracking beacon script is not loaded on any page and the REST recording endpoint silently rejects all requests. Historical data is fully preserved.
Use this during content imports, database migrations, load tests, or any period when you do not want views recorded. The status badge on the panel header shows TRACKING ACTIVE (green) or TRACKING PAUSED (red) at a glance. Toggle it off to resume normal tracking immediately.
Post History
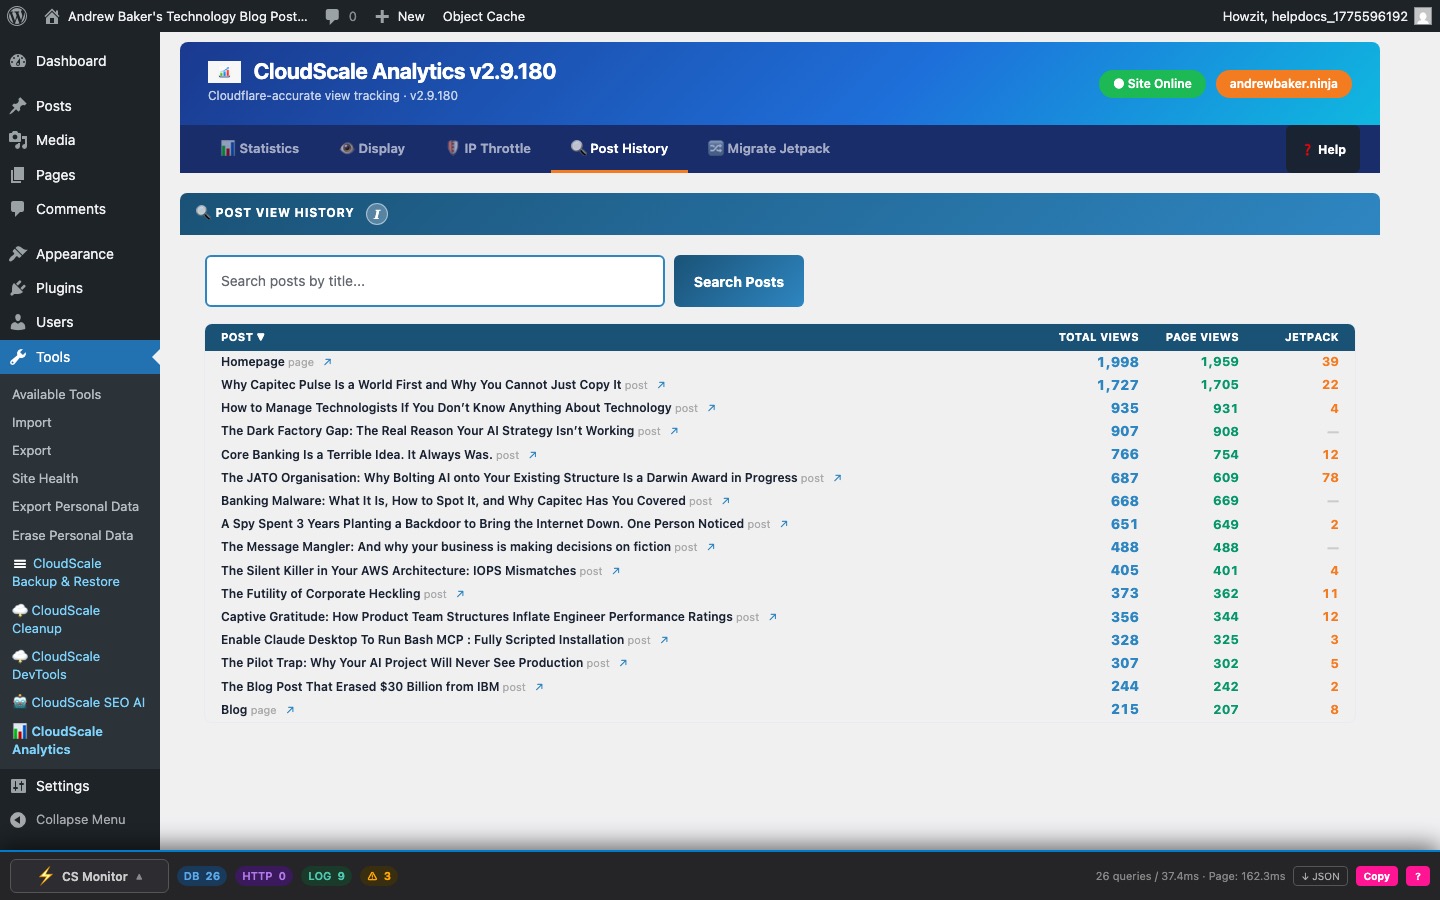
The Post History tab provides a full day-by-day breakdown of views for any individual post or page — useful for diagnosing traffic spikes, measuring the impact of promotions, and spotting seasonal patterns.
- Post search — autocomplete dropdown queries
wp_postsby title. Supports pages, custom post types, and any post type that has tracking enabled. - View timeline — bar chart showing daily view volume from the post’s first recorded view to the current date. Built from a
GROUP BY DATE(viewed_at)query onwp_cspv_views_v2filtered to the selectedpost_id. Days with zero views are filled in programmatically so the chart has no gaps. - Total views — lifetime count for that post. This is the same value stored in the
_cspv_view_countpost meta key, which you can query directly:get_post_meta($post_id, '_cspv_view_count', true). - Trending indicator — compares the last 7 days of views against the 28-day average daily rate for that post. Green arrow = accelerating; red arrow = decelerating. Posts with fewer than 7 days of data show “Insufficient history”.
- Jetpack migration — if you migrated from Jetpack Stats, the lifetime view count imported during migration is stored as a base offset and blended with live beacon data. The Post History chart shows both the imported baseline and new beacon views combined.
Migrate Jetpack Stats
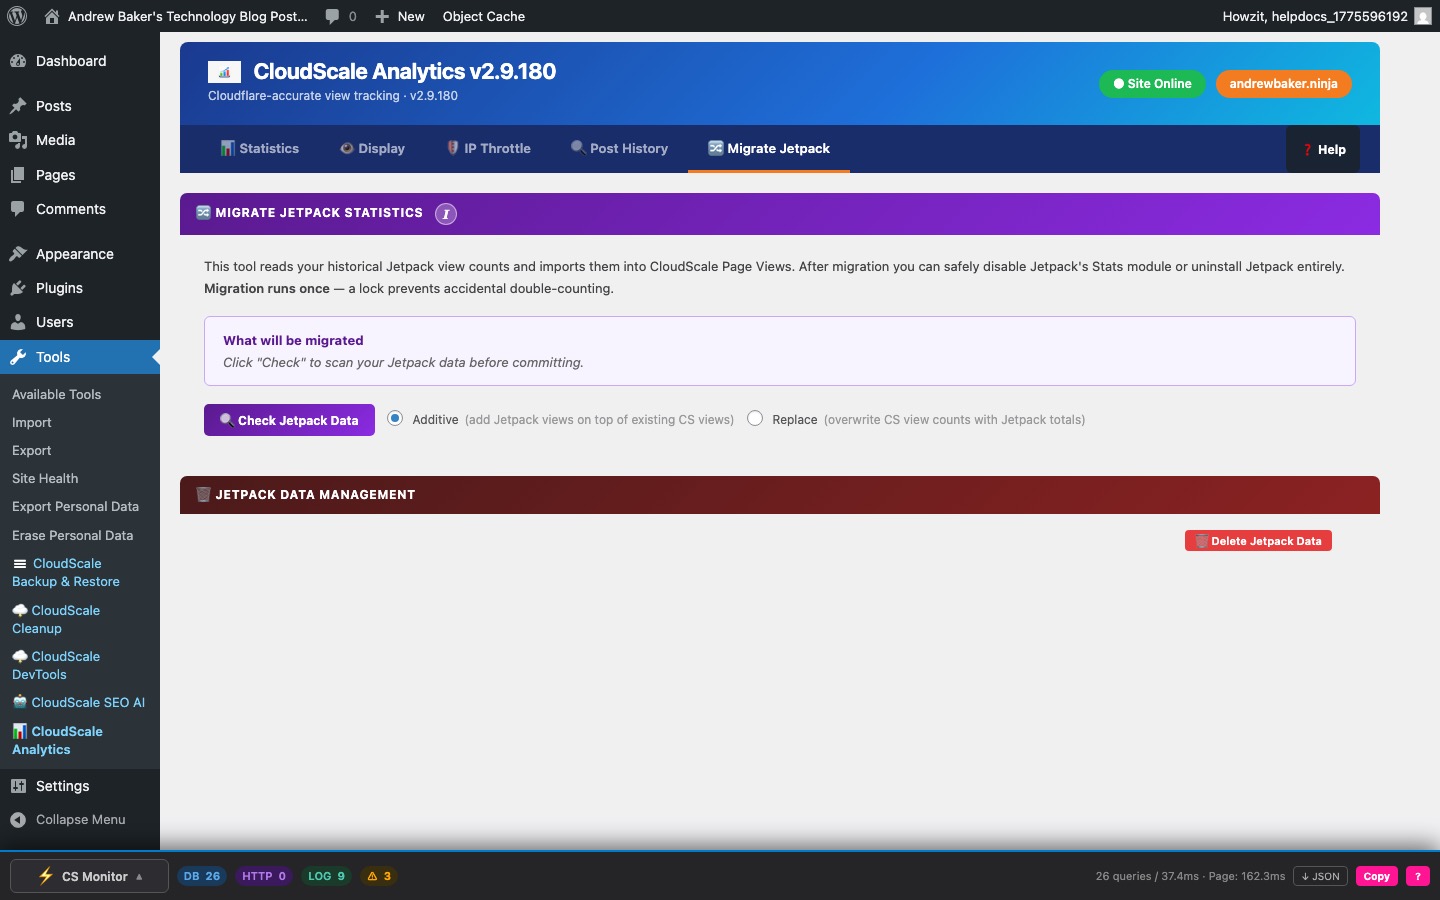
The Migrate Jetpack Stats tab imports your historical Jetpack view counts into CloudScale Analytics so you don’t lose years of traffic data when switching away from Jetpack. After migration you can safely disable the Jetpack Stats module or uninstall Jetpack entirely.
Migration runs once — a lock prevents accidental double-counting. If you have already migrated and need to re-run (e.g. after importing additional Jetpack export data), click Reset Lock first.
Workflow
- Check Jetpack Data — scans your database for Jetpack view counts and shows a pre-flight summary: how many posts have Jetpack stats and how many views will be imported. No data is written at this stage.
- Choose import mode:
- Additive (default) — Jetpack view counts are added on top of any existing CloudScale counts for each post. Use this if CloudScale has been running alongside Jetpack and you want to combine the two histories.
- Replace — CloudScale view counts are overwritten with the Jetpack totals. Use this if CloudScale was just installed and has no meaningful data yet.
- Run Migration — imports all found view counts. The result shows total posts migrated, views imported, and posts skipped. A migration history log is saved and displayed below the panel.
Manual CSV Import
If Jetpack stored your stats on WordPress.com (cloud-only mode) rather than locally, the automatic check will find no data. In this case use the CSV import: log in to WordPress.com, go to your site’s Stats, scroll to the bottom, and export a CSV. Paste post slug or ID and view count pairs (one per line, comma-separated) into the text area and click Import CSV Data.
Jetpack Data Management
Delete Jetpack Data — permanently removes the Jetpack stats tables and option rows from your database once you have confirmed the migration was successful and you no longer need the original data. This is irreversible.