Written by Andrew Baker | February 2026
I spent years working across major financial institutions watching vendors charge eye-watering licence fees for tools that were, frankly, not that impressive. That instinct never left me. So when I wanted serious SEO for my personal tech blog, I built my own WordPress plugin instead of paying $99/month for the privilege of checkbox features.
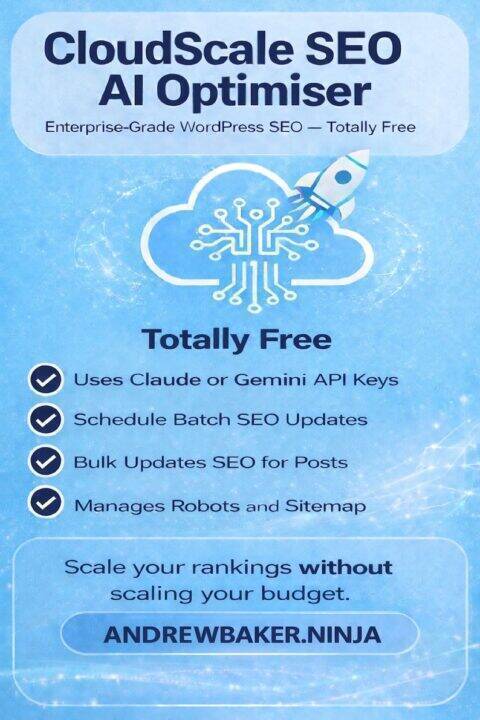
The result is CloudScale SEO AI Optimiser, a full featured WordPress SEO plugin with Claude AI powered meta description generation. You download it once, install it for free, and the only thing you ever pay for is the Claude API tokens you actually use. No subscription. No monthly fee. No vendor lock-in.
Here’s what it does, how to get it, and how to set it up in under ten minutes.
Github Repo:
https://github.com/andrewbakercloudscale/wordpress-seo-ai-optimizer
How does it rank vs other SEOs: https://andrewbaker.ninja/2026/03/08/next-generation-ai-seo-for-wordpress-just-launched-and-its-totally-free/
1. What Does It Do?
The plugin covers the full SEO stack that a serious WordPress site needs:
Structured Data and OpenGraph. Every post gets properly formed JSON-LD schema markup: BlogPosting, Person, and WebSite schema so Google understands who you are and what you write. OpenGraph and Twitter Card tags mean your posts look great when shared on LinkedIn, X, or WhatsApp.
Sitemap. A dynamic /sitemap.xml generated fresh on every request. Publish a post and it appears in your sitemap immediately. No caching, no stale data, no plugins fighting over file writes. Submit the URL to Google Search Console once and you’re done.
Robots.txt. Full control over your robots.txt directly from the dashboard. Block AI training bots if you want, or leave them open if you want your content distributed through AI assistants (I leave mine open). Handles subdirectory WordPress installs and detects physical robots.txt files that would override your settings.
AI Meta Descriptions. This is the part that separates it from every free SEO plugin. Claude AI reads each post and writes a proper meta description, not a truncated excerpt, but a real 140–160 character summary written for humans. You can generate all missing descriptions in one batch, fix descriptions that are too long or too short, or set up a scheduled nightly run so new posts are always covered automatically.
noindex Controls. One click noindex for search result pages, 404s, attachment pages, author archives, and tag archives. All the things that waste Google’s crawl budget and dilute your rankings.
2. The Cost Model: Why This Is Different
Every major SEO plugin follows the same commercial model: free tier that does almost nothing, then $99–$199/year to unlock the features you actually want.
This plugin flips that entirely. The plugin itself is free and open. The only cost is Claude API or Google Gemini tokens when you run AI generation, and the numbers are tiny.
Claude Haiku (the model I recommend for bulk generation) costs roughly $0.001–$0.003 per post. If you have 200 posts and want AI generated descriptions for all of them, you’re looking at around $0.20–$0.60 total. A one time charge. After that, you only pay when new posts need descriptions, a few tenths of a cent each time.
Compare that to $99/year for a premium SEO plugin and the maths are not close.
3. Download and Install
Step 1: Download the plugin
Download the zip file directly:
👉 cloudscale-seo-ai-optimizer.zip
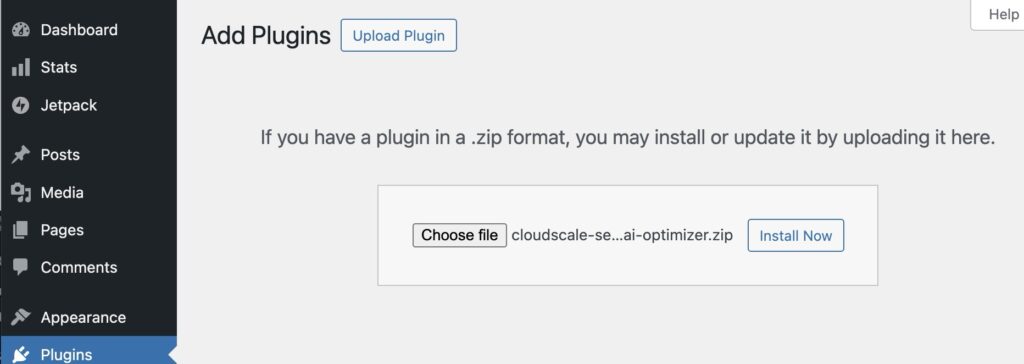
Step 2: Install in WordPress
Go to your WordPress admin: Plugins → Add New Plugin → Upload Plugin, choose the zip file you just downloaded, then click Install Now and Activate Plugin.

Once selected click “Install Now”:
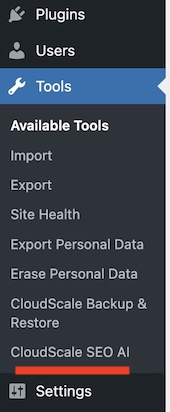
The plugin appears in your admin sidebar under Tools → CloudScale SEO AI.
4. Get Your Anthropic API Key
The AI features require an Anthropic API key. Getting one takes about two minutes.
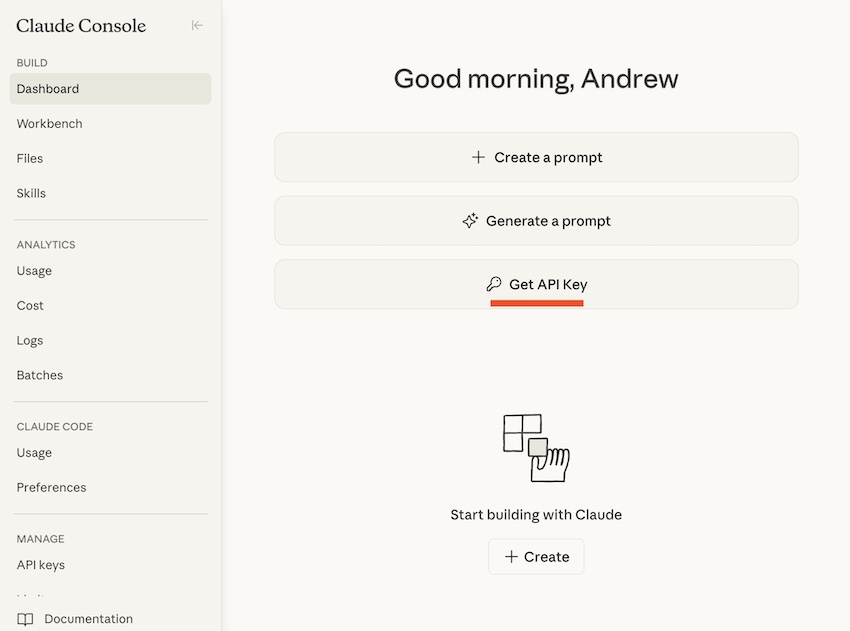
Step 1 Go to console.anthropic.com and create an account. You’ll need to add a credit card, but Anthropic gives you a small credit to start with.
Step 2 Once logged in, go to Settings → API Keys and click Create Key. Give it a name like “WordPress Blog” so you can identify it later. Below is the first sceen you will likely see after signing in:
Then you will see this page:
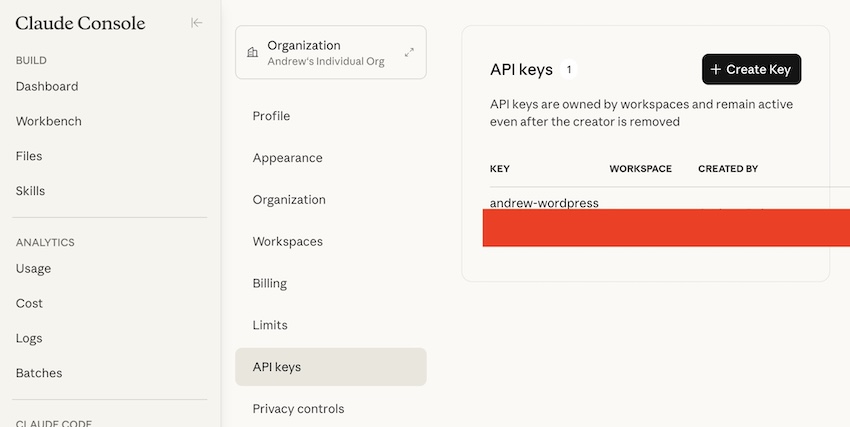
Step 3 Copy the key. It looks like sk-ant-api03-... and you only see it once, so copy it now. Note: Once you have. copied the API key you can test it by clicking “Test Key”.
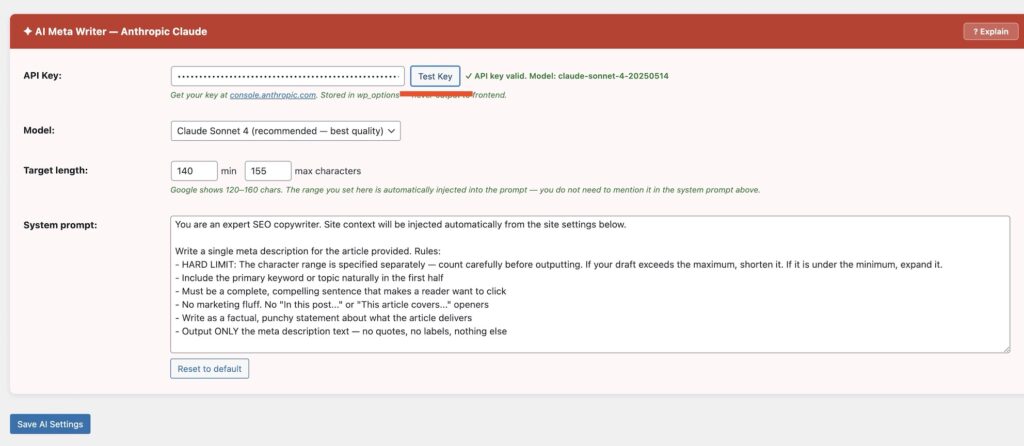
Step 4 Back in WordPress, go to Tools → CloudScale SEO AI → Optimise SEO tab. In the AI Meta Writer card, paste your key into the API Key field and click Test Key to confirm it works. Then click Save AI Settings.
That’s it. The plugin never sends your key to any third party. It calls the Anthropic API directly from your server.
4.1 Gemini Key
Note: I dont currently have a Google Gemini account, so I have just added their link here for you to follow: https://ai.google.dev/gemini-api/docs/api-key
5. Initial Setup
With the plugin installed and your API key saved, work through these settings:
Site Identity. Fill in your site name, home title, and home description. These feed into your JSON-LD schema and OpenGraph tags. Your home description should be 140–155 characters, your homepage elevator pitch.
Person Schema. Add your name, job title, profile URL, and a link to your headshot. Add your social profiles (LinkedIn, GitHub, etc.) one per line in the SameAs field. This is what Google uses to build your author entity and connect your content to you as a person.
Features and Robots. Click the ? Explain button in the card header for a full plain English guide to every option with recommendations. For most personal tech blogs, you want OpenGraph, all three JSON-LD schemas, the sitemap enabled, and noindex on search results, 404s, attachment pages, author archives, and tag archives.
Sitemap Settings. Enable the sitemap and include Posts and Pages. Submit https://yoursite.com/sitemap.xml to Google Search Console.
Robots.txt. Review the default rules and adjust if needed. The sitemap URL is appended automatically when the sitemap is enabled.
6. Generate Your Meta Descriptions
Once your API key is saved, go to the Optimise SEO tab and scroll to the Update Posts with AI Descriptions card. The click “Load Posts”:

You’ll see a count of your total posts, how many have descriptions, and how many are still unprocessed. Click Generate Missing to kick off a batch run. The plugin processes posts one at a time, logging each one in the terminal style display as it goes. For a site with 150–200 posts, expect it to take a few minutes.
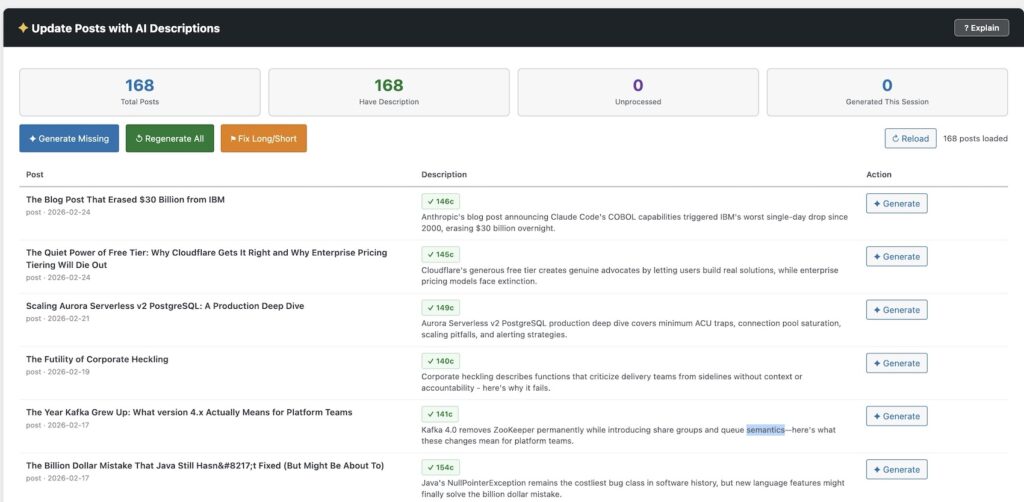
After the run completes, any descriptions that came out too long or too short can be cleaned up with Fix Long/Short. And if you want everything rewritten from scratch, say you’ve updated your prompt, Regenerate All will do a full pass.
For ongoing use, set up a scheduled batch in the Scheduled Batch tab. Pick which days you want it to run and the plugin will automatically process any new posts overnight. New content never goes unprocessed.
7. Performance Tab: Core Web Vitals Optimisation
The Performance tab tackles the speed problems that cost you search rankings. Google’s Core Web Vitals measure how fast your page loads and how stable it feels while loading. Three features here directly improve those scores.
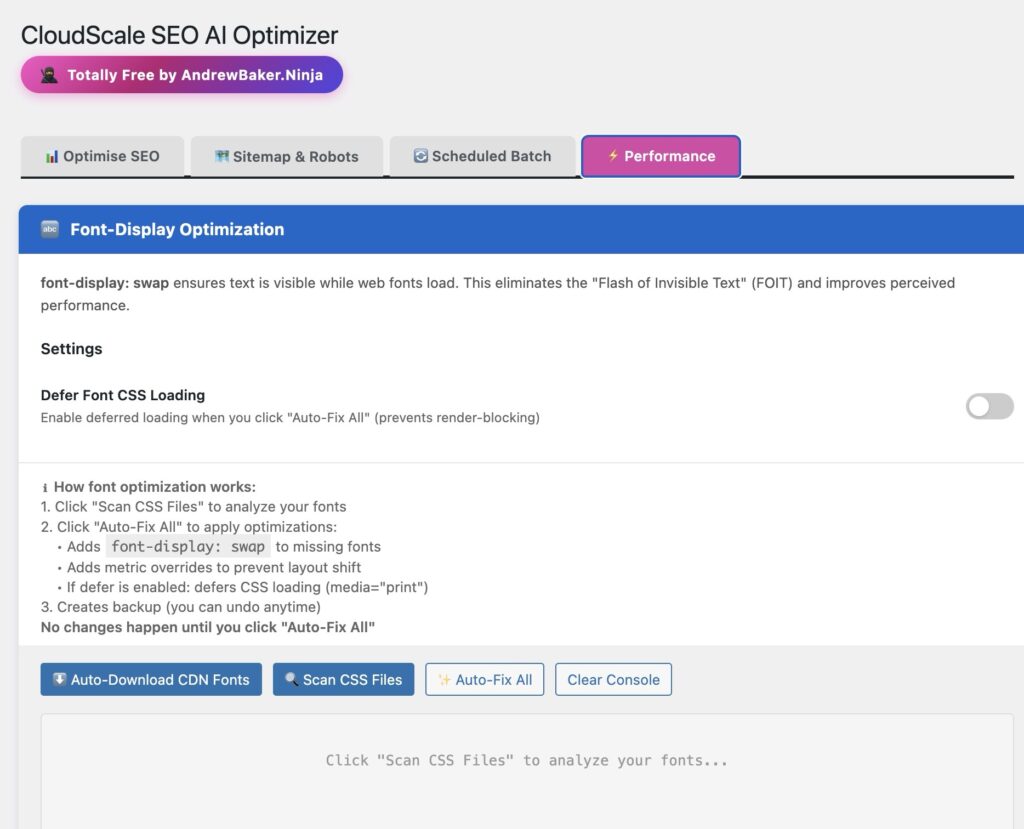
Font Display Optimisation. Fonts are one of the biggest culprits for slow Largest Contentful Paint (LCP) scores. By default, browsers wait for custom fonts to download before showing any text. Your visitors stare at blank space while font files crawl across the network.
The fix is font-display: swap. This tells the browser to show text immediately using a fallback font, then swap in the custom font once it arrives. The plugin scans all your theme and plugin stylesheets for @font-face rules missing this property.
Click Scan Font Files to see which stylesheets have the problem. The plugin shows you exactly which fonts are blocking render and estimates the time savings. Click Auto Fix All to patch them. The plugin backs up each file before modifying it, so you can undo any change with one click.
For sites using Google Fonts, the savings are typically 500ms to 2 seconds off your LCP. That’s often enough to push you from amber to green in PageSpeed Insights.
Defer Render Blocking JavaScript. Scripts in your page head block rendering. The browser stops everything, downloads the script, executes it, then continues. Stack up a few plugins doing this and your page sits frozen for seconds.
The defer attribute fixes this. Deferred scripts download in parallel and execute after the HTML is parsed. The Performance tab lets you enable defer across all front end scripts with one toggle.
Some scripts break when deferred, things like jQuery that other scripts depend on, or payment widgets that need to run early. The exclusions box lets you list handles or URL fragments to skip. The plugin comes with sensible defaults for jQuery, WooCommerce, and reCAPTCHA.
HTML Minification. Every byte counts on mobile connections. The minifier strips whitespace, comments, and unnecessary characters from your HTML, CSS, and inline JavaScript before the page is sent. It’s conservative by design, it won’t break your layout, but it shaves 5 to 15 percent off page size without you changing anything.
HTTPS Mixed Content Scanner. If your site runs on HTTPS but still loads images or scripts over HTTP, browsers show security warnings and Google penalises your rankings. The scanner checks your database for http:// references to your own domain and shows you exactly where they are. One click replaces them all with https://. Fixes posts, pages, metadata, options, and comments in a single operation.
All four features are toggles. Enable what you need, test in PageSpeed Insights, and watch the numbers improve.
8. What You Get
A complete SEO setup with no monthly cost, no vendor dependency, and AI quality meta descriptions on every post. The only thing you pay for is the handful of API tokens you use, and at Haiku prices that’s less than the cost of a coffee for your entire site’s back catalogue.
I packed as much helpful hints in as a I could, so hopefully this just works for you!
Everything else, the schema markup, the sitemap, the robots.txt control, the noindex settings, is yours permanently for free.
That’s how software should work.
Andrew Baker is Chief Information Officer at Capitec Bank and writes about cloud architecture, banking technology, and enterprise software at andrewbaker.ninja.
Thanks Andrew!