CloudScale SEO AI Optimizer
Complete SEO & AEO documentation — every panel, every setting explained. Bring your own Claude or Gemini API key. No Pro version, no upsells, no subscriptions.
- Go to the SEO Settings tab → Site Identity panel and fill in your Site name, Locale, and Default OG image.
- In the AI Settings panel, add your Anthropic Claude or Google Gemini API key and click Test Key to confirm it works. (Get a Claude key · Get a Gemini key)
- In the SEO Features panel (Sitemap & Robots tab), tick the features you want active and save.
- In the AI Tools tab, click Generate Missing in the Meta Description Writer to fill in all missing descriptions.
- Submit your sitemap URL to Google Search Console.
📊 SEO Settings
Configure your site identity, structured data schemas, AI provider connection, and the Auto Pipeline that processes new posts automatically on publish.
Site Identity & Schema
The Site Identity panel controls the core information used across all SEO (Search Engine Optimisation) outputs — meta tags, OG (OpenGraph) tags, and JSON-LD (JavaScript Object Notation for Linked Data) structured data.
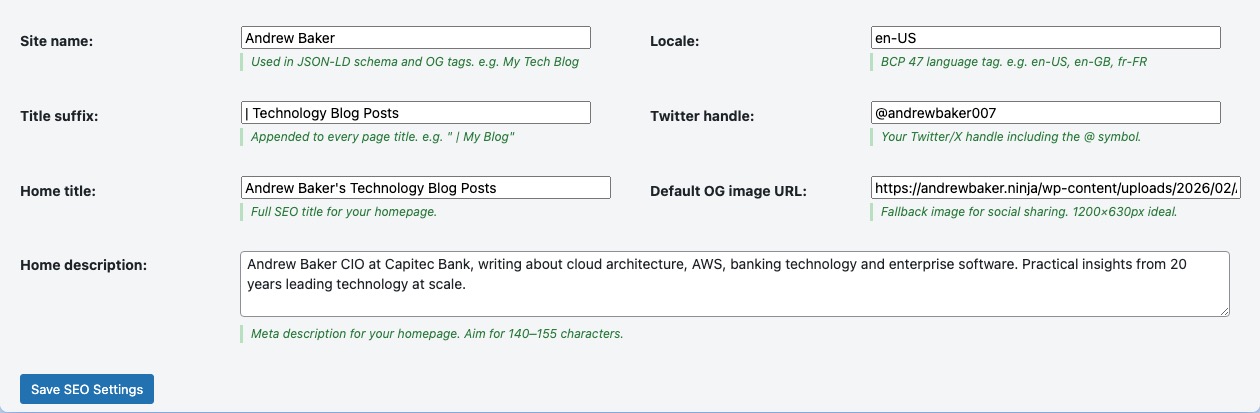
- Site name — The name of your website as it should appear in search results and social media previews. Used in the
og:site_nametag and WebSite JSON-LD schema. - Locale — Your language and region code in the format
en-US,en-GB,fr-FR, etc. Used in the HTMLlangattribute and theog:localeOpenGraph tag. This helps Google serve the right language to the right audience. - Title suffix — Text appended to every page title in the browser tab and search results, e.g.
| My Blog. Helps users recognise your brand when multiple tabs are open. - Twitter handle — Your Twitter/X username including the @ symbol, e.g.
@yourusername. Added to thetwitter:sitemeta tag so Twitter can attribute your shared content. - Home title — The SEO title specifically for your homepage. This overrides the default WordPress site title for the front page only.
- Default OG image URL — A fallback image used in social media previews when a post or page has no featured image. Recommended size: 1200 × 630 pixels. A visually consistent default makes your links look professional when shared on Facebook, LinkedIn, Slack, etc.
Person Schema
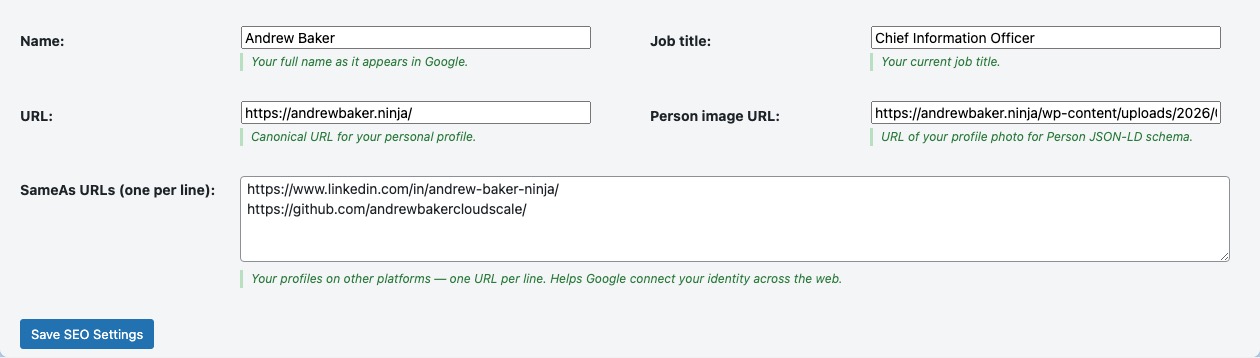
The Person Schema panel adds JSON-LD structured data that identifies you as the author and owner of the website. This is especially important for personal blogs and authority sites — Google uses Person schema to associate your content with your real-world identity, which supports E-E-A-T (Experience, Expertise, Authoritativeness, Trustworthiness) signals.
- Name — Your full name as you want it to appear in structured data and author rich results.
- Job title — Your professional title (e.g. “Software Engineer”, “Technical Writer”). Appears in Person structured data.
- URL — The canonical URL for your identity, usually your homepage or an about page.
- Person image URL — A headshot or profile photo URL. Recommended: square image, at least 400 × 400 pixels. Used in Person JSON-LD and can appear in Google’s Knowledge Panel.
- sameAs URLs — Links to your profiles on other authoritative platforms: LinkedIn, GitHub, Twitter, Wikipedia, Wikidata, etc. These cross-references help Google confirm your identity. Add one URL per line.
This panel only affects the JSON-LD output in your page source — nothing visible is added to the page itself.
AI Settings
The AI (Artificial Intelligence) Settings panel connects the plugin to your chosen AI provider. The plugin uses AI to generate meta descriptions, ALT text, article summaries, and related article suggestions. You supply your own API (Application Programming Interface) key — there is no shared key and no usage limit imposed by this plugin.
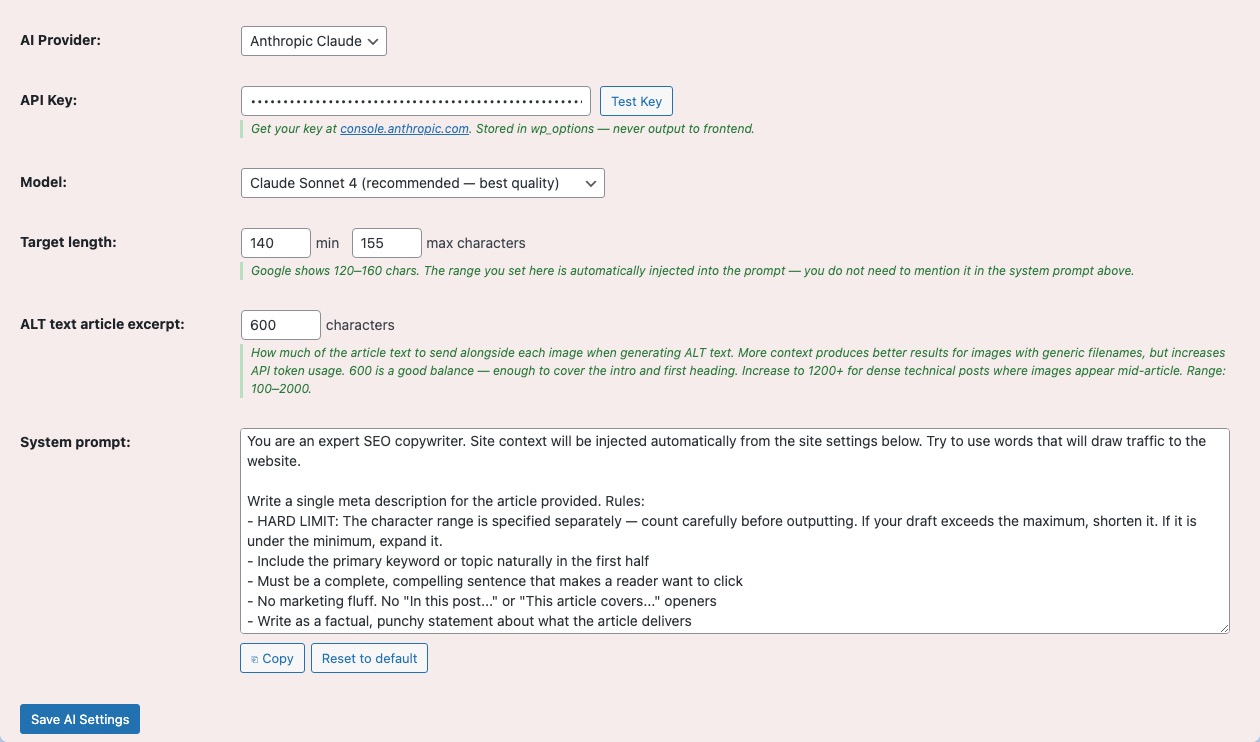
- AI provider — Choose between Anthropic Claude or Google Gemini:
- To get a Claude API key: visit console.anthropic.com → sign up → API Keys → Create Key. Claude is highly capable at writing natural, accurate meta descriptions.
- To get a Gemini API key: visit aistudio.google.com/app/apikey → sign in with your Google account → Create API Key. Gemini has a generous free tier.
- API key — Paste your key here. It is stored in your WordPress database and sent only to the chosen provider’s API endpoint. It is never shared with this plugin’s author or any third party.
- Model — The specific AI model to use. Leave blank to use the provider’s recommended default. Advanced users can specify a model ID (e.g.
claude-haiku-4-5-20251001for faster/cheaper processing,claude-opus-4-6for higher quality). - Meta description character targets (min / max) — Google displays meta descriptions up to approximately 158 characters in search results. The default range of 120–158 characters produces descriptions that display fully without being truncated. Descriptions below 120 characters may appear thin; descriptions above 158 will be cut off.
- ALT text excerpt length — How many characters of post content to send to the AI when generating image ALT text. A longer excerpt gives the AI more context but costs slightly more API tokens. Default 600 characters is sufficient for most images.
Test your key using the “Test Key” button before running bulk operations — this makes a minimal API call to confirm your key is valid and your account has available credits.
Auto Pipeline
The Auto Pipeline automatically processes each post the moment it is published — with no manual intervention required. When enabled, publishing a post triggers: meta description generation → SEO scoring → AI summary box creation, all in the background.
- Enable Auto Pipeline on publish — When ticked, every new post you publish will automatically receive an AI-generated meta description, an SEO score, and an AI summary box. Untick this if you prefer to generate content manually or in scheduled batches.
- Overwrite existing descriptions — When ticked, the pipeline will regenerate the meta description even if one already exists. Leave unticked to only fill in missing descriptions (safer for existing content).
The Auto Pipeline runs synchronously on publish — the post save may take a couple of seconds longer than usual while the AI generates content. If your API key has rate limits or if you publish very frequently, consider using Scheduled Batch processing instead.
Note: this panel only appears once an AI API key has been saved in the AI Settings panel above.
✨ AI Tools
AI-powered tools for generating and managing meta descriptions, image ALT text, article summary boxes, and automatic internal linking.
AI Meta Description Writer
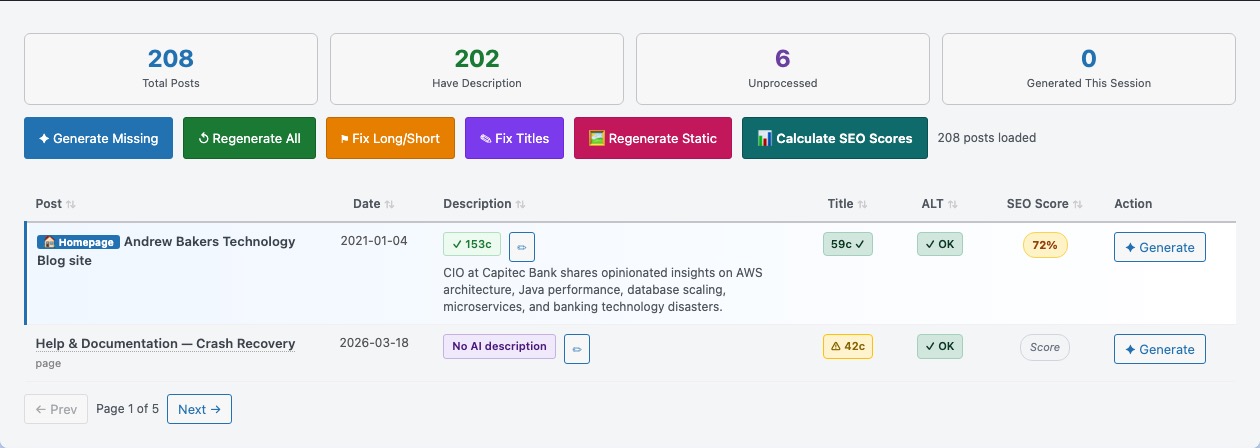
The AI Meta Description Writer is the main bulk AI tool. A meta description is the short paragraph that appears under your page title in Google Search results — it is the first thing a searcher reads and directly influences whether they click through to your site.
The table shows all your posts and pages with their current meta description status:
- Has desc — A meta description is already written. Shows the current text and character count.
- Missing — No meta description has been written. These are the highest priority to fix.
- Too short / Too long — A description exists but falls outside your configured character range. Descriptions under 120 characters may appear thin; over 158 characters will be cut off by Google.
- SEO score — A 0–100 score produced by the AI evaluating the description’s relevance, keyword presence, and readability. Scores above 70 are good; below 50 indicate the description needs improvement.
Available actions:
- ✦ Generate (per row) — Generates an AI description for that specific post.
- Generate Missing — Generates descriptions for all posts that have none. Skips posts that already have one.
- Generate All (overwrite) — Regenerates descriptions for every post, replacing any existing ones.
- Fix Out-of-Range — Regenerates only the descriptions that are too short or too long.
- Score All — Runs the AI scoring pass on all posts without regenerating descriptions.
- Stop — Halts a running bulk operation at the end of the current post.
AI ALT Text Generator
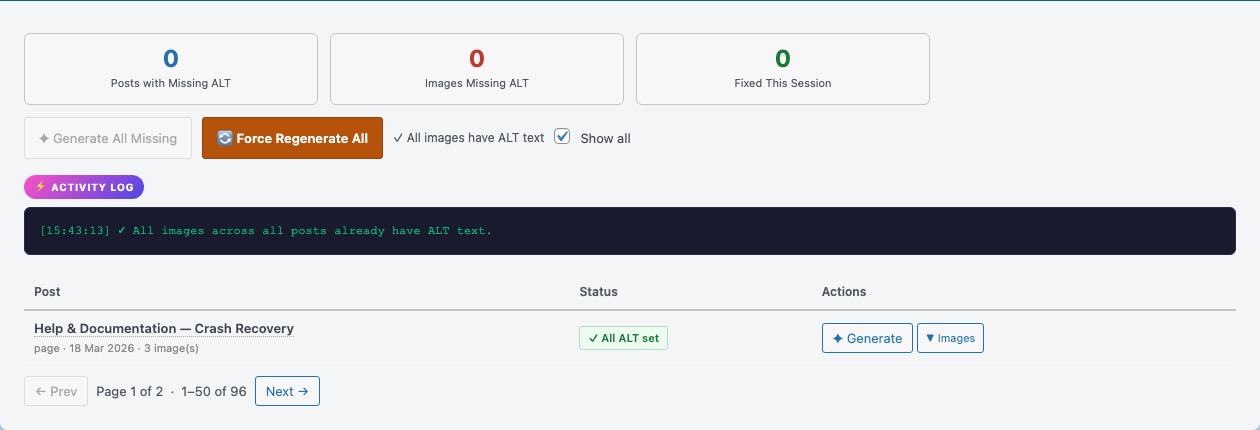
The AI ALT Text (Alternative Text) Generator scans your site for images missing their ALT attribute and uses AI to write descriptive, contextually relevant ALT text for each one.
Why ALT text matters: ALT text serves two purposes. First, accessibility — screen readers used by visually impaired visitors read the ALT text aloud instead of the image. Second, SEO — search engine crawlers cannot see images, so they rely on ALT text to understand what an image contains. Well-written ALT text can help images rank in Google Image Search and reinforces the keyword relevance of the surrounding content.
- Scan for missing ALT text — Finds all images attached to your posts and pages that have an empty or missing ALT attribute.
- Show all checkbox — When ticked, shows every image including those that already have ALT text. Useful for reviewing or overwriting existing ALT attributes.
- ✦ Generate (per image) — Sends the image and surrounding post context to the AI, which writes a concise, descriptive ALT attribute and saves it to the WordPress attachment metadata.
- Generate All Missing — Processes all images with no ALT text in one bulk operation.
The AI receives a short excerpt of the post content around the image to provide context — this is why the “ALT text excerpt length” setting in AI Settings matters.
AI Summary Box
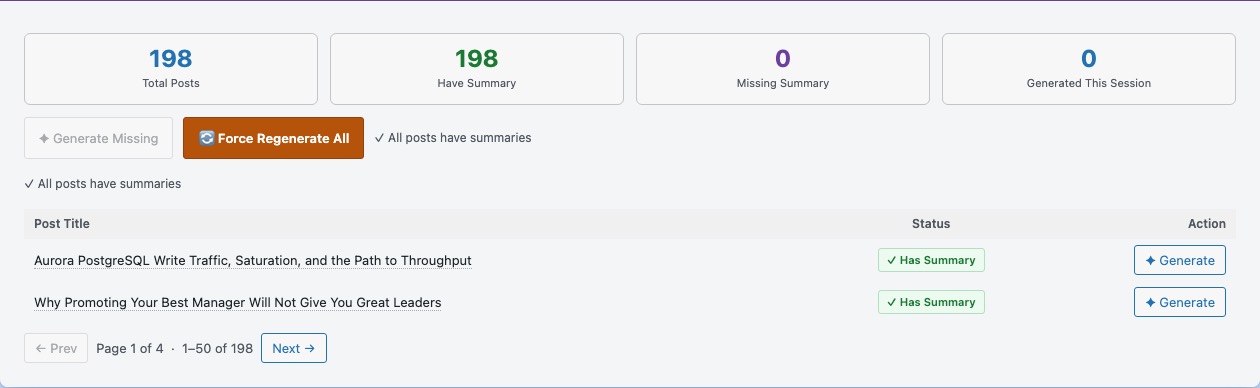
The AI Summary Box generates a three-field structured summary for each post and displays it as a styled card at the top of the post content — before the article text begins. This serves two purposes: it helps readers quickly decide if the article is relevant to them (reducing bounce rate), and it writes content directly into the Article JSON-LD schema, which can appear as structured snippets in search results.
The three fields generated per post:
- What it is — A one-sentence definition of the topic.
- Why it matters — A one-sentence explanation of why the reader should care.
- Key takeaway — The single most important thing to take away from the article.
Available actions:
- ✦ Generate (per row) — Generates or regenerates the summary for a single post.
- Generate Missing — Generates summaries for all posts that do not yet have one.
- Generate All (force) — Regenerates summaries for every post, replacing existing ones.
Whether the summary box is visible on the frontend is controlled by the “Show AI summary box on posts” checkbox in the SEO Features panel. Unticking that hides the box without deleting the generated summaries — they remain in the database and in the JSON-LD schema.
Related Articles — Settings
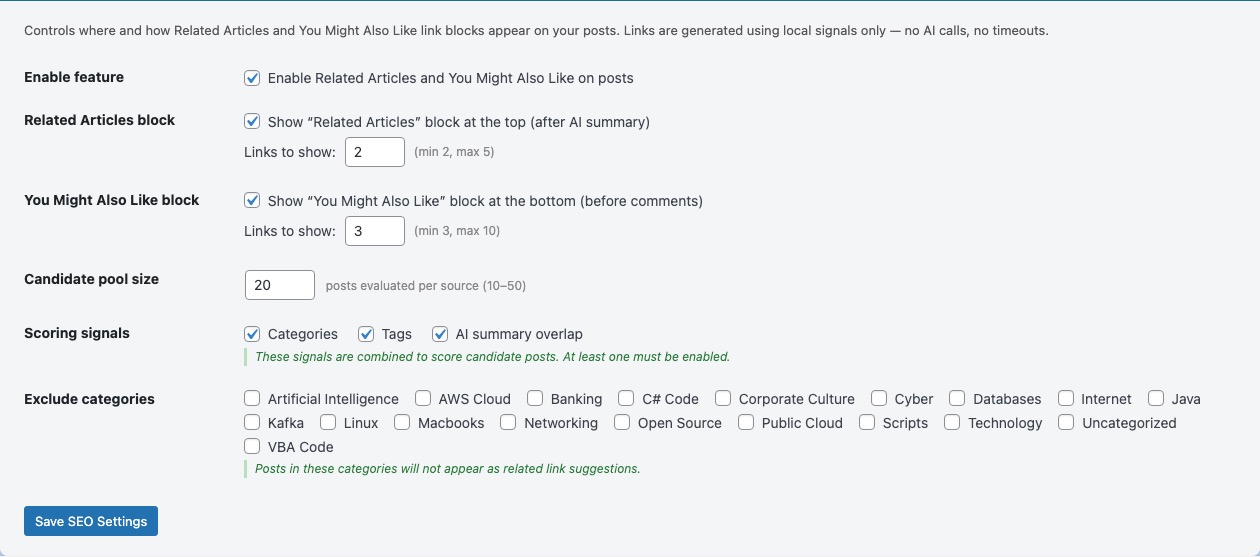
Related Articles is one of the key AEO (Answer Engine Optimisation) features of this plugin. AEO is the practice of structuring your content to be understood and surfaced by AI-powered answer engines (such as Google’s AI Overviews, Perplexity, and ChatGPT’s Browse feature) as well as traditional search engines.
Related Articles automatically inserts links to contextually similar posts at the top and bottom of each post. This creates an internal linking network that helps both readers and search engine crawlers discover more of your content.
- Enable Related Articles and You Might Also Like on posts — Master switch. Untick to disable all related article output site-wide without losing your settings.
- Show “Related Articles” block at the top — Adds a “Related Articles” section immediately after the AI summary box (or at the top of the post if no summary box is present). Good for keeping readers on your site after reading the opening.
- Number of links (top) — How many related post links to show in the top block. 3–4 is recommended; too many links before the article content can feel intrusive.
- Show “You Might Also Like” block at the bottom — Adds a “You Might Also Like” section at the end of the post, before comments. This is the traditional position for related content and tends to have higher engagement.
- Number of links (bottom) — How many links to show in the bottom block. 5 is a good default.
- Pool size — The number of candidate posts to consider when scoring relatedness. A larger pool gives better results but takes marginally longer to process. Default 20 is sufficient for most sites.
- Match by Categories — Include posts from the same categories as a relevance signal. Recommended on.
- Match by Tags — Include posts sharing tags as a relevance signal. Recommended on if you use tags consistently.
- Match by AI summary overlap — Use semantic similarity between AI-generated summaries to find related posts. This produces the most contextually accurate matches but requires summaries to have been generated first.
- Excluded categories — Posts in these categories will never appear as related article suggestions. Useful for excluding promotional posts, announcements, or unrelated categories.
Related Articles — Management
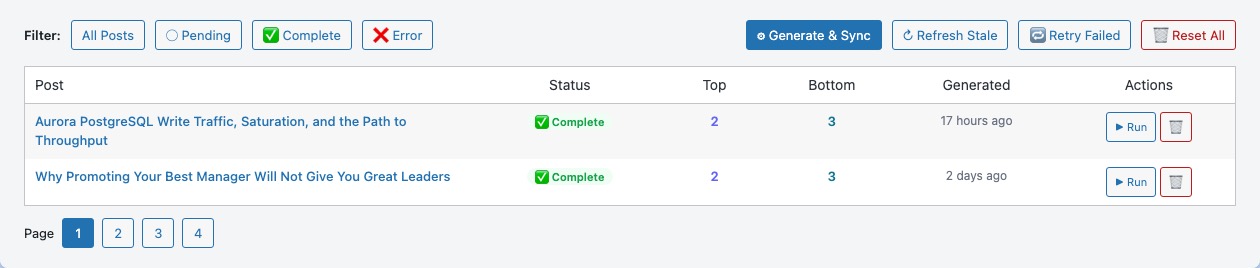
The Related Articles Management table shows the processing status of every post. After changing your Related Articles settings, you need to regenerate the related links for existing posts.
- Status badges:
- Pending — Related articles have not yet been generated for this post.
- Complete — Related articles have been generated and are live.
- Error — Something went wrong during generation. The error message is shown in the row.
- Top / Bottom counts — How many links are currently being shown at the top and bottom of the post.
- ▶ Run (per row) — Generates or regenerates related articles for a single post.
- 🗑 Reset (per row) — Clears the related articles data for a post, setting it back to Pending.
- Batch buttons — Run all Pending posts, re-run all Complete posts (useful after settings changes), or re-run all Error posts.
- Sync Counts — Recalculates the top/bottom counts for all posts without regenerating the related links.
🗺 Sitemap & Robots
Control which URLs are indexed by search engines, manage your robots.txt, and configure the llms.txt file for AI crawlers.
SEO Features
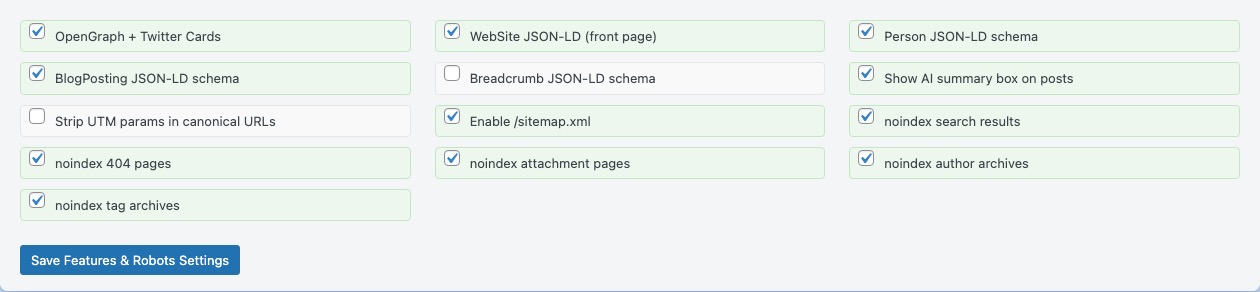
The SEO Features panel is the master control board — a single checklist of every SEO feature the plugin provides. Tick the features you want active; untick to disable them without losing any settings.
- OpenGraph + Twitter Cards — Adds
og:*andtwitter:*meta tags to every page. These tags control how your pages appear when shared on Facebook, LinkedIn, Twitter/X, Slack, WhatsApp, and iMessage — including the preview image, title, and description. Strongly recommended. - WebSite JSON-LD (front page) — Adds
{"@type":"WebSite"}structured data to your homepage. This enables a Sitelinks Searchbox in Google Search results (a search box directly under your homepage result). Recommended. - Person JSON-LD schema — Outputs your Person structured data (configured in the Person Schema panel) on author and homepage templates. Supports Google’s Knowledge Panel and E-E-A-T signals. Recommended for personal sites and blogs.
- BlogPosting JSON-LD schema — Adds
{"@type":"BlogPosting"}or{"@type":"Article"}structured data to every post. Helps Google understand your content type and can enable rich results including article dates and author details. Recommended. - Breadcrumb JSON-LD schema — Adds
{"@type":"BreadcrumbList"}structured data. This can display the page’s position in your site hierarchy directly in Google Search results (e.g. Home › Category › Post Title). Useful for sites with a clear hierarchy. - Show AI summary box on posts — Controls whether the AI-generated summary card is visible on the frontend. Untick to hide it without deleting the underlying data. Recommended if summaries have been generated.
- Strip UTM params in canonical URLs — UTM (Urchin Tracking Module) parameters (e.g.
?utm_source=newsletter) are used for marketing analytics but should not appear in canonical URLs. Enabling this strips them from therel="canonical"tag, preventing Google from indexing tracking URLs as separate pages. Recommended if you use UTM tracking. - Enable /sitemap.xml — Activates the XML sitemap. Same as the toggle in the Sitemap Settings panel below. Recommended.
- noindex search results — Adds a
<meta name="robots" content="noindex">tag to WordPress search results pages (URLs containing?s=). Search results pages are thin, auto-generated content that Google should not index. Recommended. - noindex 404 pages — Adds noindex to 404 error pages. These pages have no content and should never be indexed. Recommended.
- noindex attachment pages — WordPress automatically creates a page for every uploaded file (e.g.
/your-site.com/?attachment_id=123). These pages contain almost no content and dilute your site’s quality signal. Recommended. - noindex author archives — Author archive pages (e.g.
/author/username/) duplicate post content. If your site has only one author, noindexing these removes a source of duplicate content. Use with caution on multi-author sites where author pages have unique value. - noindex tag archives — Tag pages can produce thin, low-value content. Noindex if your tags are loosely applied. Leave indexed if your tag pages are genuinely curated topic hubs.
XML Sitemap Settings
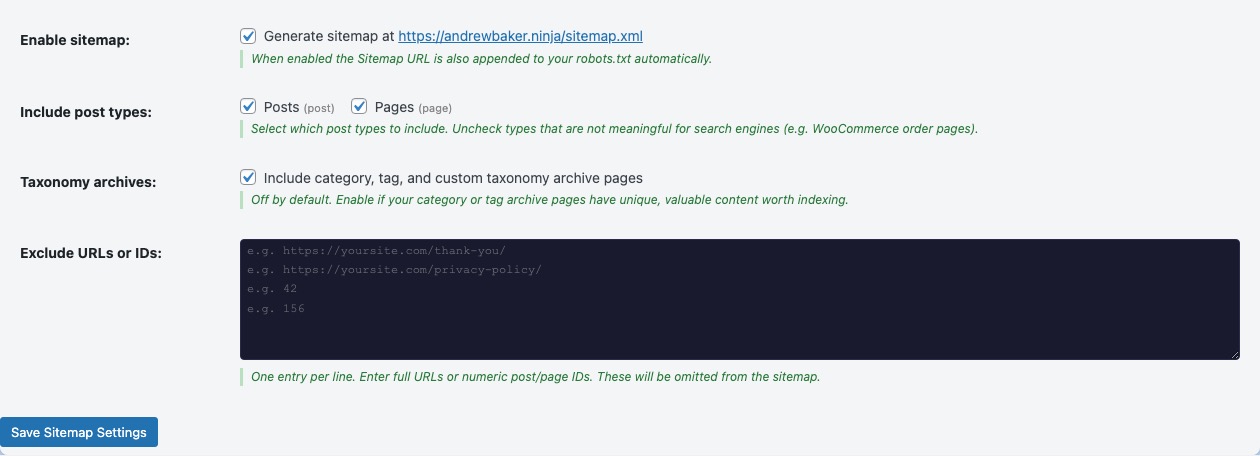
The XML Sitemap is a file at /sitemap.xml that lists every important URL on your site. Search engines use it to discover and re-crawl your content efficiently. Without a sitemap, Google may miss pages or take longer to find new content.
- Enable /sitemap.xml — Activates the sitemap. Once enabled, visit
yoursite.com/sitemap.xmlto confirm it is working, then submit it in Google Search Console. - Post types to include — Tick each post type (Posts, Pages, and any custom post types) that should be included in the sitemap. Exclude post types that do not contain indexable public content.
- Include taxonomy pages — When ticked, category and tag archive pages are included in the sitemap. Only enable this if those pages have unique, valuable content worth indexing.
- Sitemap exclude list — A list of URL paths to exclude from the sitemap, one per line. Use this for pages like
/privacy-policy/or/contact/that you do not want prominently crawled.
The sitemap is automatically paginated — if you have more than 5,000 URLs, the plugin creates multiple child sitemaps (/sitemap-1.xml, /sitemap-2.xml, etc.) and lists them in the index at /sitemap.xml. A plain-text version is also available at /sitemap.txt.
Use the Sitemap Preview panel to browse the generated sitemap directly in your admin area.
Robots.txt Editor
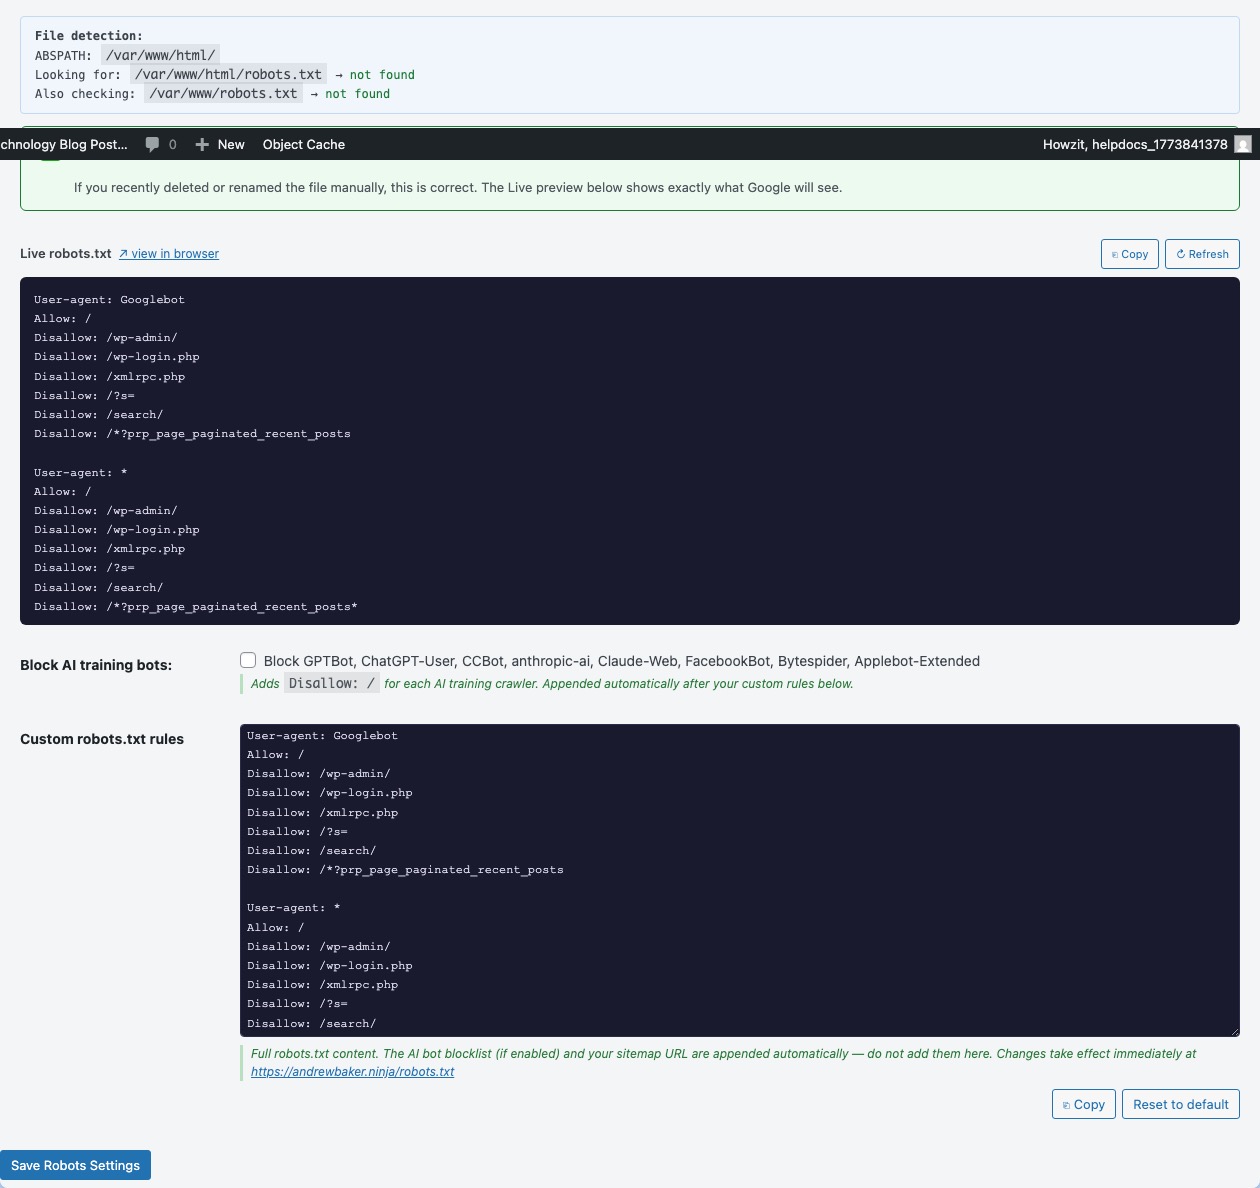
The Robots.txt Editor lets you manage your site’s /robots.txt file — the first file a search engine crawler reads when it arrives at your domain. It tells crawlers which parts of your site they are allowed to access.
- Block AI bots — When ticked, adds
Disallowrules for known AI content scrapers including GPTBot (OpenAI), CCBot (Common Crawl), Claude-Web (Anthropic), anthropic-ai, Google-Extended, and others. These bots crawl your content to train AI language models. Tick this if you do not want your content used for AI training. - Custom robots.txt rules — A freeform text editor for your complete robots.txt content. The plugin provides sensible defaults. You can add custom rules such as:
Disallow: /wp-admin/— Prevent crawling the admin area (usually already blocked by WordPress defaults)Disallow: /checkout/— Block crawling of WooCommerce checkout pagesSitemap: https://yoursite.com/sitemap.xml— Advertise your sitemap location (added automatically when sitemap is enabled)
Important: Robots.txt controls crawl access, not indexing. A page blocked by robots.txt may still appear in Google’s index if other sites link to it — it just won’t be re-crawled. To prevent indexing, use the noindex meta tag instead.
llms.txt
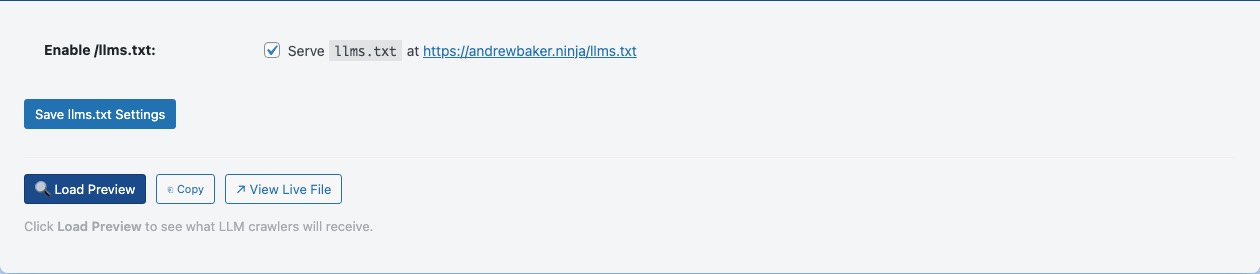
llms.txt is an emerging standard (similar to robots.txt but for AI language models) that provides a structured, human-readable summary of your website for AI crawlers and chat interfaces. When an AI assistant like ChatGPT, Claude, or Perplexity wants to understand what your site is about, it looks for this file at /llms.txt.
- Enable /llms.txt — Activates the endpoint. Once enabled, visit
yoursite.com/llms.txtto see the generated file. It lists your key pages, recent posts, and a brief description of your site.
Publishing an llms.txt file is an AEO (Answer Engine Optimisation) best practice. It gives you control over how AI systems summarise and represent your content — rather than letting them infer it from raw HTML. The llms.txt specification is maintained as an open standard.
⚡ Performance
Performance optimisations including the HTTPS URL fixer, font hosting, JavaScript deferral, and HTML minification.
Font Optimiser
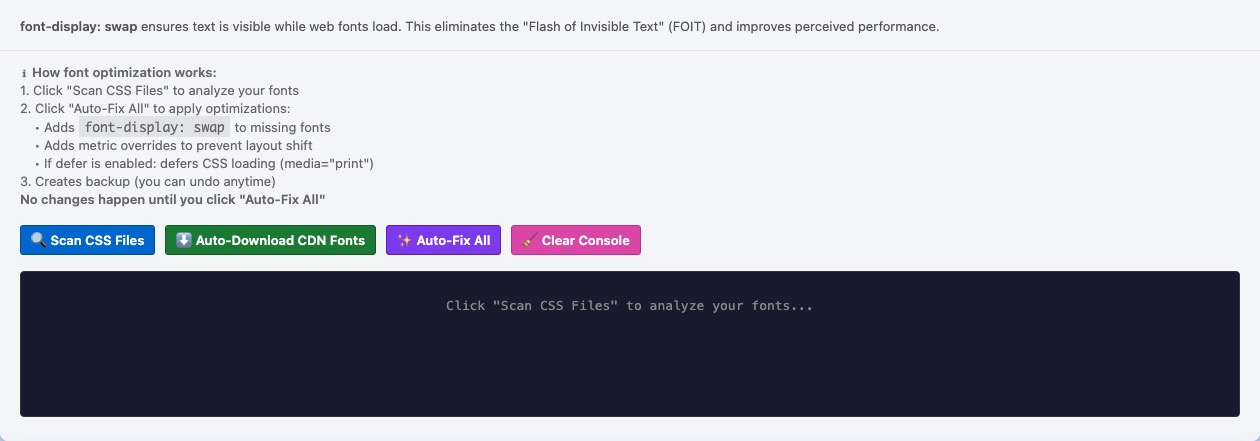
The Font Optimiser downloads Google Fonts to your own server and replaces the external Google Fonts CDN (Content Delivery Network) requests with locally hosted files. This solves two problems:
- Performance — Each Google Fonts request adds a DNS lookup and network round-trip that delays page rendering. Hosting fonts locally eliminates this latency and can improve your Core Web Vitals scores, particularly LCP (Largest Contentful Paint).
- Privacy / GDPR (General Data Protection Regulation) — When a visitor loads a Google Font from Google’s CDN, their IP address is sent to Google. Under GDPR this is a data transfer to a third party that requires disclosure and potentially consent. Hosting fonts locally keeps all data on your own server.
How to use it:
- Click Scan & Download — the plugin detects Google Fonts CDN URLs used by your theme and downloads the font files to your server.
- Click Apply Fixes — the plugin rewrites the font references in your theme to point to the local files.
- Click Undo if you need to revert the changes.
JS, CSS & HTML Optimisation
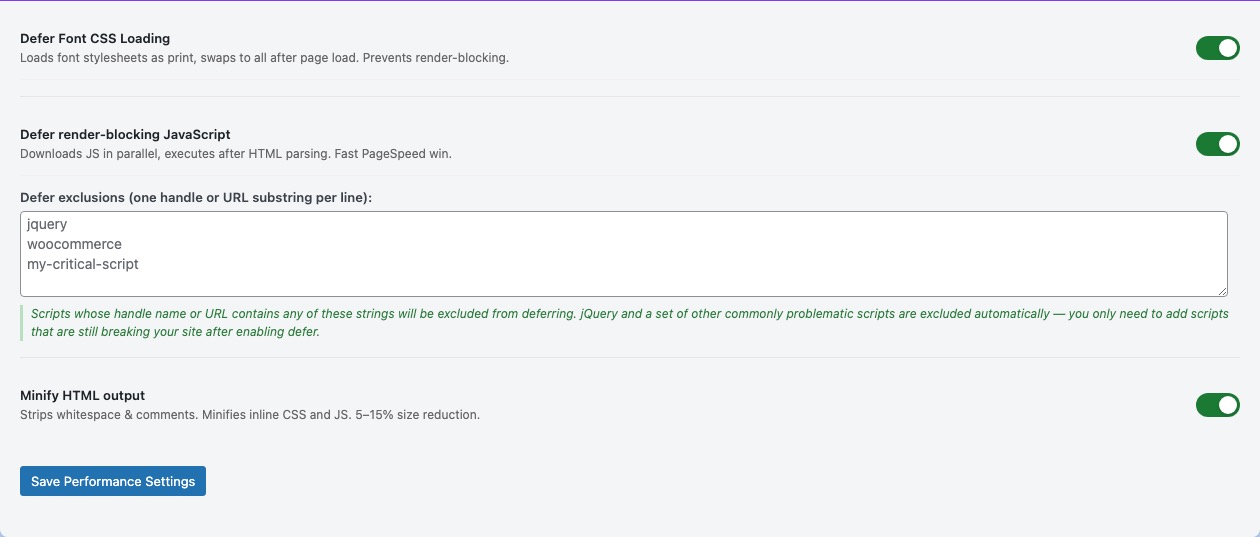
The JS, CSS & HTML Optimisation panel provides three performance improvements that reduce page load time.
- Defer non-Google fonts — Loads non-critical font files asynchronously so they do not block the initial page render. Fonts that are not in the critical rendering path are loaded after the visible content appears.
- Defer JavaScript — Adds the
deferattribute to non-critical JavaScript files. By default, the browser pauses HTML parsing whenever it encounters a<script>tag. Deferring scripts allows the page to render first and execute scripts afterwards, significantly reducing Time to Interactive (TTI). You can add a list of JS file patterns to exclude from deferring — add any scripts that must run before the page is visible (e.g. analytics, anti-flicker snippets).
Note: If deferring JS causes layout issues or broken functionality, check the exclusion list first. - Minify HTML output — Removes unnecessary whitespace, comments, and line breaks from the HTML sent to the browser. A typical page can be 10–15% smaller after minification, reducing bandwidth usage and transfer time. This is a safe optimisation that has no effect on how the page looks or functions.
HTTPS URL Fixer
The HTTPS URL Fixer scans your WordPress database for hardcoded http:// URLs and replaces them with https://. This is essential after migrating a site from HTTP to HTTPS — old HTTP links in your content cause mixed-content browser warnings and can prevent pages from loading correctly over a secure connection.
How to use it:
- Click Scan to find all HTTP URLs currently in your database.
- Review the results — the scanner shows which domains it found and how many occurrences of each.
- Tick the domains you want to fix (typically your own domain).
- Click Fix Selected to replace those URLs with HTTPS equivalents.
The fix updates post content, post meta, and common option values. It does not modify PHP files or your theme — only database content. Always take a database backup before running bulk find-and-replace operations.
Note: this panel only appears once an AI API key has been saved in the AI Settings panel above.
🏷 Categories
Taxonomy management tools: fix miscategorised posts, review category health grades, and detect AI-identified category drift.
Category Fixer
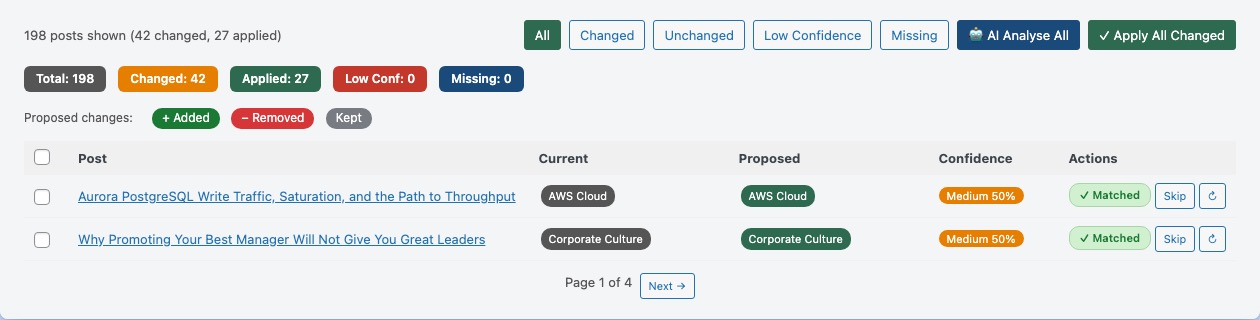
The Category Fixer analyses every published post on your site and suggests whether each post is in the most appropriate category. Posts that are miscategorised hurt your site’s topical authority — Google prefers sites where each category contains a coherent set of closely related content.
How to use it:
- Click Scan Posts — the plugin scans all published posts and proposes category changes based on keyword scoring and AI analysis.
- Review the results table. Each row shows the post title, its current categories, and the proposed categories.
- Click Apply on individual rows to accept the suggestion, or Skip to dismiss it.
- Use Apply All Changed to accept all pending suggestions at once.
Filter tabs at the top let you view: All posts, Changed (proposals pending), Unchanged (no proposal), Low-confidence proposals, and posts with no category assigned.
The 🤖 AI Analyse button re-analyses selected posts using your AI provider for more nuanced category suggestions beyond the keyword-scoring approach.
Category Health

The Category Health Dashboard grades every category on your site based on how many published posts it contains and how recently they were written. Weak or empty categories dilute your site’s topical focus and waste crawl budget.
Health grades:
- Strong (green) — 10 or more published posts. Well established.
- Moderate (orange) — 4 to 9 posts. Healthy but could grow.
- New (blue) — 1 to 3 posts, all published within the last 180 days. Growing topic — do not merge or delete.
- Weak (yellow) — 2 to 3 posts, none recent. Consider whether this topic needs its own category or should be merged into a broader one.
- Empty (red) — 0 or 1 posts. This category adds no value to your taxonomy. Consider deleting it or reassigning the post.
- Uncategorized (grey) — WordPress’s default fallback category. Posts here were never properly assigned a category.
Click any grade pill at the top to filter the table. Click ▼ Show posts in any row to see which posts are in that category. Click Edit to open the category editor.
Category Drift Detection

Category Drift Detection uses AI to identify categories that are being used as “catch-alls” — containing posts on unrelated topics that would be better served by more specific categories. Drift weakens your site’s topical authority because it sends mixed signals to search engines about what a category is actually about.
How to use it:
- Click Run Fresh AI Analysis — the AI reads a sample of post titles from each category and identifies semantic drift.
- Click Load Cached Results to reload the last analysis without making another API call (results are cached).
- Review the results. Each flagged category shows:
- Verdict — Catch-all (posts on completely unrelated topics) or Drifting (loosely related but diverging).
- Confidence — How certain the AI is: High, Medium, or Low.
- AI Reasoning — A brief explanation of why this category was flagged.
- Where to move posts — Specific suggestions for which posts should move to which category, with a reason for each move. Click → Move on individual posts or → Move all to apply the suggestion.
- Use 🤖 Analyse N remaining to ask the AI to suggest destinations for any posts not yet covered by the initial analysis.
Move actions update the post’s WordPress category assignments immediately. The cache is updated on each move so refreshing the page shows the current state.
🔄 Scheduled Batch
Configure automated scheduled batch processing so new content is always processed without manual effort.
Batch Schedule

The Scheduled Batch panel configures automatic AI processing to run on a recurring schedule — so your new content is always processed without any manual effort.
- Enable scheduled batch processing — Master switch. When ticked, a WordPress Cron job runs the batch processor at the configured frequency.
- Schedule frequency — How often to run: Hourly, Twice Daily, or Daily. Choose based on how frequently you publish new content. Daily is sufficient for most blogs; Hourly is useful if you publish multiple times per day.
- Generate missing meta descriptions — When ticked, the batch will generate AI meta descriptions for any posts that do not have one.
- Generate missing AI summaries — When ticked, the batch will generate summary boxes for posts that do not have one.
- Score posts — When ticked, runs the SEO scoring pass on posts that have not been scored yet.
The batch processor only processes posts that are missing the specific content type — it will not overwrite manually written descriptions or existing summaries. To force regeneration, use the individual bulk tools in the AI Tools tab.
Note on WordPress Cron: WordPress’s built-in scheduler (WP-Cron) runs when someone visits your site. If your site has low traffic overnight, the scheduled job may run later than expected. For precise scheduling on low-traffic sites, set up a real server cron job to ping your site’s wp-cron.php at the desired interval.
Last Run Log
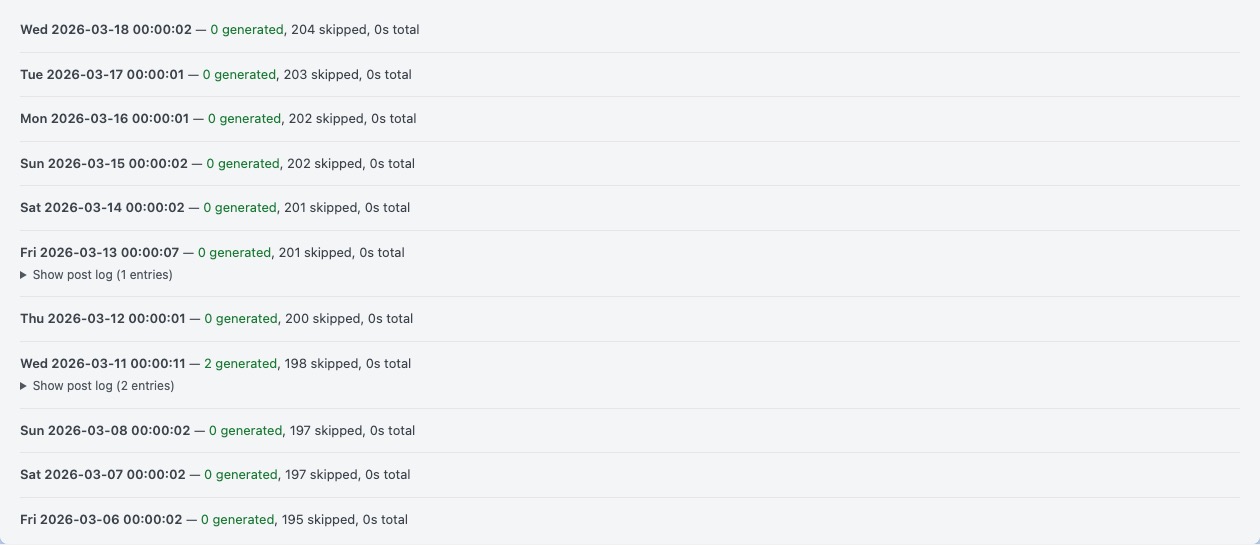
The Last Run Log shows a detailed record of the most recent scheduled batch run. Use this to verify the automation is working correctly and to diagnose any issues.
- Run date/time — When the last batch ran.
- Posts processed — How many posts were checked.
- Meta descriptions generated — How many new descriptions were written.
- Summaries generated — How many new summary boxes were created.
- Scores updated — How many SEO scores were calculated.
- Errors — Any posts that failed, with the error reason. Common errors include API rate limits (the AI provider temporarily rejecting requests) or posts with no readable content.
If the log shows no recent runs, check that the “Enable scheduled batch processing” checkbox is ticked and that WordPress Cron is functioning. You can test this by clicking Run Now to trigger a manual batch run immediately.
Glossary of terms
- AEO
- Answer Engine Optimisation — the practice of structuring content to be understood and surfaced by AI-powered answer engines such as Google’s AI Overviews, Perplexity, and ChatGPT Browse, as well as traditional search engines.
- API
- Application Programming Interface — a way for software to communicate with another service. In this plugin, you supply an API key so WordPress can send requests to Anthropic Claude or Google Gemini to generate content.
- ALT text
- Alternative text — a written description of an image, stored in the HTML
altattribute. Read by screen readers for accessibility and used by search engines to understand image content. - Canonical URL
- The preferred URL for a page when multiple URLs could serve the same content. Set via
<link rel="canonical" href="...">to tell search engines which version to index. - CDN
- Content Delivery Network — a globally distributed network of servers that delivers files (e.g. fonts, images, scripts) to visitors from the closest physical location, reducing load time.
- CSS
- Cascading Style Sheets — the language that controls the visual appearance of web pages.
- E-E-A-T
- Experience, Expertise, Authoritativeness, Trustworthiness — Google’s quality evaluation framework for web content. Person schema and author information contribute to E-E-A-T signals.
- GDPR
- General Data Protection Regulation — EU privacy law requiring disclosure and often consent for processing personal data, including IP addresses sent to third-party services such as Google Fonts CDN.
- JSON-LD
- JavaScript Object Notation for Linked Data — a format for embedding structured data in a web page. Google reads JSON-LD to understand page type, author, organisation, and content, enabling rich search results.
- JS
- JavaScript — the programming language that runs in web browsers. Deferring JS improves page load speed.
- LCP
- Largest Contentful Paint — a Core Web Vitals metric measuring how long it takes the largest visible element (usually an image or heading) to appear. Google uses LCP as a ranking factor.
- llms.txt
- A plain-text file at
/llms.txtthat provides a structured summary of your website for AI language models. Analogous torobots.txtbut for AI systems. - noindex
- A directive in the
<meta name="robots">tag that tells search engines not to include a page in their index. The page can still be crawled but will not appear in search results. - OG / OpenGraph
- OpenGraph — a protocol developed by Facebook that standardises how web pages are represented when shared on social media. OG tags control the title, description, and image shown in social previews.
- SEO
- Search Engine Optimisation — the practice of improving a website’s visibility in organic (unpaid) search engine results.
- Schema / Structured Data
- Machine-readable data embedded in a web page (using formats like JSON-LD) that tells search engines what a page is about — its type, author, publication date, etc. Can enable rich results in Google Search.
- TTI
- Time to Interactive — a performance metric measuring how long until a page is fully interactive. Deferring JavaScript improves TTI.
- UTM
- Urchin Tracking Module — parameters appended to URLs for marketing analytics (e.g.
?utm_source=newsletter). Should be stripped from canonical URLs to prevent duplicate content. - XML
- eXtensible Markup Language — the format used for sitemaps. An XML sitemap is a structured list of URLs that search engines can parse to discover your content.