Category: Public Cloud


Reverse Engineer AWS to Terraform: CloudToRepo Guide
If you have ever inherited an AWS estate, you know the feeling before you can even describe it. Hundreds of resources spread across regions you did not know were enabled. Lambdas with no source repos. Config rules that predate the current team. IAM roles that look like they were generated by a sleep-deprived octopus at […]
Read more →
Aurora PostgreSQL Write Throughput: Saturation & Tuning Guide
1. Introduction Every engineering team that runs a high throughput transactional workload on Amazon Aurora PostgreSQL will eventually arrive at the same uncomfortable question: why does the database start refusing to go faster, and what can actually be done about it? Aurora’s architecture is genuinely brilliant, but it introduces a set of write path constraints […]
Read more →
Predict EBS and RDS IOPS Saturation Before It Breaks
Andrew Baker | March 2026 Companion article to: https://andrewbaker.ninja/2026/03/01/aws-iops-mismatch-fix-the-hidden-double-ceiling-bug/ Last week I published a script that scans your AWS estate and finds every EBS volume and RDS instance where your provisioned storage IOPS exceed what the compute instance can actually consume. That problem, the structural mismatch between storage ceiling and instance ceiling, is important and […]
Read more →AWS IOPS Mismatch: Fix the Hidden Double Ceiling Bug
Andrew Baker, Chief Information Officer at Capitec Bank There is a class of AWS architecture mistake that is genuinely difficult to see. It does not appear in your cost explorer as an obvious line item. It does not trigger a CloudWatch alarm. It does not show up in a well architected review unless the reviewer […]
Read more →
CloudScale Free WordPress Backup & Restore Plugin Guide
I’ve been running this blog on WordPress for years, and the backup situation has always quietly bothered me. The popular backup plugins either charge a monthly fee, cap you on storage, phone home to an external service, or do all three. I wanted something simple: a plugin that makes a zip file of my site, […]
Read more →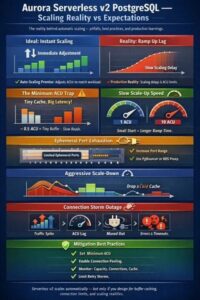
Aurora Serverless v2 PostgreSQL: Production Scaling Guide
Aurora Serverless v2 promises the dream of a database that automatically scales to meet demand, freeing engineering teams from capacity planning. The reality is considerably more nuanced. After running Serverless v2 PostgreSQL clusters under production workloads, I have encountered enough sharp edges to fill a blog post. This is that post. The topics covered here […]
Read more →Auto-Recover a Failed WordPress Instance on AWS
When WordPress goes down on your AWS instance, waiting for manual intervention means downtime and lost revenue. Here are two robust approaches to automatically detect and recover from WordPress failures. Approach 1: Lambda Based Intelligent Recovery This approach tries the least disruptive fix first (restarting services) before escalating to a full instance reboot. Step 1: […]
Read more →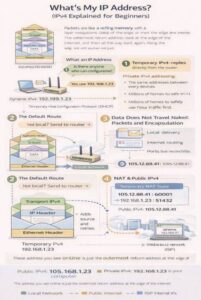
What Is My IP Address? IPv4 Explained for Beginners
Firstly, let me acknowledge that there are lots of these kinds of posts on the internet. But the reason why i wrote this blog is that I wanted to force myself to consolidate the various articles I have read and my learnt knowledge in this space. I will probably update this article several times and […]
Read more →Protected: Neo by Capitec: AI Client Support That Resolves Issues Proactively
There is no excerpt because this is a protected post.
Read more →WordPress on AWS Graviton: Deploy & Migrate in Minutes
Running WordPress on ARM-based Graviton instances delivers up to 40% better price-performance compared to x86 equivalents. This guide provides production-ready scripts to deploy an optimised WordPress stack in minutes, plus everything you need to migrate your existing site. Why Graviton for WordPress? Graviton3 processors deliver: The t4g.small instance (2 vCPU, 2GB RAM) at ~$12/month handles […]
Read more →