Category: Technology
CloudScale SEO AI Optimiser: Free WordPress SEO Plugin
Written by Andrew Baker | February 2026 Download the plugin here: https://wordpress.org/plugins/cloudscale-seo-ai-optimizer/ S3 download (updated frequently): https://andrewninjawordpress.s3.af-south-1.amazonaws.com/cloudscale-seo-ai-optimizer.zip I spent years working across major financial institutions watching vendors charge eye-watering licence fees for tools that were, frankly, not that impressive. That instinct never left me. So when I wanted serious SEO for my personal tech blog, I […]
Read more →
How a Blog Post Wiped $30 Billion from IBM in One Day
Anthropic published a blog post on Monday. Not a product launch, not a partnership announcement, not a keynote at a major conference. Just a simple blog post explaining that Claude Code can read COBOL. IBM proceeded to drop 13%, its worst single day loss since October 2000, with twenty five years of stock resilience gone […]
Read more →
Cloudflare Free Tier Review: Why It Works for Enterprise
By Andrew Baker, CIO at Capitec Bank There is a truth that most technology vendors either do not understand or choose to ignore: the best sales pitch you will ever make is letting someone use your product for free. Not a watered-down demo, not a 14-day trial that expires before anyone has figured out the […]
Read more →Technology Leadership Competence: Self-Assessment Guide
A Self Assessment for Technology Leaders This questionnaire explores how you think about technology leadership, systems, teams, and delivery. There are no right or wrong answers. Each question presents four options that reflect different leadership styles and priorities. Simply select the option that best reflects your natural instinct in each situation. Select one answer per […]
Read more →Auto-Recover a Failed WordPress Instance on AWS
When WordPress goes down on your AWS instance, waiting for manual intervention means downtime and lost revenue. Here are two robust approaches to automatically detect and recover from WordPress failures. Approach 1: Lambda Based Intelligent Recovery This approach tries the least disruptive fix first (restarting services) before escalating to a full instance reboot. Step 1: […]
Read more →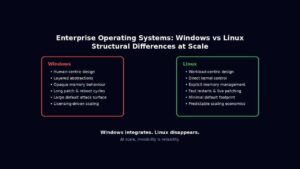
Windows Server vs Linux for Enterprises: 10 Key Differences
Enterprise operating systems for servers, are not chosen because they are liked. They are chosen because they survive stress. At scale, an operating system stops being a piece of software and becomes an amplifier of either discipline or entropy. Every abstraction, compatibility promise, and hidden convenience eventually expresses itself under load, during failure, or in […]
Read more →WordPress on AWS Graviton: Deploy & Migrate in Minutes
Running WordPress on ARM-based Graviton instances delivers up to 40% better price-performance compared to x86 equivalents. This guide provides production-ready scripts to deploy an optimised WordPress stack in minutes, plus everything you need to migrate your existing site. Why Graviton for WordPress? Graviton3 processors deliver: The t4g.small instance (2 vCPU, 2GB RAM) at ~$12/month handles […]
Read more →
AI vs Salesforce: The True Cost of Enterprise CRM in 2025
When a $3 API call can replace a $165 per user per month platform, the financial mathematics of enterprise software fundamentally change. 1. The New Economics of Customer Engagement Something fundamental shifted in 2024. The capabilities that once justified six and seven figure enterprise software contracts became commoditised overnight. Not gradually, through slow competitive erosion, […]
Read more →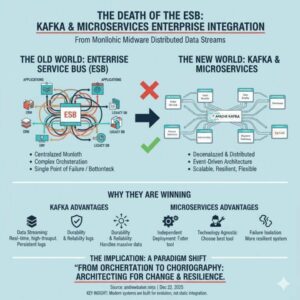
ESB vs Kafka: Why Microservices Are Replacing Enterprise Buses
1. Introduction The Enterprise Service Bus (ESB) once promised to be the silver bullet for enterprise integration. Organizations invested millions in platforms like MuleSoft, IBM Integration Bus, Oracle Service Bus, and TIBCO BusinessWorks, believing they would solve all their integration challenges. Today, these same organizations are discovering that their ESB has become their biggest architectural […]
Read more →Model Context Protocol: Enterprise Implementation Guide
The Model Context Protocol (MCP) represents a fundamental shift in how we integrate Large Language Models (LLMs) with external data sources and tools. As enterprises increasingly adopt AI powered applications, understanding MCP’s architecture, operational characteristics, and practical implementation becomes critical for technical leaders building production systems. 1. What is Model Context Protocol? Model Context Protocol […]
Read more →