Category: Macbooks
MacOs: How to see which processes are using a specific port (eg 443)
Below is a useful script when you want to see which processes are using a specific port.
Read more →Mac OSX: Altering the OS route table to re-direct the traffic of a website to a different interface (eg re-routing whatsapp traffic to en0)
This was a hard article to figure out the title for! Put simply, your mac book has a route table and if you want to move a specific IP address or dns from one interface to another, then follow the steps below: First find the IP address of the website that you want to re-route […]
Read more →Macbook OSX: Using Touch ID / fingerprints to enable SUDO and permanently enabling this after Mac OSX updates
Each day that I wake up I try and figure out if I can do less work than yesterday. With this in mind I was playing around to see if there is a way to save me typing my password each time I SUDO. It turns out this is quite a simple change… Open Terminal […]
Read more →Macbook OSX: Change the default image type of your screenshots from PNG to JPEG, GIF or PDF
There are a few things that I tweak when I get a new Macbook, one of which is the screenshot format (mainly because it doesnt natively render in Whatsapp). So I thought I would share the code snippet that you can run in Terminal to alter the default image type of your screenshots: For JPEG […]
Read more →AWS: Install and configure the AWS CLI on a Macbook
You can absolutely get the following from the AWS help pages; but this is the lazy way to get everything you need for a simple single account setup. Run the two commands below to drop the package on your Mac. Then check the versions you have installed: Next you need to setup your environment. Note: […]
Read more →Macbook OSX: Using gping over a Zero Trust Network Client (like Zscaler)
Once you start using a zero trust network, the first causality is normally the Ping command. The gping (Graphical Ping) command line displays a color coded realtime graph of continuous pings to a specified host and it supports specifying alternate interfaces/gateways. First lets find which interface to use. The “arp -a” command is used to display […]
Read more →Mac OSX : Tracing which network interface will be used to route traffic to an IP/DNS address
If you have multiple connections on your device (and maybe you have a zero trust client installed); how do you find out which network interface on your device will be used to route the traffic? Below is a route get request for googles DNS service: If you have multiple interfaces enabled, then the first item […]
Read more →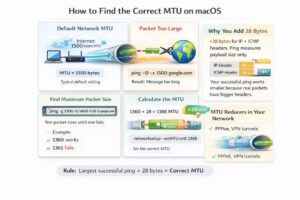
Finding and Setting the Maximum Transmission Unit (MTU) on Mac/OSX
If you have just changed ISPs or moved house and your internet suddenly starts misbehaving the likelihood is your Maximum Transmission Unit (MTU) is set too high for your ISP. The default internet facing MTU is 1500 bytes, BUT depending on your setup, this often needs to be set much lower. Step 1: First check […]
Read more →Macbook Tip: iTerm2 clearing your scroll back history
I frequently forget this command shortcut, so this post is simply because I am lazy. To clear your history in iTerm press Command + K. Control + L only clears the screen, so as soon as you run the next command you will see the scroll back again. If you want to view your command […]
Read more →Macbook: Check a DNS (web site) to see if basic email security has been setup (SPF, DKIM and DMARC)
There are three basic ways to secure email, these are: Sender Policy Framework (SPF), Domain Keys Identified Mail (DKIM), Domain-based Message Authentication, Reporting & Conformance (DMARC) definitions. Lets quickly discuss these before we talk about how to check if they have been setup: SPF helps prevent spoofing by verifying the sender’s IP address SPF (Sender […]
Read more →