Author: Andrew Baker
CloudScale PageViews: Fix WordPress Analytics Behind Cloudflare
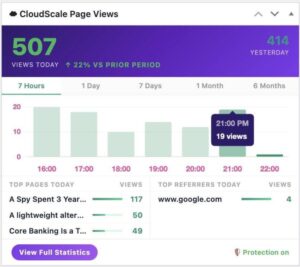
If you run a WordPress site behind Cloudflare, your page view numbers are lying to you. Jetpack Stats, WP Statistics, Post Views Counter and nearly every other WordPress analytics plugin share the same fatal flaw: they count views on the server. When Cloudflare serves a cached HTML page (which is the entire point of using […]
Read more →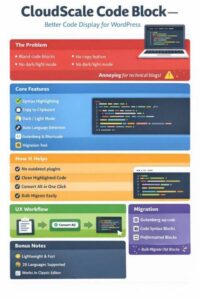
CloudScale Code Block Plugin: Syntax Highlighting for WordPress
If you run a technical blog on WordPress, you know the pain. You paste a markdown article with fenced code blocks, Gutenberg creates bland core/code blocks with no syntax highlighting, no copy button, no dark mode. You end up wrestling with third party plugins that haven’t been updated in years or manually formatting every code […]
Read more →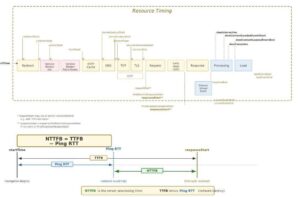
NTTFB: Net Time to First Byte Explained and Why It Matters
Andrew Baker · February 2026 · andrewbaker.ninja 1 The Problem with TTFB Time to First Byte has been the go to diagnostic for server responsiveness since the early days of web performance engineering. Google’s own web.dev guidance describes TTFB as measuring the elapsed time between the start of navigation and when the first byte of […]
Read more →
XZ Utils Backdoor: How One Engineer Saved the Internet
On a quiet Friday evening in late March 2024, a Microsoft engineer named Andres Freund was running some routine benchmarks on his Debian development box when he noticed something strange. SSH logins were taking about 500 milliseconds longer than they should have. Failed login attempts from automated bots were chewing through an unusual amount of […]
Read more →Fix FOIT with font-display: swap to Boost Core Web Vitals
Stop Waiting for Fonts Quick Guide to font-display: swap on macOS Your website might be secretly blocking page renders while it waits for fancy custom fonts to load. This invisible delay tanks your Core Web Vitals and frustrates users. The fix is simple: font-display: swap. Here’s how to audit your sites and fix it in […]
Read more →
Why AI Pilots Fail to Reach Production (And How to Fix It)
Gartner says 40% of agentic AI projects will fail by 2027. I think they’re being optimistic. Walk into almost any large enterprise right now and you’ll find the same scene: a glossy AI pilot, a proud press release, a steering committee meeting monthly to “track progress,” and an absolutely zero percent chance that any of […]
Read more →
WordPress Database & Media Cleanup Plugin: Free Guide
If you run a WordPress site for any length of time, the database quietly fills with junk. Post revisions stack up every time you hit Save. Drafts you abandoned years ago sit there. Spam comments accumulate. Transients expire but never get deleted. Orphaned metadata from plugins you uninstalled months ago quietly occupies table rows nobody […]
Read more →What Is Minification and How to Test If It Works
1. What is Minification Minification is the process of removing everything from source code that a browser does not need to execute it. This includes whitespace, line breaks, comments, and long variable names. The resulting file is functionally identical to the original but significantly smaller. A CSS file written for human readability might look like […]
Read more →
Enterprise Software Tiering: Why Bundle Pricing Fails
By Andrew Baker, CIO at Capitec Bank There is a category of enterprise technology vendor whose approach to pricing is so fundamentally at odds with how purchasing decisions actually get made that it borders on self-defeating. Their commercial model is built on access gates, bundled tiers, and a deeply held belief that controlling what a […]
Read more →
CloudScale Free WordPress Backup & Restore Plugin Guide
I’ve been running this blog on WordPress for years, and the backup situation has always quietly bothered me. The popular backup plugins either charge a monthly fee, cap you on storage, phone home to an external service, or do all three. I wanted something simple: a plugin that makes a zip file of my site, […]
Read more →