Ghostty Is the Terminal Claude Code Deserves

Ghostty pairs exceptionally well with Claude Code because its GPU-accelerated rendering, native split panes, and robust protocol support eliminate the terminal friction that accumulates during long agentic sessions. When Claude Code is looping through file edits and test runs, a fast, well-configured terminal keeps context visible and reduces the small interruptions that quietly erode focus over hours of work.
There is a meaningful difference between running Claude Code and running it well. The agent is doing serious work: reading your codebase, modifying files, running tests, interpreting output, and looping back. If your terminal is fighting you the whole time, you are burning cognitive load on the environment instead of the work.
Ghostty is a fast terminal emulator written in Zig, created by Mitchell Hashimoto (the person who built Terraform and Vagrant at HashiCorp). It is configured through a plain text file with no nesting and no mandatory quotes, and it has native split panes, native tabs, a drop-down quick terminal, and first-class support for the notification and keyboard protocols Claude Code relies on.
This post is a practical setup guide covering the core configuration, three split layouts I use daily, and paste-ready scripts to bootstrap everything in one go.
A note on terminology before we start. The Super key is the key with the cmd symbol on a Mac keyboard, and the Windows key on a Linux keyboard. Throughout this post, super+d means hold that key and press D at the same time, exactly like cmd+c for copy. A split pane is when the terminal window is divided into two sections side by side or top and bottom, each running independently. A shell is the command line prompt you type into; on macOS this is zsh by default, and on Linux it is usually bash.
1. Why Ghostty over the Alternatives
Ghostty is not the only serious terminal on macOS or Linux. Here is the honest comparison:
| Alacritty | Kitty | WezTerm | Ghostty | |
|---|---|---|---|---|
| Native splits | No | Yes | Yes | Yes |
| Tabs | No | Yes | Yes | Yes |
| Fast rendering | Yes | Yes | Yes | Yes |
| Config format | TOML | kitty.conf | Lua | Plain text |
| Drop-down quick terminal | No | No | No | Yes |
| Claude Code notifications | Manual setup | Yes | Manual setup | Yes (default) |
The two things that matter most for Claude Code work are native splits and notification forwarding. Claude Code fires desktop notifications when it finishes a task or needs a permission decision, and Ghostty forwards those to your OS notification centre without any configuration. Kitty does this too, but nothing else does by default.
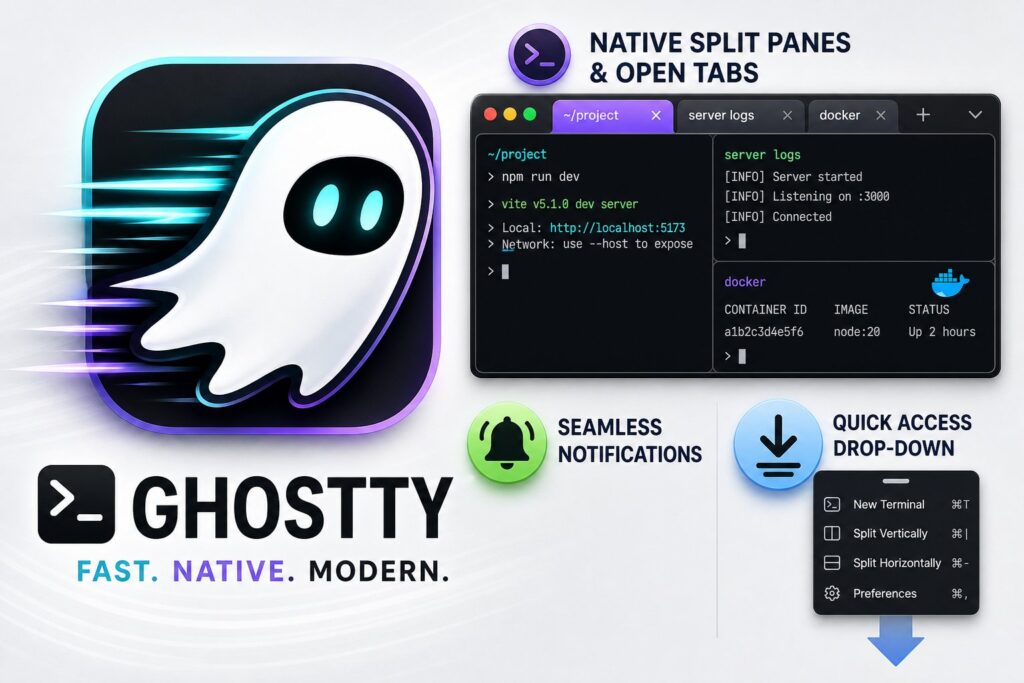
The drop-down quick terminal is a global keyboard shortcut that slides a terminal down from the top of the screen regardless of which app you are currently in. When Claude is running a long operation and you want to check something without losing your editor, this saves you from switching apps back and forth. No other terminal has this built in.
Alacritty has no native splits or tabs, so you need tmux (explained in section 6) for everything. Kitty is powerful but has a large configuration surface that is tedious to get started with. WezTerm is configured in Lua, a full programming language, which is overkill if you just want a terminal that works well. Ghostty’s plain text config is a genuine competitive advantage.
2. Installation
macOS: if you have Homebrew installed (the standard macOS package manager), run:
brew install --cask ghosttyIf you do not have Homebrew, install it first from brew.sh, then run the command above.
Linux (Debian/Ubuntu):
curl -LO https://github.com/ghostty-org/ghostty/releases/latest/download/ghostty_linux_x86_64.tar.gz
tar -xzf ghostty_linux_x86_64.tar.gz
sudo mv ghostty /usr/local/bin/ghostty
Once installed, open Ghostty. The config file lives at ~/.config/ghostty/config on both platforms, where the tilde (~) is shorthand for your home directory. The file does not exist yet; the bootstrap script in the next section creates it.
2.1 Make Ghostty Your Default Terminal
Yes, I know this is premature, but I promise when your done reading this post – you will be running this script:
cat > ~/ghostty-set-default.sh << 'EOF'
#!/usr/bin/env bash
set -euo pipefail

GHOSTTY_BUNDLE="com.mitchellh.ghostty"

# Check Ghostty is installed
if ! osascript -e "id of application \"Ghostty\"" &>/dev/null 2>&1; then
  echo "Error: Ghostty is not installed." >&2
  exit 1
fi

# Install duti if needed (manages macOS default app associations)
if ! command -v duti &>/dev/null; then
  if ! command -v brew &>/dev/null; then
    echo "Error: Homebrew required. Install from https://brew.sh" >&2
    exit 1
  fi
  echo "Installing duti..."
  brew install duti
fi

# .command files (double-clicking these in Finder runs them in a terminal)
duti -s "${GHOSTTY_BUNDLE}" com.apple.terminal.shell-script all

echo "Done. Ghostty is now the default terminal."
echo ""
echo "VS Code: add this to settings.json to open Ghostty from the editor:"
echo '  "terminal.external.osxExec": "Ghostty.app"'
EOF
chmod +x ~/ghostty-set-default.sh
What it does
- Verifies Ghostty is installed
- Installs
duti(via Homebrew) if needed - Sets Ghostty as the default handler for
.commandshell scripts - Sets Ghostty as the default handler for
.termTerminal.app session documents - Provides VS Code configuration for external terminal integration EOF chmod +x ~/ghostty-setup.md
3. Bootstrap Script
Before you do anything productive in Ghostty, three things need to be in place: the config file, a compatible shell prompt, and the right font.
Without the config file, Ghostty opens with defaults that are fine for general use but wrong for Claude Code. The scrollback history is too short, there are no split pane shortcuts, and window state is not saved between sessions.
Without a compatible shell prompt, Claude Code’s shell integration cannot reliably detect where your prompt ends and where command output begins. This causes parsing errors and, in some cases, Claude silently missing the output of commands it ran. The bootstrap script installs Starship, a fast and compatible prompt replacement. If you are currently using Powerlevel10k, do not skip this step; see section 4 for why P10k specifically breaks Claude Code.
Without a Nerd Font, certain icon characters that Claude Code’s interface and Starship use for git branch symbols, file type icons, and status indicators will render as blank boxes or question marks. The script installs JetBrains Mono Nerd Font, which covers all of them.
The script below handles all three in one paste. Copy the entire block, paste it into your terminal, and press Enter. It is safe to run more than once because it checks whether each thing is already installed before doing anything. After it finishes, follow the one manual step it prints at the end: adding the Starship initialisation line to your shell config file.
#!/usr/bin/env bash
set -euo pipefail

# ── Ghostty config ────────────────────────────────────────────────────────────
mkdir -p ~/.config/ghostty

cat > ~/.config/ghostty/config << 'EOF'
# ghostty/config - Claude Code optimised configuration

# Typography
# JetBrains Mono Nerd Font: ligatures + icon glyphs used by eza,
# Starship, and Claude Code's TUI for file types and git symbols.
font-family = JetBrainsMonoNerdFont
font-size = 14
font-thicken = true
adjust-cell-height = 2

# Theme - auto light/dark follows the OS appearance setting.
# Switch your OS to dark mode and Ghostty changes without restarting.
# background-opacity lets you see background windows during long Claude
# runs without switching away. The blur keeps it from being distracting.
theme = light:Catppuccin Latte,dark:Catppuccin Mocha
background-opacity = 0.9
background-blur-radius = 20
window-padding-x = 10
window-padding-y = 8
window-theme = auto

# Window state - restores all splits and tabs on reopen.
# Your Claude Code layout is waiting for you the next morning.
window-save-state = always

# Cursor - bar is less distracting than block when reading long output.
cursor-style = bar
cursor-style-blink = true
cursor-opacity = 0.8

# Mouse - hide cursor while typing so it does not overlap Claude's
# output stream. copy-on-select puts selected text into the clipboard
# immediately, which matters when grabbing file paths or commands.
mouse-hide-while-typing = true
copy-on-select = clipboard

# Shell integration - gives Ghostty semantic knowledge of your prompt:
# working directory tracking across splits, better scrollback navigation.
shell-integration = detect
shell-integration-features = cursor,sudo,title

# Performance - Claude Code generates long outputs. 100 000 lines is
# generous. Disable resize overlay; it flickers on fast redraws.
scrollback-limit = 100000
resize-overlay = never

# Split keybindings - SAND pattern (Split, Across, Navigate, Destroy).
# super+d: split right. super+shift+d: split down. super+w: close pane.
# ctrl+vim-keys: navigate between panes.
keybind = super+d=new_split:right
keybind = super+shift+d=new_split:down
keybind = super+w=close_surface
keybind = ctrl+h=goto_split:left
keybind = ctrl+l=goto_split:right
keybind = ctrl+k=goto_split:top
keybind = ctrl+j=goto_split:bottom

# Tab keybindings
keybind = super+t=new_tab
keybind = super+1=goto_tab:1
keybind = super+2=goto_tab:2
keybind = super+3=goto_tab:3
keybind = super+4=goto_tab:4
keybind = super+5=goto_tab:5

# Quick terminal - global hotkey, drops from the top of the screen
# over whatever app is focused. 150ms animation keeps it snappy.
keybind = global:super+grave_accent=toggle_quick_terminal
quick-terminal-position = top
quick-terminal-screen = main
quick-terminal-animation-duration = 0.15
EOF

echo "Ghostty config written to ~/.config/ghostty/config"

# ── Starship prompt ───────────────────────────────────────────────────────────
if ! command -v starship &> /dev/null; then
  echo "Installing Starship..."
  # Install to ~/.local/bin to avoid requiring sudo
  mkdir -p ~/.local/bin
  curl -sS https://starship.rs/install.sh | BIN_DIR=~/.local/bin sh -s -- --yes
else
  echo "Starship already installed."
fi

mkdir -p ~/.config

cat > ~/.config/starship.toml << 'EOF'
format = """
$directory$git_branch$git_status$nodejs$python$rust$golang$java
$character"""

[character]
success_symbol = "[❯](bold green)" error_symbol = "[❯](bold red)"

[directory]
truncation_length = 3 truncate_to_repo = true

[git_branch]
symbol = " " format = "[$symbol$branch]($style) " style = "bold purple"

[git_status]
format = '([\[$all_status$ahead_behind\]]($style) )' style = "bold red"

[nodejs]
symbol = " " format = "[$symbol($version)]($style) "

[python]
symbol = " " format = "[$symbol($version)]($style) " EOF echo "Starship config written to ~/.config/starship.toml" echo "" echo "MANUAL STEP REQUIRED:" echo "Add this line to your ~/.zshrc (Mac) or ~/.bashrc (Linux):" echo ' eval "$(starship init zsh)"' echo "Then run: source ~/.zshrc" # ── JetBrains Mono Nerd Font ────────────────────────────────────────────────── if [[ "$(uname)" == "Darwin" ]]; then if ! fc-list 2>/dev/null | grep -qi "JetBrainsMono"; then brew install --cask font-jetbrains-mono-nerd-font \ || echo "Font install failed - download manually from https://www.nerdfonts.com/font-downloads" else echo "JetBrains Mono Nerd Font already installed." fi elif [[ "$(uname)" == "Linux" ]]; then FONT_DIR="${HOME}/.local/share/fonts" mkdir -p "${FONT_DIR}" if ! fc-list | grep -qi "JetBrainsMono"; then echo "Downloading JetBrains Mono Nerd Font..." TMP=$(mktemp -d) curl -Lo "${TMP}/JetBrainsMono.zip" \ "https://github.com/ryanoasis/nerd-fonts/releases/latest/download/JetBrainsMono.zip" unzip -q "${TMP}/JetBrainsMono.zip" -d "${FONT_DIR}" fc-cache -fv "${FONT_DIR}" > /dev/null 2>&1 rm -rf "${TMP}" echo "JetBrains Mono Nerd Font installed." else echo "JetBrains Mono Nerd Font already installed." fi fi echo "" echo "Bootstrap complete. Restart Ghostty to pick up the new config."
After the script finishes it will print the manual step. Open ~/.zshrc in any text editor, add the Starship line at the bottom, save it, then run source ~/.zshrc in your terminal. Then close and reopen Ghostty.
4. The Config Explained
The config the bootstrap script writes is not just aesthetic preferences. Each setting either directly affects how Claude Code behaves inside Ghostty or eliminates a category of friction that accumulates over a long agentic session. The things that look like minor tweaks such as opacity, cursor style, and copy behaviour are the ones you stop noticing after a day because they quietly remove small interruptions that were costing you attention.
Why Starship and not Powerlevel10k: if you are already using Powerlevel10k as your shell prompt, you need to replace it. P10k has a feature called instant prompt that caches a rendered prompt before the shell finishes initialising. This is clever for human interactive use because it eliminates the half-second startup pause, but Claude Code probes your shell on launch to detect where prompts are and understand when commands have finished running. P10k’s cached prompt fires before that detection completes, which causes Claude Code to time out, produce parsing errors, and in some cases fail to detect that a command has finished at all. Starship has no instant prompt feature and has no such conflict.
window-save-state = always is the setting I would refuse to give up. When you close Ghostty and reopen it, every split pane and tab is restored exactly as you left it, with your Claude Code session ready, the git pane open, and the shell sitting in the project directory. When you are working on a problem that spans hours or days, a terminal that rebuilds your environment every morning is friction you do not need.
copy-on-select = clipboard means that any text you highlight with your mouse is immediately copied to the clipboard without needing to press cmd+c. Claude Code constantly surfaces file paths, function names, suggested commands, and error strings, and being able to highlight and immediately paste keeps your hands on the keyboard and your focus on the agent output.
background-opacity = 0.9 makes the terminal window ten percent transparent. When Claude is running an operation that takes several seconds, you can read a background window such as documentation or a file in your editor without switching away. The 20-pixel blur setting keeps the background soft enough that it does not compete with the terminal content.
The SAND keybindings are the split pane shortcuts configured in this file. SAND stands for Split, Across, Navigate, Destroy and covers the four things you do with panes. super+d splits the current pane to the right, super+shift+d splits it downward, ctrl+h/j/k/l moves focus between panes in Vim directions (h=left, j=down, k=up, l=right), and super+w closes the current pane. The pattern was published by Dani Avila and it is the cleanest split management system available in any terminal.
5. Three Layouts for Different Work Modes
A split layout is a way of dividing your terminal window into multiple panes so you can see Claude Code and a shell at the same time without switching between windows. Each pane is independent, so you can run different commands in each one and they do not interfere with each other.
The config from section 3 sets up the keyboard shortcuts, and this section shows you how to use them to build the three layouts I use most.
5.1 Standard Split
The layout I use for most sessions has Claude Code on the left at roughly two-thirds of the window and a shell on the right for running tests, checking git history, and reviewing anything before handing it to Claude.
┌──────────────────────────┬───────────────┐
│                          │               │
│      Claude Code         │  Shell / Git  │
│        (70%)             │    (30%)      │
│                          │               │
└──────────────────────────┴───────────────┘
To build it:
- Open Ghostty. You start with a single full-width pane.
- Press
super+d(cmd+d on Mac, Win+d on Linux). Ghostty splits the window to the right and your cursor lands in the new right pane. - In the right pane, run whatever shell commands you need such as
git logorls. - Press
ctrl+hto move focus back to the left pane. - In the left pane, run
claude.
Navigate between panes at any time with ctrl+h to go left and ctrl+l to go right. Close either pane with super+w.
5.2 Three-Pane Neovim Layout
This layout places Claude Code alongside a text editor and a dedicated shell at the bottom for test output and logs. Neovim is a terminal-based text editor; if you do not use it, substitute any editor that can open from the command line, or simply use the bottom pane as a second shell.
┌────────────────────┬────────────────────┐
│                    │                    │
│    Claude Code     │      Neovim        │
│      (50%)         │       (50%)        │
│                    │                    │
├────────────────────┴────────────────────┤
│              Shell / Test Output        │
└─────────────────────────────────────────┘
To build it:
- Open Ghostty. Single full-width pane, cursor is here.
- Press
super+shift+d. Ghostty splits the window downward and your cursor moves to the new bottom pane. - The bottom pane will be your shell. Leave it at a prompt for now.
- Press
ctrl+kto move focus back up to the top pane. - Press
super+d. Ghostty splits the top pane to the right and your cursor moves to the new top-right pane. - In the top-right pane, run
nvim .or your editor of choice. - Press
ctrl+hto move focus to the top-left pane. - In the top-left pane, run
claude.
Navigate with ctrl+h/j/k/l in any direction. ctrl+j drops focus to the bottom shell and ctrl+k brings it back up.
5.3 Multi-Project Tab Layout
This layout is for working across two repositories at the same time. Each tab is fully independent with its own shell environment, its own Claude Code session, and no shared state between them.
[ Tab 1: Project A ] [ Tab 2: Project B ] [ Tab 3: Scratchpad ]To build it:
- Open Ghostty. You are in Tab 1.
cdinto your first project directory and runclaude. Optionally presssuper+dto add a shell pane on the right.- Press
super+tto open Tab 2. Ghostty creates a fresh tab and focuses it. cdinto your second project and runclaude. Add a shell pane withsuper+dif you want one.- Press
super+tagain for Tab 3 and use this as a general scratchpad shell.
Jump between tabs with super+1, super+2, and super+3. Each tab remembers its own pane layout, and because window-save-state = always is in the config, all three tabs with their layouts and working directories are restored the next time you open Ghostty.
6. tmux Script
Ghostty’s native splits are excellent for local work. The moment you move to SSH, running Claude Code on a remote server, a homelab machine, or a cloud dev environment, they stop helping you because if your connection drops the panes disappear and whatever Claude was doing is gone.
tmux (short for terminal multiplexer) solves this. It is a program that runs sessions inside the remote machine rather than inside your terminal window. Your terminal is just a viewport into the session, so when you drop the connection and reconnect the session is exactly where you left it, including any Claude Code operation that was mid-task. Locally, tmux is also useful if you want Claude Code to keep running after you close your laptop lid.
If you have never used tmux before, here is the mental model. A tmux server runs silently in the background, and you create named sessions inside it. Each session has windows, and each window can have panes. You attach your terminal to a session to see it and detach without killing anything, and the session keeps running whether you are attached or not.
Essential tmux commands to run in any terminal:
tmux ls                              List all running sessions
tmux attach-session -t claude        Attach to a session named "claude"
tmux new-session -s myproject        Create a new session named "myproject"
tmux kill-session -t claude          Kill a session entirely
Inside a tmux session, ctrl+b is the prefix key. Press it, release it, then press the second key:
ctrl+b then d       Detach from the session (leaves it running in the background)
ctrl+b then $       Rename the current session
ctrl+b then c       Create a new window
ctrl+b then n       Switch to the next window
ctrl+b then p       Switch to the previous window
ctrl+b then %       Split the pane left and right
ctrl+b then "       Split the pane top and bottom
ctrl+b then arrow   Move between panes
ctrl+b then z       Zoom the current pane to full screen (press again to shrink back)
There is a catch specific to Claude Code. By default, tmux intercepts certain signals before they reach Claude Code, and two things break as a result. Desktop notifications never reach your OS because tmux swallows them, and shift+enter becomes indistinguishable from plain Enter, so Claude submits when you meant to continue typing. Both are fixed with three lines added to ~/.tmux.conf, which is tmux’s config file, and the script below adds them automatically.
What the script does: it writes itself to ~/ghostty-tmux-claude.sh, first checks that tmux is installed and installs it via Homebrew if not, patches ~/.tmux.conf with the three fix lines only if they are not already present, then creates a named tmux session with Claude Code running in a left pane at 65% width and a shell in the right pane. If a session with the same name already exists it attaches to it instead of creating a duplicate.
Paste this once to create the script:
cat > ~/ghostty-tmux-claude.sh << 'EOF'
#!/usr/bin/env bash
# Usage: ./ghostty-tmux-claude.sh [session-name] [project-dir]
set -euo pipefail

SESSION="${1:-claude}"
PROJECT_DIR="${2:-${PWD}}"

# ── dependencies ──────────────────────────────────────────────────────────────
if ! command -v tmux &>/dev/null; then
  if ! command -v brew &>/dev/null; then
    echo "Error: tmux and Homebrew are both missing. Install Homebrew first:" >&2
    echo "  https://brew.sh" >&2
    exit 1
  fi
  echo "tmux not found - installing via Homebrew..."
  brew install tmux
fi

# ── tmux passthrough config ───────────────────────────────────────────────────
# allow-passthrough: lets Claude Code notifications reach the outer terminal
#   instead of being swallowed by tmux.
# extended-keys: lets tmux distinguish Shift+Enter from plain Enter so the
#   newline shortcut works correctly inside Claude Code.

if ! grep -qF "Claude Code passthrough" ~/.tmux.conf 2>/dev/null; then
  cat >> ~/.tmux.conf << 'TMUXEOF'

# Claude Code passthrough (added by ghostty-tmux-claude.sh)
set -g allow-passthrough on
set -s extended-keys on
set -as terminal-features 'xterm*:extkeys'
TMUXEOF
fi

# Reload if a server is running
tmux list-sessions &>/dev/null && tmux source-file ~/.tmux.conf 2>/dev/null || true

# ── Session setup ─────────────────────────────────────────────────────────────
if tmux has-session -t "${SESSION}" 2>/dev/null; then
  echo "Session '${SESSION}' already exists - attaching."
  tmux attach-session -t "${SESSION}"
  exit 0
fi

tmux new-session -d -s "${SESSION}" -c "${PROJECT_DIR}"

# Left pane: Claude Code
tmux send-keys -t "${SESSION}:0" "claude" Enter

# Right pane: shell
tmux split-window -h -t "${SESSION}:0" -c "${PROJECT_DIR}"
tmux send-keys -t "${SESSION}:0.1" "clear" Enter

# Claude Code gets 65% of the width
tmux resize-pane -t "${SESSION}:0.0" -x "65%"

# Return focus to Claude Code
tmux select-pane -t "${SESSION}:0.0"

tmux set-option -t "${SESSION}" history-limit 100000

tmux attach-session -t "${SESSION}"
EOF
chmod +x ~/ghostty-tmux-claude.sh
Then use it like this:
# Start a session in your current directory (the session will be named "claude")
./ghostty-tmux-claude.sh

# Start a session with a specific name and project directory
./ghostty-tmux-claude.sh myproject ~/code/myproject

# If you close Ghostty or get disconnected, reattach with:
tmux attach-session -t myproject
When the script runs you land inside a tmux session with Claude Code already started on the left and a plain shell on the right. You are now inside tmux, which means pressing ctrl+b then d detaches you cleanly without stopping anything, and running tmux attach-session -t myproject from any terminal window brings you straight back.
One thing that surprises first-time tmux users is that closing the Ghostty window does not kill the session. The tmux server keeps running in the background, so you can reopen Ghostty, run tmux attach-session -t myproject, and find Claude exactly where you left it.
To move focus to the right pane:
Ctrl+b then →or
Ctrl+b then oto cycle between panes. Just type exit or Ctrl+D in the tmux session to detach/close it, then you’ll be back at a plain shell in Ghostty.
Here is my typical layout:

7. Claude Code Settings Script
Claude Code has its own settings file at ~/.claude/settings.json that is completely separate from Ghostty’s config. By default, Claude Code makes conservative assumptions about the terminal it is running in and does not know you are in Ghostty, does not know your OS theme, and does not know how you want notifications delivered. Left at defaults, you get a colour scheme that may clash with your Ghostty theme and notifications that either go nowhere or only appear inside the Claude Code interface where you might miss them.
Two settings matter here. theme: auto tells Claude Code to detect whether Ghostty is currently in light or dark mode and match its own colour scheme accordingly. Because Ghostty’s window-theme = auto already tracks your OS appearance, setting this means both Ghostty and Claude Code switch together when you change your desktop theme and you never need to manually toggle Claude Code’s colours.
preferredNotifChannel: system tells Claude Code to deliver task completion and permission-request notifications to the OS notification centre, the same place where calendar reminders and messages appear, rather than only showing them inside the terminal interface. Ghostty forwards these natively, so you get a real desktop notification even when you are in a different application. The hook at the bottom of the settings file adds an audio cue so that a single system sound plays when Claude finishes a task and you hear it without having to watch the terminal.
The script backs up any existing settings.json before overwriting it and detects whether you are on macOS or Linux to set the correct sound command.
cat > ~/ghostty-claude-settings.sh << 'EOF'
#!/usr/bin/env bash
set -euo pipefail

mkdir -p ~/.claude

# Back up existing settings
if [[ -f ~/.claude/settings.json ]]; then
  cp ~/.claude/settings.json \
     ~/.claude/settings.json.bak.$(date +%Y%m%d%H%M%S)
  echo "Existing settings backed up."
fi

# Platform sound command
if [[ "$(uname)" == "Darwin" ]]; then
  NOTIFY_CMD="afplay /System/Library/Sounds/Glass.aiff"
else
  NOTIFY_CMD="paplay /usr/share/sounds/freedesktop/stereo/complete.oga 2>/dev/null || true"
fi

cat > ~/.claude/settings.json << SETTINGSEOF
{
  "theme": "auto",
  "preferredNotifChannel": "system",
  "hooks": {
    "Notification": [
      {
        "hooks": [
          {
            "type": "command",
            "command": "${NOTIFY_CMD}"
          }
        ]
      }
    ]
  }
}
SETTINGSEOF

echo "Claude Code settings written to ~/.claude/settings.json"
echo "  theme: auto - follows Ghostty's light/dark mode"
echo "  notifications: system - forwarded to OS notification centre by Ghostty"
echo "  sound: ${NOTIFY_CMD}"
EOF
chmod +x ~/ghostty-claude-settings.sh
Run it with ./ghostty-claude-settings.sh. No restart is required because Claude Code reads settings.json each time it starts.
8. Quick Reference
Once everything is configured, you should not need to think about the terminal at all. These are the only keyboard shortcuts you will actually use day to day.
A reminder: super is the cmd key on Mac and the Win key on Linux. The ctrl+h/j/k/l navigation uses Vim-style directions where h means left, j means down, k means up, and l means right.
Ghostty pane and tab shortcuts:
super+d             Split current pane to the right (creates a new pane alongside)
super+shift+d       Split current pane downward (creates a new pane below)
super+w             Close the current pane
ctrl+h              Move focus to the pane on the left
ctrl+l              Move focus to the pane on the right
ctrl+k              Move focus to the pane above
ctrl+j              Move focus to the pane below
super+t             Open a new tab
super+1             Switch to Tab 1
super+2             Switch to Tab 2
super+3             Switch to Tab 3 (and so on up to 5)
super+`             Toggle the drop-down quick terminal (works from any app)
Inside Claude Code:
shift+enter         Insert a new line without submitting (works natively in Ghostty)
ctrl+j              Insert a new line (works everywhere including inside tmux)
shift+tab twice     Switch to Plan Mode (Claude plans before acting)
/theme              Change Claude Code's colour theme to match Ghostty
/terminal-setup     Not needed in Ghostty because shift+enter works without it
9. One Last Thing
window-save-state = always is the setting I keep coming back to. Open Ghostty in the morning and your panes are exactly where you left them, with the Claude Code session ready, the git pane open, and the shell sitting in the project directory. The environment picks up where you stopped.
When you are working at the Claude Code level of abstraction, you are not just writing code. You are directing an agent through a problem that might span hours, and a terminal that rebuilds your workspace every session is friction you are paying with attention. This setting eliminates it.
Run the bootstrap script, run the settings script, restart Ghostty, and you are done.
Posted on andrewbaker.ninja. More at @futureherman on Substack.