Ghostty the terminal for Claude Code: Config, Splits, and Scripts

Ghostty pairs well with Claude Code because its GPU-accelerated rendering, native splits, and configurable keybindings remove the friction of running an agentic coding tool in a default terminal. Configuring split panes, quick-terminal toggles, and custom scripts lets you monitor file edits, test runs, and Claude's output simultaneously, turning Ghostty into a purpose-built workspace for agentic development on macOS and Linux.
There is a meaningful difference between running Claude Code and running it well. The agent is doing serious work: reading your codebase, modifying files, running tests, interpreting output, and looping back. If your terminal is fighting you the whole time, you are burning cognitive load on the environment instead of the work. And if you never move past the default configuration Claude Code ships with, you are leaving most of what makes it an agent, rather than a chatbot with file access, on the table.
This is the complete version of that idea, split into two halves. Sections 1 to 4 cover Ghostty: installation, configuration, and the scripts that remove the friction Claude Code introduces into a normal terminal. This half is macOS and Linux only, since Ghostty does not run on Windows. Sections 5 onward cover Claude Code itself: installing it, teaching it about your project, the layouts and commands you actually use day to day, and the configuration layer, permissions, hooks, commands, MCP, appearance, that most setups never touch. If you are on Windows, or you already have a terminal you like, skip straight to section 5.
Here is the full contents, so you can jump to what you need:
- Why Ghostty over the alternatives
- Installing Ghostty
- Bootstrap script: config, prompt, and font
- The config explained
- Installing Claude Code itself
- Teaching Claude Code about your project: CLAUDE.md and memory
- Split layouts for different work modes
- Real agent workflows inside these layouts
- Guardrails: permissions and hooks
- Custom slash commands and skills
- Connecting Claude Code to other tools with MCP
- tmux for remote and persistent sessions
- Claude Code settings: notifications and theme sync
- Configuring how Claude Code looks
- Quick reference
- Troubleshooting
- Running several Claude Code sessions well
- One last thing
A note on terminology before we start. The Super key is the key with the cmd symbol on a Mac keyboard, and the Windows key on a Linux keyboard. Throughout this post, super+d means hold that key and press D at the same time, exactly like cmd+c for copy. A split pane is when the terminal window is divided into two sections, side by side or one above the other, each running independently. A shell is the command line prompt you type into. On macOS this is zsh by default, and on Linux it is usually bash.
1. Why Ghostty Over the Alternatives
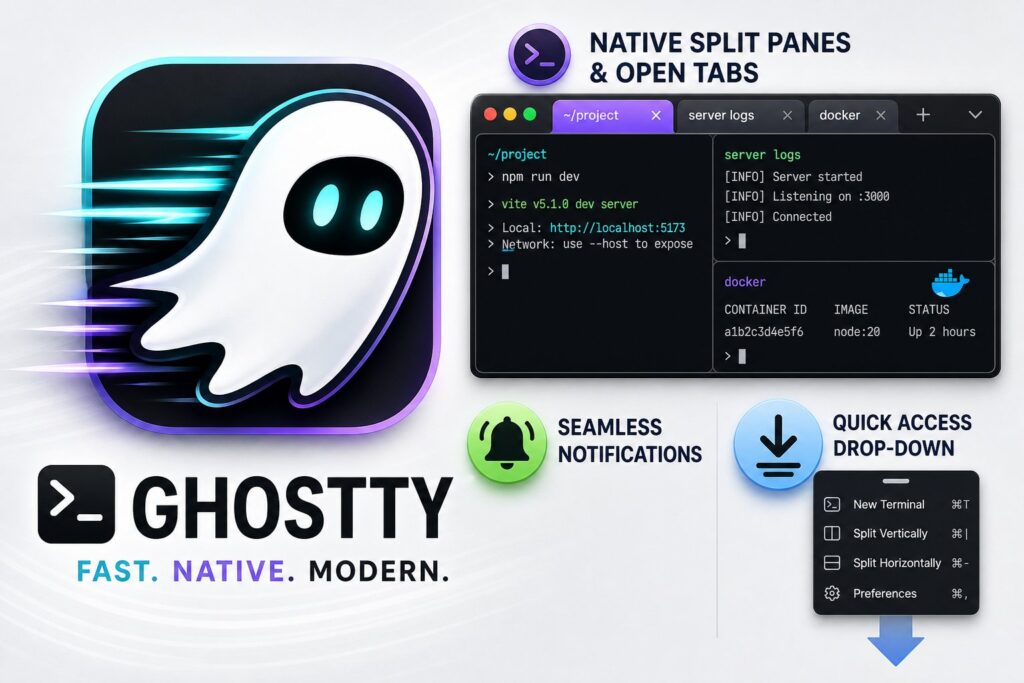
Ghostty is a fast terminal emulator written in Zig, created by Mitchell Hashimoto, the person who built Terraform and Vagrant at HashiCorp. It is configured through a plain text file with no nesting and no mandatory quotes, and it has native split panes, native tabs, a terminal that drops down from the top of the screen on a global shortcut, and strong support for the notification and keyboard protocols Claude Code relies on.
It is not the only serious terminal on macOS or Linux, so here is the honest comparison.
| Alacritty | Kitty | WezTerm | Ghostty | |
|---|---|---|---|---|
| Native splits | No | Yes | Yes | Yes |
| Tabs | No | Yes | Yes | Yes |
| Fast rendering | Yes | Yes | Yes | Yes |
| Config format | TOML | kitty.conf | Lua | Plain text |
| Quick terminal that drops down globally | No | No | No | Yes |
| Claude Code notifications | Manual setup | Yes | Manual setup | Yes, by default |
The two things that matter most for Claude Code work are native splits and notification forwarding. Claude Code fires desktop notifications when it finishes a task or needs a permission decision, and Ghostty forwards those to your OS notification centre without any configuration. Kitty does this too, but nothing else does by default.
The quick terminal is a global shortcut that pulls a terminal down from the top of the screen regardless of which app you are currently in. When Claude is running a long operation and you want to check something without losing your editor, this saves you from switching apps back and forth. No other terminal here has it built in.
Alacritty has no native splits or tabs, so you need tmux, covered in section 12, for everything. Kitty is powerful but has a large configuration surface that takes a while to get through. WezTerm is configured in Lua, a full programming language, which is more than you need if you just want a terminal that works. Ghostty’s plain text config is a genuine advantage.
2. Installing Ghostty
On macOS, if you have Homebrew installed, run:
brew install --cask ghosttyIf you do not have Homebrew, install it first from brew.sh, then run the command above.
On Linux:
curl -LO https://github.com/ghostty-org/ghostty/releases/latest/download/ghostty_linux_x86_64.tar.gz
tar -xzf ghostty_linux_x86_64.tar.gz
sudo mv ghostty /usr/local/bin/ghostty
Once installed, open Ghostty. The config file lives at ~/.config/ghostty/config on both platforms, where the tilde is shorthand for your home directory. The file does not exist yet. The bootstrap script in section 3 creates it.
2.1 A Finder Quick Action to launch Claude Code from any folder
Yes, I know this is premature, but I promise that by the time you’re done reading this post, you’ll be running this script. This one is macOS only, and it is worth the setup even though it is the most involved script in this guide. It adds a right click Quick Action in Finder: right click any folder, choose Launch Claude Code in Ghostty, and a new Ghostty window opens in that folder with Claude Code already running.
cat > setup-ghostty-claude.sh << 'OUTEREOF'
#!/usr/bin/env bash
#
# setup-ghostty-claude.sh
#
# Adds a Finder right-click Quick Action: "Launch Claude Code in Ghostty".
# Right-click any folder -> Quick Actions -> Launch Claude Code in Ghostty,
# and a new Ghostty window opens in that folder running Claude Code.
#
# macOS only. Requires Ghostty (https://ghostty.org) and Claude Code.
#
# Run it once from a terminal:
#   bash setup-ghostty-claude.sh
#
set -euo pipefail

SERVICE_NAME="Launch Claude Code in Ghostty"
SERVICE_PATH="${HOME}/Library/Services/${SERVICE_NAME}.workflow"
LAUNCHER="${HOME}/.local/bin/ghostty-claude-launcher"

# 1. Sanity checks
if [[ "$(uname)" != "Darwin" ]]; then
  echo "Error: this script is macOS only." >&2
  exit 1
fi
if ! osascript -e 'id of application "Ghostty"' >/dev/null 2>&1; then
  echo "Error: Ghostty is not installed. Get it from https://ghostty.org" >&2
  exit 1
fi

# 2. Launcher script
# Locates the claude binary, cd's into the selected folder, and runs Claude Code.
mkdir -p "$(dirname "$LAUNCHER")"
cat > "$LAUNCHER" << 'LAUNCHER_EOF'
#!/bin/bash
for rc in "$HOME/.zshrc" "$HOME/.bashrc" "$HOME/.bash_profile" "$HOME/.profile"; do
  [ -f "$rc" ] && source "$rc" 2>/dev/null || true
done

CLAUDE="$(command -v claude 2>/dev/null || true)"
if [ -z "$CLAUDE" ]; then
  for candidate in \
    "$HOME/.local/bin/claude" \
    "$HOME/.npm-global/bin/claude" \
    "/opt/homebrew/bin/claude" \
    "/usr/local/bin/claude" \
    "/usr/bin/claude"; do
    if [ -x "$candidate" ]; then CLAUDE="$candidate"; break; fi
  done
fi
if [ -z "$CLAUDE" ]; then
  osascript -e 'display alert "Claude Code not found" message "Install Claude Code, or make sure the claude command is on your PATH."'
  exit 1
fi

FOLDER="$1"
if [ -n "$FOLDER" ] && [ -d "$FOLDER" ]; then
  cd "$FOLDER"
fi

caffeinate -i "$CLAUDE"
LAUNCHER_EOF
chmod +x "$LAUNCHER"

# 3. Build the Automator Quick Action (Service)
rm -rf "$SERVICE_PATH"
mkdir -p "$SERVICE_PATH/Contents"

python3 - "$SERVICE_PATH/Contents/Info.plist" "$SERVICE_NAME" << 'PYEOF'
import plistlib, sys
path, name = sys.argv[1], sys.argv[2]
plist = {
    "NSServices": [{
        "NSMenuItem": {"default": name},
        "NSMessage": "runWorkflowAsService",
        "NSRequiredContext": {"NSApplicationIdentifier": "com.apple.finder"},
        "NSSendFileTypes": ["public.folder"],
    }]
}
with open(path, "wb") as f:
    plistlib.dump(plist, f)
PYEOF

python3 - "$SERVICE_PATH/Contents/document.wflow" "$LAUNCHER" << 'PYEOF'
import plistlib, sys
path, launcher = sys.argv[1], sys.argv[2]

command = (
    'for folder in "$@"; do\n'
    '  [ -d "$folder" ] || continue\n'
    '  open -na Ghostty.app --args --window-save-state=never '
    '--quit-after-last-window-closed=true -e "'
    + launcher + '" "$folder" &\n'
    'done\n'
)

wflow = {
    "AMApplicationBuild": "521.1",
    "AMApplicationVersion": "2.10",
    "AMDocumentVersion": "2",
    "actions": [{
        "action": {
            "AMAccepts": {"Container": "List", "Optional": True,
                          "Types": ["com.apple.cocoa.path"]},
            "AMActionVersion": "2.0.3",
            "AMApplication": ["Automator"],
            "ActionBundlePath": "/System/Library/Automator/Run Shell Script.action",
            "ActionName": "Run Shell Script",
            "ActionParameters": {
                "COMMAND_STRING": command,
                "CheckedForUserDefaultShell": True,
                "inputMethod": 1,
                "shell": "/bin/bash",
                "source": "",
            },
            "BundleIdentifier": "com.apple.RunShellScript",
            "CFBundleVersion": "2.0.3",
            "CanShowSelectedItemsWhenRun": False,
            "CanShowWhenRun": True,
            "Category": ["AMCategoryUtilities"],
            "Class Name": "RunShellScriptAction",
            "InputUUID": "A1B2C3D4-E5F6-7890-ABCD-EF1234567890",
            "OutputUUID": "B2C3D4E5-F6A7-8901-BCDE-F12345678901",
            "UUID": "C3D4E5F6-A7B8-9012-CDEF-123456789012",
            "UnlockPlugin": False,
            "arguments": {},
            "isViewVisible": 1,
            "location": "309.500000:253.000000",
            "nibPath": "/System/Library/Automator/Run Shell Script.action/Contents/Resources/English.lproj/main.nib",
        },
        "isViewVisible": 1,
    }],
    "connectors": {},
    "workflowMetaData": {
        "serviceApplicationBundleID": "com.apple.finder",
        "serviceApplicationPath": "/System/Library/CoreServices/Finder.app",
        "serviceInputTypeIdentifier": "com.apple.Automator.fileSystemObject.folder",
        "serviceOutputTypeIdentifier": "com.apple.Automator.nothing",
        "serviceProcessesInput": 0,
        "workflowTypeIdentifier": "com.apple.Automator.servicesMenu",
    },
}
with open(path, "wb") as f:
    plistlib.dump(wflow, f)
PYEOF

# 4. Register the service
/System/Library/CoreServices/pbs -update || true
killall Finder >/dev/null 2>&1 || true

cat << EOF

Done.

Right-click any folder in Finder ->
  Quick Actions (or Services) -> ${SERVICE_NAME}

To uninstall:
  rm -rf "${SERVICE_PATH}"
  rm -f "${LAUNCHER}"
  /System/Library/CoreServices/pbs -update && killall Finder
EOF
OUTEREOF
chmod +x setup-ghostty-claude.sh
What it does: it confirms you’re on macOS and that Ghostty is installed, writes a launcher script to ~/.local/bin/ghostty-claude-launcher that sources your shell config so claude is found on PATH regardless of how it’s invoked, changes into the folder you right clicked, and runs Claude Code under caffeinate -i so the Mac doesn’t sleep mid session. It then generates a macOS Automator Quick Action, built with Python’s plistlib so the embedded shell command is escaped correctly rather than hand written as XML, and registers the service with Finder so it’s available immediately without a logout. The uninstall commands are printed at the end of its own output.
3. Bootstrap Script: Config, Prompt, and Font
Before you do anything productive in Ghostty, three things need to be in place: the config file, a compatible shell prompt, and the right font.
Without the config file, Ghostty opens with defaults that are fine for general use but wrong for Claude Code. Scrollback is too short, there are no split pane shortcuts, and window state is not saved between sessions.
Without a compatible shell prompt, Claude Code’s shell integration cannot reliably detect where your prompt ends and where command output begins. This causes parsing errors and, in some cases, Claude silently missing the output of commands it ran. The script below installs Starship, a fast prompt that does not have this problem. If you currently use Powerlevel10k, do not skip this step. Section 4 explains why P10k specifically breaks Claude Code.
Without a Nerd Font, icon characters used by Claude Code’s interface and by Starship for git branch symbols and status indicators render as blank boxes or question marks. The script installs JetBrains Mono Nerd Font, which covers all of them.
Paste the whole block below and run it. It is safe to run more than once, since it checks whether each thing is already installed before doing anything.
cat > ~/ghostty-bootstrap.sh << 'OUTER_EOF'
#!/usr/bin/env bash
set -euo pipefail

# 1. Ghostty config
mkdir -p ~/.config/ghostty

cat > ~/.config/ghostty/config << 'EOF'
# ghostty/config: Claude Code optimised configuration

# Typography. JetBrains Mono Nerd Font ships ligatures plus icon glyphs
# used by eza, Starship, and Claude Code's TUI for file types and git
# symbols.
font-family = JetBrainsMonoNerdFont
font-size = 14
font-thicken = true
adjust-cell-height = 2

# Theme. Auto light or dark follows the OS appearance setting, so
# switching the Mac to dark mode changes Ghostty without restarting.
# background-opacity lets you read background windows during long
# Claude runs without switching away. The blur keeps it from being
# distracting.
theme = light:Catppuccin Latte,dark:Catppuccin Mocha
background-opacity = 0.9
background-blur-radius = 20
window-padding-x = 10
window-padding-y = 8
window-theme = auto

# Window state. Restores all splits and tabs on reopen, so your Claude
# Code layout is waiting for you the next morning.
window-save-state = always

# Cursor. A bar is less distracting than a block when reading long
# output.
cursor-style = bar
cursor-style-blink = true
cursor-opacity = 0.8

# Mouse. Hide the cursor while typing so it does not overlap Claude's
# output stream. copy-on-select puts selected text into the clipboard
# immediately, which matters when grabbing file paths or commands.
mouse-hide-while-typing = true
copy-on-select = clipboard

# Shell integration. Gives Ghostty semantic knowledge of your prompt:
# working directory tracking across splits, better scrollback
# navigation.
shell-integration = detect
shell-integration-features = cursor,sudo,title

# Performance. Claude Code generates long outputs. 100000 lines is
# generous. Disable the resize overlay; it flickers on fast redraws.
scrollback-limit = 100000
resize-overlay = never

# Split keybindings. SAND pattern (Split, Across, Navigate, Destroy).
# super+d splits right. super+shift+d splits down. super+w closes a
# pane. ctrl with vim keys navigates between panes.
keybind = super+d=new_split:right
keybind = super+shift+d=new_split:down
keybind = super+w=close_surface
keybind = ctrl+h=goto_split:left
keybind = ctrl+l=goto_split:right
keybind = ctrl+k=goto_split:top
keybind = ctrl+j=goto_split:bottom

# Tab keybindings
keybind = super+t=new_tab
keybind = super+1=goto_tab:1
keybind = super+2=goto_tab:2
keybind = super+3=goto_tab:3
keybind = super+4=goto_tab:4
keybind = super+5=goto_tab:5

# Quick terminal. Global hotkey that drops from the top of the screen
# over whatever app is focused. 150ms animation keeps it snappy.
keybind = global:super+grave_accent=toggle_quick_terminal
quick-terminal-position = top
quick-terminal-screen = main
quick-terminal-animation-duration = 0.15
EOF
echo "Ghostty config written to ~/.config/ghostty/config"

# 2. Starship prompt
if ! command -v starship &> /dev/null; then
  echo "Installing Starship..."
  mkdir -p "$HOME/.local/bin"
  curl -sS https://starship.rs/install.sh | BIN_DIR="$HOME/.local/bin" sh -s -- --yes
else
  echo "Starship already installed."
fi

mkdir -p ~/.config

cat > ~/.config/starship.toml << 'EOF'
format = """
$directory$git_branch$git_status$nodejs$python$rust$golang$java
$character"""

[character]
success_symbol = "[❯](bold green)"
error_symbol = "[❯](bold red)"

[directory]
truncation_length = 3
truncate_to_repo = true

[git_branch]
symbol = " "
format = "[$symbol$branch]($style) "
style = "bold purple"

[git_status]
format = '([\[$all_status$ahead_behind\]]($style) )'
style = "bold red"

[nodejs]
symbol = " "
format = "[$symbol($version)]($style) "

[python]
symbol = " "
format = "[$symbol($version)]($style) "
EOF
echo "Starship config written to ~/.config/starship.toml"
echo ""
echo "MANUAL STEP REQUIRED:"
echo "Add these two lines to the bottom of your ~/.zshrc on macOS or"
echo "your ~/.bashrc on Linux:"
echo ""
echo '  export PATH="$HOME/.local/bin:$PATH"'
echo '  eval "$(starship init zsh)"'
echo ""
echo "Then run: source ~/.zshrc"

# 3. JetBrains Mono Nerd Font
if [[ "$(uname)" == "Darwin" ]]; then
  if ls "$HOME/Library/Fonts"/JetBrainsMono*.ttf >/dev/null 2>&1 \
     || ls /Library/Fonts/JetBrainsMono*.ttf >/dev/null 2>&1; then
    echo "JetBrains Mono Nerd Font already installed."
  else
    brew install --cask font-jetbrains-mono-nerd-font \
      || echo "Font install failed. Download manually from https://www.nerdfonts.com/font-downloads"
  fi
elif [[ "$(uname)" == "Linux" ]]; then
  FONT_DIR="${HOME}/.local/share/fonts"
  mkdir -p "${FONT_DIR}"
  if ! fc-list 2>/dev/null | grep -qi "JetBrainsMono"; then
    echo "Downloading JetBrains Mono Nerd Font..."
    TMP=$(mktemp -d)
    curl -Lo "${TMP}/JetBrainsMono.zip" \
      "https://github.com/ryanoasis/nerd-fonts/releases/latest/download/JetBrainsMono.zip"
    unzip -q "${TMP}/JetBrainsMono.zip" -d "${FONT_DIR}"
    fc-cache -fv "${FONT_DIR}" > /dev/null 2>&1
    rm -rf "${TMP}"
    echo "JetBrains Mono Nerd Font installed."
  else
    echo "JetBrains Mono Nerd Font already installed."
  fi
fi

echo ""
echo "Bootstrap complete. Restart Ghostty to pick up the new config."
echo ""
echo "Some Ghostty config keys used here (font-thicken, cursor-opacity,"
echo "quick-terminal-screen) require Ghostty 1.0 or newer. Earlier"
echo "builds will print warnings for those lines and ignore them."
OUTER_EOF
chmod +x ~/ghostty-bootstrap.sh
4. The Config Explained
Each setting in that config either directly affects how Claude Code behaves inside Ghostty or removes a category of friction that builds up over a long agentic session. Things that look like minor tweaks, opacity, cursor style, copy behaviour, are the ones you stop noticing after a day because they quietly remove small interruptions that were costing you attention.
Why Starship and not Powerlevel10k. P10k has a feature called instant prompt that caches a rendered prompt before the shell finishes initialising. This is clever for interactive human use because it removes the half a second startup pause, but Claude Code probes your shell on launch to work out where prompts are and detect when commands have finished running. P10k’s cached prompt fires before that detection completes, which causes Claude Code to time out, produce parsing errors, and in some cases fail to notice that a command has finished at all. Starship has no instant prompt feature and so has no such conflict.
window-save-state = always is the setting I would refuse to give up. When you close Ghostty and reopen it, every split pane and tab is restored exactly as you left it, with your Claude Code session ready, the git pane open, and the shell sitting in the project directory.
copy-on-select = clipboard means any text you highlight with your mouse is copied to the clipboard immediately, without pressing cmd+c. Claude Code constantly surfaces file paths, function names, suggested commands, and error strings, and being able to highlight and paste straight away keeps your hands on the keyboard and your focus on the agent output.
background-opacity = 0.9 makes the window ten per cent transparent, and the blur setting keeps whatever is behind it soft enough not to compete with the terminal content. When Claude is running an operation that takes several seconds, you can glance at documentation or an editor window without switching away.
The keybindings follow a pattern published by Dani Avila, sometimes called SAND for split, across, navigate, destroy, covering the four things you do with panes. super+d splits right, super+shift+d splits down, ctrl+h/j/k/l moves focus using Vim directions where h is left, j is down, k is up, and l is right, and super+w closes the current pane.
5. Installing Claude Code Itself
Everything above assumes claude is already on the machine. It usually is not, so here is that step.
You need a Claude Pro, Max, Team, or Enterprise subscription, or an Anthropic Console account billed by the token. The free Claude.ai plan does not include Claude Code access.
The recommended install method is the native installer, which needs no Node.js and updates itself in the background.
curl -fsSL https://claude.ai/install.sh | bashIf you would rather use npm, that remains fully supported, and is worth it if you want to pin a specific version. As of recent releases, the npm package requires Node.js 22 or later.
npm install -g @anthropic-ai/claude-codeEither way, avoid sudo with the npm form, since root owned files in your npm directory cause permission failures on every future global install. If you hit that, fix npm’s prefix to a directory you own rather than reaching for sudo.
Verify the install, then start it inside a project directory:
claude --version
cd ~/code/your-project
claude
The first run opens your browser to authenticate against your Anthropic account. claude doctor is the command to run any time something feels wrong afterwards, it checks your install type, authentication state, and configuration in one pass and tells you what to fix.
6. Teaching Claude Code About Your Project: CLAUDE.md and Memory
This is the single highest value thing in this whole guide, and it is easy to skip past because it is just a text file. Without it, Claude Code infers your conventions from the code it happens to read and makes reasonable guesses that drift session to session. With it, Claude follows your actual conventions from the first prompt, every time.
CLAUDE.md is a plain Markdown file that Claude Code reads at the start of every session. Create one at your project root, or ask Claude to generate a first draft for you:
/initThis scans your codebase and writes a starter file covering build commands, architecture, and conventions. From there, edit it directly. Keep it to facts Claude should hold in every session: build and test commands, the testing framework, naming conventions, and the one or two things a new teammate would need to be told on day one. Write instructions as direct commands rather than soft suggestions, “never use inline mocks, use the factories in src/test/factories” rather than “we generally try to avoid inline mocks”, since the imperative form is what the model weights as a real rule rather than a preference.
There are three scopes. ~/.claude/CLAUDE.md for things you’d want in every project regardless of codebase, your own habits and preferences. ./CLAUDE.md at the project root for the whole team, committed to git. ./CLAUDE.local.md for your personal notes on that project that nobody else needs, and which you’d typically gitignore. All three load together, most specific taking precedence.
Treat it as a behavioural contract rather than documentation. If a line would not change how Claude acts on a task, it does not belong in the file. Real world usage settles around 20 to 80 lines for a small project, rarely more than 200 for anything else, since a file that reads like a long document becomes harder to keep consistent than one that stays a short index.
Alongside CLAUDE.md, Claude Code also keeps auto memory: notes it writes for itself as it works, build quirks it discovers, debugging insights, your corrections. This is on by default and needs no setup. Run /memory in a session to see what is currently loaded and where each file lives, which is the fastest way to work out why a rule isn’t being followed, it may be in a nested file that hasn’t loaded yet.
7. Split Layouts for Different Work Modes
A split layout divides your terminal window into multiple panes so you can see Claude Code and a shell at the same time without switching windows. Each pane is independent, so you can run different commands in each one without them interfering with each other.
7.1 Standard split
Claude Code on the left at roughly two thirds of the window, a shell on the right for git log, test runs, and anything you want to check before handing it to Claude.
┌──────────────────────────┬───────────────┐
│                          │               │
│      Claude Code         │  Shell / Git  │
│        (70%)             │    (30%)      │
│                          │               │
└──────────────────────────┴───────────────┘- Open Ghostty. You start with a single full width pane.
- Press super+d. Ghostty splits to the right and focus moves there.
- In the right pane, run whatever you need, such as
git logorls. - Press ctrl+h to move focus back to the left pane.
- In the left pane, run
claude.
Move between panes at any time with ctrl+h and ctrl+l, and close either one with super+w.
7.2 Three pane editor layout
Claude Code alongside a text editor, with a dedicated shell at the bottom for test output and logs. Neovim is used here as the example editor; substitute your own, or use the bottom pane as a second shell.
┌────────────────────┬────────────────────┐
│                    │                    │
│    Claude Code     │      Neovim        │
│      (50%)         │       (50%)        │
│                    │                    │
├────────────────────┴────────────────────┤
│              Shell / Test Output        │
└─────────────────────────────────────────┘- Open Ghostty. Single full width pane, cursor here.
- Press super+shift+d. Ghostty splits downward and focus moves to the new bottom pane. Leave it at a prompt for now, this will be your shell.
- Press ctrl+k to move focus back up to the top pane.
- Press super+d. Ghostty splits the top pane to the right, and focus moves to the new top right pane.
- In the top right pane, run
nvim .or your editor of choice. - Press ctrl+h to move focus to the top left pane.
- In the top left pane, run
claude.
Move in any direction with ctrl+h/j/k/l. ctrl+j drops focus to the bottom shell, ctrl+k brings it back up.
7.3 Multi project tab layout
For working across two repositories at once, each tab fully independent, with its own shell, its own Claude Code session, and no shared state between them.
[ Tab 1: Project A ] [ Tab 2: Project B ] [ Tab 3: Scratchpad ]- Open Ghostty. You are in tab 1.
cdinto your first project and runclaude. Optionally press super+d to add a shell pane on the right.- Press super+t to open tab 2.
cdinto your second project and runclaudethere too, again adding a shell pane if you want one. - Press super+t again for tab 3, and use this as a general scratch shell.
Jump between tabs with super+1, super+2, and super+3. Each tab remembers its own pane layout, and because window-save-state = always is in the config, all three tabs, with their layouts and working directories, are restored the next time you open Ghostty.
This layout is for separate repositories. If you want two Claude sessions working on different branches of the same repository at once, section 8.3 covers the better mechanism for that.
8. Real Agent Workflows Inside These Layouts
Everything so far is about the terminal. This section is about the agent, and it is the part most setups skip. The layouts above give you the panes. What you actually run in them, and how you steer Claude Code once it’s running, is where the real time savings are.
8.1 Plan mode for anything you want to review first
By default, Claude Code can act as it goes. For a change you want to see before it touches disk, a schema change, a refactor across several files, switch to Plan mode. Claude reads the relevant files and proposes a plan, but makes no edits until you approve it.
claude --permission-mode planOr toggle into it mid session by pressing Shift+Tab twice. In the standard split from 7.1, this is the natural mode for the left pane whenever you’re about to ask for something with a wide blast radius. Approve the plan and Claude proceeds with the edits in the same pane.
8.2 Subagents, ad hoc and custom
Exploring a large codebase to answer one question fills your context with file reads you don’t need afterwards. Delegate the exploration to a subagent instead, and only the summary comes back into your main conversation.
use a subagent to investigate how our auth system handles token refreshThat works without any setup, Claude Code spins up a general purpose subagent on the fly. For anything you’d delegate repeatedly, define your own. A subagent is a Markdown file with YAML frontmatter, stored in .claude/agents/ for a project or ~/.claude/agents/ for one that follows you everywhere:
---
name: code-reviewer
description: Reviews code changes for quality, security, and best practices. Use proactively after any significant edit.
tools: Read, Grep, Glob
model: sonnet
---
You are a senior code reviewer. When invoked, run `git diff HEAD` to see
recent changes, focus on the modified files, and check for security
issues, obvious bugs, and style problems. Report findings by severity
with file and line references. Do not modify any files.
Claude delegates to it automatically when a request matches the description, or you can ask for it by name. The tools field is worth being deliberate about, a reviewer that can only Read, Grep, and Glob cannot accidentally edit the code it’s reviewing. This is particularly worth setting up for the three pane editor layout from 7.2, where your main session is doing real work across a long stretch of time and shouldn’t be filling up with exploratory reads it doesn’t need to keep.
8.3 Worktrees for genuinely parallel sessions on one repo
The multi project tab layout in 7.3 works well across separate repositories, but it doesn’t help when you want two Claude sessions on different branches of the same repository at once. Git worktrees solve this. Each worktree is a separate checkout on its own branch, so two sessions can edit without colliding.
claude --worktree feature-authRun the same command with a different name in a second pane or tab to start an isolated parallel session on a different branch:
claude --worktree fix-flaky-testPut one worktree session in a tab, a second in another tab, and use the shell pane in each to run that branch’s tests independently. Because each worktree is its own checkout, there’s no risk of one session’s uncommitted changes bleeding into the other’s.
8.4 Piping Claude into the shell pane for one off automation
Not every use of Claude Code needs the interactive interface. The shell pane next to your main session is a good place for one off, non interactive calls, using Claude the way you’d use any other Unix tool with stdin and stdout.
git log --oneline -20 | claude -p "summarize these recent commits"Useful for quick checks you don’t want cluttering your main conversation: summarising a diff before you write a commit message, or a fast sanity check on a file without starting a full session.
8.5 Resuming sessions and asking Claude about itself
claude --continue resumes the most recent session in the current directory, so a task that spans multiple sittings doesn’t need re-explaining. claude --resume opens a picker across all your recent sessions. And Claude Code has live access to its own documentation, so questions like “how does Claude Code handle permissions” get a documentation grounded answer rather than a guess.
9. Guardrails: Permissions and Hooks
Left at defaults, Claude Code asks before most actions that write or execute. That is safe but slow. The fix is not --dangerously-skip-permissions, which really does mean what it says, it is configuring the permission system so the safe, repetitive stuff runs quietly and the genuinely risky stuff still stops for you.
9.1 Permission rules
Permission rules live in permissions.allow, permissions.deny, and permissions.ask in a settings file. ~/.claude/settings.json applies everywhere, .claude/settings.json is project level and committed to git, and .claude/settings.local.json is your personal, gitignored overrides for that project. Rules from every layer merge, and deny always wins over allow, so a deny in your user settings is a safety net no individual project can switch off.
{
  "permissions": {
    "defaultMode": "default",
    "allow": [
      "Bash(git status)",
      "Bash(git diff:*)",
      "Bash(npm run lint:*)",
      "Read(./**)"
    ],
    "deny": [
      "Bash(rm -rf:*)",
      "Read(./.env)",
      "Read(./.env.*)"
    ],
    "ask": [
      "Bash(git push:*)"
    ]
  }
}
Rules follow the pattern Tool or Tool(specifier). Bash alone matches every Bash command, Bash(npm run:*) matches any npm run variant. Run /permissions inside a session to see exactly which rules are active and which settings file each one came from, the fastest way to work out why something prompted when you expected it not to. defaultMode sets what happens when nothing matches: default prompts on first use of each tool, acceptEdits auto approves file edits in the working directory while still gating other tools, and plan is the mode behind Plan mode in section 8.1.
One honest caveat worth knowing: deny rules on Read and Edit are a best effort protection for Claude’s own built in tools, not a hard filesystem sandbox, a Bash command or an arbitrary script can still open a denied file directly. Treat permission rules as guiding Claude’s own behaviour, not as a substitute for real file permissions on anything genuinely sensitive.
9.2 Hooks, for the rules that must run regardless of what the model decides
Permission rules are declarative pattern matches. Hooks are shell commands that fire on lifecycle events regardless of what Claude decides, which makes them the right tool for anything that needs to be guaranteed rather than merely likely. PreToolUse fires before a tool runs and can block it outright. PostToolUse fires after and is where auto formatting and linting belong.
{
  "hooks": {
    "PreToolUse": [
      {
        "matcher": "Bash",
        "hooks": [
          { "type": "command", "command": ".claude/hooks/block-dangerous.sh" }
        ]
      }
    ],
    "PostToolUse": [
      {
        "matcher": "Write|Edit",
        "hooks": [
          { "type": "command", "command": "npx prettier --write \"$CLAUDE_TOOL_INPUT_FILE_PATH\"" }
        ]
      }
    ]
  }
}
The hook script receives JSON on stdin describing the event and exits with a code that decides the outcome, 0 to proceed, 2 to block. A PreToolUse hook on Bash that inspects the command and exits 2 on a dangerous pattern is a genuine gate, not a suggestion the model can talk itself out of. Add these to .claude/settings.json for a shared, version controlled guardrail the whole team gets, or ~/.claude/settings.json for personal ones.
10. Custom Slash Commands and Skills
Any prompt you find yourself retyping is worth saving as a command. Historically these lived as Markdown files in .claude/commands/, and that format still works, but the current recommended approach is Skills, .claude/skills/<name>/SKILL.md, which support the same /name invocation plus the option for Claude to invoke them on its own when the task matches, without you typing the slash command at all.
---
description: Run a comprehensive code review of recent changes
allowed-tools: Read, Grep, Glob, Bash(git diff:*)
---
## Changed files
!`git diff --name-only HEAD~1`

## Review checklist
1. Code quality and readability
2. Security vulnerabilities
3. Test coverage

Provide specific, actionable feedback organised by priority.
Save that as .claude/skills/code-review/SKILL.md and it becomes /code-review. $ARGUMENTS captures whatever you type after the command name, useful for something like /fix-issue 123 expanding to a prompt that references issue 123 directly. The ! prefix on a line runs that shell command before the prompt reaches Claude and injects the output, which is how the git diff above ends up in context without you pasting it. Project level commands in .claude/commands/ or .claude/skills/ ship with the repository; personal ones in the ~/.claude/ equivalents follow you everywhere.
11. Connecting Claude Code to Other Tools with MCP
MCP, the Model Context Protocol, is how Claude Code reaches things outside your filesystem and shell: a GitHub account, a database, an issue tracker, a design tool. Each server you connect gives Claude a new set of tools it can call directly.
claude mcp add --transport http github https://api.githubcopilot.com/mcp --header "Authorization: Bearer YOUR_TOKEN"Add --scope user to make a server available across every project on your machine, or --scope project to write it to .mcp.json at the project root and share it with your team through git. Left unset, it registers at local scope, private to you and only active in the current project. claude mcp list shows everything connected, and /mcp inside a session handles authentication for servers that need a browser sign-in. Once connected, you don’t need to invoke it specially, ask a question that needs the service, such as “what are my open pull requests”, and Claude calls the right tool on its own.
Start with one server that matches something you already do by hand every day. GitHub is the obvious first one if you’re not already using gh directly. Add a second once the first is genuinely useful rather than adding several at once, since each connected server adds a little to your context window and it’s easier to tell what’s earning its place one at a time.
12. tmux for Remote and Persistent Sessions
Ghostty’s native splits are excellent for local work. The moment you move to SSH, running Claude Code on a remote server, a home lab machine, or a cloud dev environment, they stop helping you, because if the connection drops, the panes disappear and whatever Claude was doing is gone.
tmux, short for terminal multiplexer, solves this. It runs sessions inside the remote machine rather than inside your terminal window, so your terminal is only a viewport into the session. Drop the connection and reconnect, and the session is exactly where you left it, including any Claude Code operation that was mid task.
If you have never used tmux before, here is the mental model. A tmux server runs quietly in the background, and you create named sessions inside it. Each session has windows, and each window can have panes. You attach your terminal to a session to see it, and detach without killing anything. The session keeps running whether you are attached to it or not.
Essential tmux commands to run from any terminal:
tmux ls                              List all running sessions
tmux attach-session -t claude        Attach to a session named "claude"
tmux new-session -s myproject        Create a new session named "myproject"
tmux kill-session -t claude          Kill a session entirely
Inside a tmux session, ctrl+b is the prefix key. Press it, release it, then press the second key:
ctrl+b then d       Detach from the session (leaves it running in the background)
ctrl+b then $       Rename the current session
ctrl+b then c       Create a new window
ctrl+b then n       Switch to the next window
ctrl+b then p       Switch to the previous window
ctrl+b then %       Split the pane left and right
ctrl+b then "       Split the pane top and bottom
ctrl+b then arrow   Move between panes
ctrl+b then z       Zoom the current pane to full screen, press again to shrink back
There is a catch specific to Claude Code. By default, tmux intercepts certain signals before they reach it. Desktop notifications never reach your OS, because tmux swallows them, and shift+enter becomes indistinguishable from plain enter, so Claude submits when you meant to keep typing. Both are fixed with three lines added to ~/.tmux.conf, which the script below adds automatically.
cat > ~/ghostty-tmux-claude.sh << 'OUTER_EOF'
#!/usr/bin/env bash
# Usage: ./ghostty-tmux-claude.sh [session-name] [project-dir]
set -euo pipefail

SESSION="${1:-claude}"
PROJECT_DIR="${2:-${PWD}}"

# 1. Dependencies
if ! command -v tmux &>/dev/null; then
  if ! command -v brew &>/dev/null; then
    echo "Error: tmux and Homebrew are both missing. Install Homebrew first:" >&2
    echo "  https://brew.sh" >&2
    exit 1
  fi
  echo "tmux not found. Installing via Homebrew..."
  brew install tmux
fi

# 2. tmux passthrough config
# allow-passthrough lets Claude Code notifications reach the outer
# terminal instead of being swallowed by tmux.
# extended-keys lets tmux distinguish Shift+Enter from plain Enter so
# the newline shortcut works correctly inside Claude Code.
if ! grep -qF "Claude Code passthrough" ~/.tmux.conf 2>/dev/null; then
  cat >> ~/.tmux.conf << 'TMUXEOF'

# Claude Code passthrough (added by ghostty-tmux-claude.sh)
set -g allow-passthrough on
set -s extended-keys on
set -as terminal-features 'xterm*:extkeys'
TMUXEOF
fi

if tmux list-sessions &>/dev/null; then
  tmux source-file ~/.tmux.conf 2>/dev/null || true
fi

# 3. Session setup
if tmux has-session -t "${SESSION}" 2>/dev/null; then
  echo "Session '${SESSION}' already exists. Attaching."
  tmux attach-session -t "${SESSION}"
  exit 0
fi

tmux new-session -d -s "${SESSION}" -c "${PROJECT_DIR}"
tmux send-keys -t "${SESSION}:0" "claude" Enter
tmux split-window -h -t "${SESSION}:0" -c "${PROJECT_DIR}"
tmux send-keys -t "${SESSION}:0.1" "clear" Enter

TMUX_MAJOR=$(tmux -V | awk '{print $2}' | cut -d. -f1)
TMUX_MINOR=$(tmux -V | awk '{print $2}' | cut -d. -f2 | tr -dc '0-9')
if [ "${TMUX_MAJOR:-0}" -gt 3 ] || { [ "${TMUX_MAJOR:-0}" -eq 3 ] && [ "${TMUX_MINOR:-0}" -ge 1 ]; }; then
  tmux resize-pane -t "${SESSION}:0.0" -x "65%"
else
  tmux resize-pane -t "${SESSION}:0.0" -x 130
fi

tmux select-pane -t "${SESSION}:0.0"
tmux set-option -t "${SESSION}" history-limit 100000

tmux attach-session -t "${SESSION}"
OUTER_EOF
chmod +x ~/ghostty-tmux-claude.sh
Use it like this:
# Start a session in your current directory (named "claude")
./ghostty-tmux-claude.sh

# Start a named session in a specific project
./ghostty-tmux-claude.sh myproject ~/code/myproject

# If you close Ghostty or get disconnected, reattach with:
tmux attach-session -t myproject
Ctrl+b then d detaches without stopping anything. Closing the Ghostty window does not kill the session either, the tmux server keeps running in the background, so tmux attach-session -t myproject from any terminal brings you straight back to exactly where Claude left off.
To move focus to the right pane, press ctrl+b then the right arrow, or ctrl+b then o to cycle between panes regardless of direction. Typing exit or pressing ctrl+d inside a pane closes that pane; doing so in the last pane of a window closes the session’s attachment without killing the session itself, so you land back at a plain shell in Ghostty.
13. Claude Code Settings: Notifications and Theme Sync
Claude Code has its own settings file at ~/.claude/settings.json, entirely separate from Ghostty’s config. By default, it doesn’t know it’s running in Ghostty, doesn’t know your OS theme, and doesn’t know how you want notifications delivered.
theme: auto tells Claude Code to detect whether Ghostty is currently in light or dark mode and match its own colours accordingly, tracking Ghostty’s own window-theme = auto so both switch together. preferredNotifChannel: ghostty tells Claude Code to deliver task completion and permission request notifications to the OS notification centre rather than only inside the terminal.
cat > ~/ghostty-claude-settings.sh << 'OUTER_EOF'
#!/usr/bin/env bash
set -euo pipefail

mkdir -p ~/.claude

# 1. Back up any existing settings
if [[ -f ~/.claude/settings.json ]]; then
  BACKUP=~/.claude/settings.json.bak.$(date +%Y%m%d%H%M%S).$$
  cp ~/.claude/settings.json "$BACKUP"
  echo "Existing settings backed up to $BACKUP"

  if ! python3 -c "import json,sys; json.load(open(sys.argv[1]))" "$BACKUP" 2>/dev/null; then
    echo "  Note: the previous settings.json was not valid JSON."
  fi
fi

# 2. Platform sound command
if [[ "$(uname)" == "Darwin" ]]; then
  NOTIFY_CMD="afplay /System/Library/Sounds/Glass.aiff"
else
  NOTIFY_CMD="paplay /usr/share/sounds/freedesktop/stereo/complete.oga 2>/dev/null || true"
fi

# 3. Write the new settings
cat > ~/.claude/settings.json << SETTINGSEOF
{
  "theme": "auto",
  "preferredNotifChannel": "ghostty",
  "hooks": {
    "Notification": [
      {
        "matcher": "",
        "hooks": [
          {
            "type": "command",
            "command": "${NOTIFY_CMD}"
          }
        ]
      }
    ]
  }
}
SETTINGSEOF

echo "Claude Code settings written to ~/.claude/settings.json"
echo "  theme: auto, follows Ghostty's light or dark mode"
echo "  notifications: system, forwarded to OS notification centre by Ghostty"
echo "  sound: ${NOTIFY_CMD}"
OUTER_EOF
chmod +x ~/ghostty-claude-settings.sh
Run it with ./ghostty-claude-settings.sh. No restart is required, Claude Code reads settings.json each time it starts. If you already have permission rules or hooks in that file from section 9, the script overwrites rather than merges, so check the backup afterwards and copy anything else you want to keep back in by hand.
14. Configuring How Claude Code Looks
Section 13 covered notifications and light or dark tracking. This section covers the rest of Claude Code’s own appearance layer: its colour theme, a custom status line, and how verbose it is by default.
14.1 Colour themes
Run /theme inside any session to open an interactive picker. Six built in presets are available: dark, light, dark-daltonized, light-daltonized, dark-ansi, and light-ansi. The daltonized variants replace red and green contrasts with blue and yellow for red green colour blindness. The ANSI variants use only your terminal’s 16 standard colours, so if your terminal already has a custom palette applied to those slots, the ANSI theme inherits it automatically.
If none of the presets fit, define your own. Custom themes are JSON files in ~/.claude/themes/, and the filename without the extension becomes the theme’s slug. Each file has a name, a base preset to inherit from, and an overrides object naming the specific colour tokens you want to change.
{
  "name": "Midnight",
  "base": "dark",
  "overrides": {
    "claude": "#a78bfa",
    "planMode": "#38bdf8",
    "diffAdded": "#14532d",
    "diffRemoved": "#7f1d1d"
  }
}
Save that as ~/.claude/themes/midnight.json, run /theme, and select it from the list under your custom themes. Claude Code watches the file and reloads it on save, so you can tweak a hex value, save, and see it applied in the running session without restarting. For the complete list of colour tokens, see the terminal configuration docs.
14.2 A status line that tells you which session you’re in
The fastest way to build one is to describe what you want directly:
/statusline show model name and context percentage with a progress barClaude Code writes the script and wires up your settings automatically. To build one by hand, add a statusLine field to ~/.claude/settings.json:
{
  "statusLine": {
    "type": "command",
    "command": "~/.claude/statusline.sh"
  }
}
Claude Code pipes a JSON object describing the session to your script’s stdin on every update, and prints whatever your script writes to stdout. A minimal script showing the model, the working directory, and context usage:
#!/bin/bash
input=$(cat)
MODEL=$(echo "$input" | jq -r '.model.display_name')
DIR=$(echo "$input" | jq -r '.workspace.current_dir')
PCT=$(echo "$input" | jq -r '.context_window.used_percentage // 0' | cut -d. -f1)
echo "[$MODEL] 📁 ${DIR##*/} | ${PCT}% context"
Make it executable with chmod +x ~/.claude/statusline.sh. With this in every pane, glancing at the bottom of each one tells you which project it’s in and how close it is to needing a /compact, which is exactly the disorientation problem covered in section 17. Full field reference, including cost tracking, git status, and rate limits, is in the status line documentation.
14.3 Output styles
Output styles aren’t visual, but they’re the other main lever on how Claude Code feels to use day to day, changing tone and format rather than colour. Run /config and select Output style to choose between Default for normal engineering work, Proactive for Claude acting on reasonable assumptions rather than pausing for routine decisions, Explanatory for educational asides alongside the work, and Learning, which asks you to fill in small marked pieces of code yourself. Set it directly if you’d rather skip the menu:
{
  "outputStyle": "Explanatory"
}
Changes take effect after /clear or the next session, since output style is part of the system prompt that Claude Code reads once at the start.
15. Quick Reference
A reminder: super is the cmd key on Mac and the Win key on Linux. The ctrl+h/j/k/l navigation uses Vim style directions where h means left, j means down, k means up, and l means right.
Ghostty pane and tab shortcuts:
super+d             Split current pane to the right
super+shift+d       Split current pane downward
super+w             Close the current pane
ctrl+h              Move focus left
ctrl+l              Move focus right
ctrl+k              Move focus up
ctrl+j              Move focus down
super+t             Open a new tab
super+1 to super+5  Switch to tab 1 through 5
super+`             Toggle the quick terminal (works from any app)
Inside Claude Code:
shift+enter          Insert a new line without submitting (works natively in Ghostty)
ctrl+j                Insert a new line (works everywhere, including inside tmux)
shift+tab twice       Switch to Plan mode
/terminal-setup       Not needed in Ghostty, since shift+enter already works without it
/init                 Generate a starter CLAUDE.md from your codebase
/memory               See which CLAUDE.md and rules files are loaded
/permissions           Review active permission rules and their source
/agents                Reminder to create or edit subagent files
/theme                 Change Claude Code's colour theme
/statusline            Generate or edit your status line
/config                Change output style, editor mode, and other settings
claude mcp list        See connected MCP servers
claude --worktree name Start a session on an isolated branch checkout
16. Troubleshooting
Claude Code seems to hang or misreads command output. This is almost always the P10k instant prompt conflict from section 4. Confirm Starship is active with starship --version, and check your shell config for leftover Powerlevel10k init lines.
Notifications never arrive. Working directly in Ghostty, check that preferredNotifChannel is ghostty in settings.json, and that your OS notification settings actually allow Ghostty to post, since some systems block new apps until you approve them once. Inside tmux, confirm the three lines from section 12 are actually in ~/.tmux.conf, and that you started the pane through the script rather than an existing session that predates the config change, since running sessions don’t pick up config changes until restarted.
Shift+Enter submits instead of adding a new line. Outside tmux this should not occur in Ghostty. Inside tmux, this is exactly what the extended-keys lines in section 12 fix. If it’s still happening, restart the tmux server with tmux kill-server and reattach, since tmux only reads its config on server start.
A permission rule isn’t matching. Run /permissions to see the active rules and which file each came from, then check that the specifier syntax matches exactly, Bash(npm run:*) is not the same pattern as Bash(npm:*). Remember deny always wins over allow across every settings layer.
Status line not appearing. Confirm the script is executable with chmod +x, and that it prints to stdout rather than stderr. Run it manually with mock input to check it produces output at all:
echo '{"model":{"display_name":"Opus"},"workspace":{"current_dir":"/home/user/project"},"context_window":{"used_percentage":25},"session_id":"test"}' | ./statusline.shThe status line also only runs once you’ve accepted the workspace trust dialog for the current directory, since it executes a shell command, which requires the same trust as hooks.
Cursor is invisible or hard to see against your colour scheme. Run the script below, adapted from the fix I use myself, which forces a steady cursor and patches your shell hooks so it stays visible after Claude Code exits.
cat > setup-ghostty-cursor.sh << 'EOF'
#!/usr/bin/env zsh
# setup-ghostty-cursor.sh
# Fixes the "cursor disappears after exiting Claude Code" problem in Ghostty.
# Safe to re-run.
set -e

echo "==> Ghostty cursor fix setup"

GHOSTTY_CONFIG="$HOME/.config/ghostty/config"
mkdir -p "$(dirname "$GHOSTTY_CONFIG")"

apply_ghostty_setting() {
  local key="$1" value="$2"
  if grep -q "^${key} *=" "$GHOSTTY_CONFIG" 2>/dev/null; then
    sed -i '' "s|^${key} *=.*|${key} = ${value}|" "$GHOSTTY_CONFIG"
  else
    echo "${key} = ${value}" >> "$GHOSTTY_CONFIG"
  fi
}

echo "--> Patching Ghostty config: $GHOSTTY_CONFIG"
apply_ghostty_setting "cursor-style"       "block"
apply_ghostty_setting "cursor-style-blink" "false"
apply_ghostty_setting "cursor-color"       "#0055ff"
apply_ghostty_setting "cursor-text"        "#ffffff"

if grep -q "^shell-integration-features" "$GHOSTTY_CONFIG" 2>/dev/null; then
  sed -i '' 's/^shell-integration-features = .*/shell-integration-features = sudo,title/' "$GHOSTTY_CONFIG"
else
  echo "shell-integration-features = sudo,title" >> "$GHOSTTY_CONFIG"
fi
echo "    Ghostty config updated."

ZSHRC="$HOME/.zshrc"
MARKER="# [cursor-fix] Force steady block cursor"

if grep -q "$MARKER" "$ZSHRC" 2>/dev/null; then
  echo "--> ~/.zshrc already patched, skipping."
else
  echo "--> Adding cursor hooks to $ZSHRC"
  printf '%s\n' \
    '' \
    '# [cursor-fix] Force steady block cursor' \
    '_reset_cursor_block() { printf $'"'"'\033[2 q'"'"' }' \
    'autoload -Uz add-zsh-hook' \
    'add-zsh-hook precmd _reset_cursor_block' \
    'zle-line-init() { printf $'"'"'\033[2 q'"'"' }' \
    'zle -N zle-line-init' >> "$ZSHRC"
  echo "    ~/.zshrc patched."
fi

echo ""
echo "Done. Next steps:"
echo "  1. Fully quit Ghostty (Cmd+Q) and relaunch."
echo "  2. Open a fresh tab, run 'claude', then exit."
echo "  3. Cursor should remain a solid blue block."
EOF
chmod +x setup-ghostty-cursor.sh
17. Running Several Claude Code Sessions Well
Splits, tabs, and worktrees from section 8.3 make it easy to run two or three Claude Code sessions in parallel, but that convenience creates a problem the earlier sections don’t solve on their own: when several sessions can each fire a notification, a sound or a banner alone doesn’t tell you which one needs you.
Name every tmux session after the project it belongs to, as the script in section 12 already does, so tmux attach-session -t myproject always takes you to the right place. In Ghostty tabs, rename each tab to match the project as soon as you open it. If you’re watching for permission prompts across several sessions, the status line from 14.2 is the more reliable fix, since it labels every pane with its own project and context usage rather than relying on you to remember which tab is which.
Be careful with copy on select when a permission prompt is visible. Because copy-on-select = clipboard copies anything you highlight immediately, dragging across a prompt to read it can silently overwrite whatever you meant to paste into a different session’s shell a moment later.
If a session looks stalled rather than genuinely busy, the shell integration troubleshooting in section 16 is the first thing to check before assuming Claude itself is stuck, since a broken prompt detection can look identical to a long running tool call.
18. One Last Thing
window-save-state = always is the setting I keep coming back to. Open Ghostty in the morning and your panes are exactly where you left them, with the Claude Code session ready, the git pane open, and the shell sitting in the project directory. The environment picks up where you stopped.
But the terminal is only ever half of this. The other half is everything from section 5 onward: a CLAUDE.md that means you stop re-explaining the same conventions, permission rules that let the safe work run quietly, subagents and worktrees for the work that genuinely benefits from running apart from your main session, and a status line that tells you which of several panes actually needs you. Get both halves right and you stop thinking about the setup entirely, which is the actual point.
Run the bootstrap script from section 3, install Claude Code from section 5, write a first CLAUDE.md with /init, and go from there.
Posted on andrewbaker.ninja. More at @futureherman on Substack.